Journey with Confidence RV GPS App RV Trip Planner RV LIFE Campground Reviews RV Maintenance Take a Speed Test Free 7 Day Trial ×


Go Back   Hi-Lo camper travel trailer forum > Hi-Lo Tech > Hydraulic lift system
Click Here to Login
Register FAQ Community Calendar Today's Posts Log in

Hydraulic lift system Hydraulic, mechanical and electrical components of the lift system
Reply
 
Thread Tools Search this Thread Display Modes
 
Old 12-02-2015, 08:53 PM   #1
Senior Member
 
Luckydog671's Avatar
 
Join Date: Apr 2014
Location: Tehachapi Mountains, Calif.
Posts: 817
Default Replacing Glide Block

Hi all,

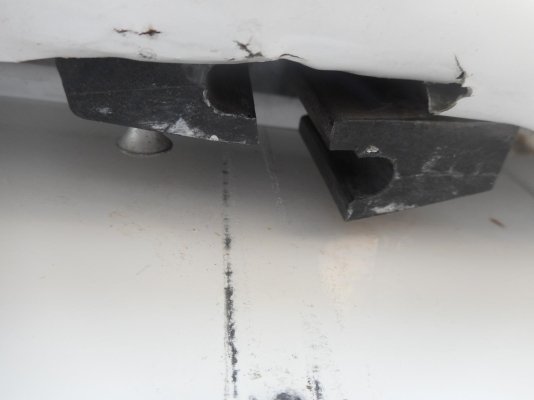
Once again, I'm hoping the wealth of knowledge on this forum can help me solve a problem! I recently noticed that one of the glide blocks on my trailer is broken in half. It's the rear one on the street side.

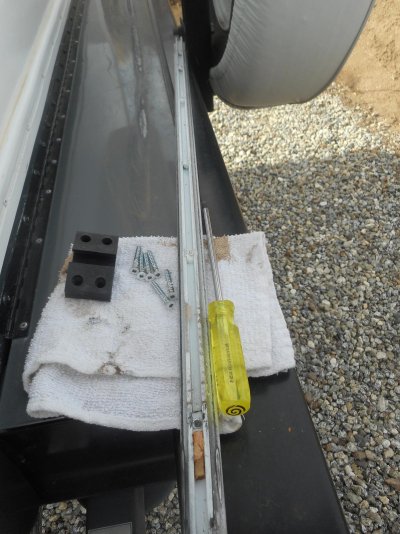
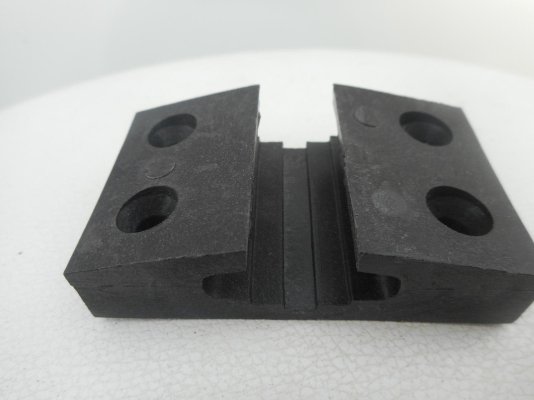
I've received the replacement part from Midget and started to install it, but there is not enough room to remove the existing glide block screws (4 of them), even with an offset screwdriver, as there is only about an inch or so to work with. I'm attaching a few photos so you can see my dilemma. First photo is the existing broken block; second photo is the removed guide rail and the new block; third photo is a close-up of the new block.

So is there anyone out there that has done this repair before? Is there another tool that might do the job? I can probably get by not replacing it as all the other glide blocks are in good shape; I just don't like having broken things on the camper if I can repair it. I really don't want to have to separate the two halves if I can avoid it.
Attached Images
File Type: jpg 002.jpg (81.6 KB, 95 views)
File Type: jpg 005.jpg (240.5 KB, 86 views)
File Type: jpg 006.jpg (115.1 KB, 73 views)
__________________

__________________
Greg
2004 4x4 Chevy Tahoe
Former owner of a 2407T
Luckydog671 is offline   Reply With Quote
Old 12-03-2015, 12:33 AM   #2
Site Team
 
JackandJanet's Avatar
 
Join Date: Jul 2010
Location: Pine, AZ
Posts: 4,692
Default

Greg, I wonder if you take all four tracks off, if it would allow the top to move out enough for you to use the offset screwdriver. I'm sure you would have to take off the two tracks on that side though. Maybe they will be enough.

- Jack
__________________

__________________
Hi-Lo 1707T - Tire Minder TPMS on Tow Vehicle and Trailer, 300W Solar Battery Charger, Equal-i-zer WDH, Progressive Dynamics Converter, Fan-Tastic Fan, LiFePO4 battery 12V DC Electrical System, SoftStartRV mounted on A/C
2024 F150 Platinum FX4 3.5L PowerBoost SCrew
JackandJanet is offline   Reply With Quote
Old 12-03-2015, 08:29 AM   #3
Moderator
 
RichR's Avatar
 
Join Date: Feb 2010
Location: NW PA
Posts: 3,386
Default

I remember a thread here where the poster removed the opposite side rail and then wedged the repair side over to make space. I also think a miniature ratchet wrench with a screwdriver tip was used to access the screws on the block. Another possibility would be to obtain a cheap screwdriver that could be clamped in a vice a bent 90 degrees close to the tip that may work better than the standard right angle screwdriver.

Maybe a search here could dig up that thread.

P.S. Jack, our son went to Georgia Tech. It is a fine school.
__________________
My Great Wife Joyce
2018 Jayco Jay Flight 21QB
Formerly owned 1705T and 2310H
2012 F150 4X4 SuperCrew EcoBoost w/Leer Cap
Reese WD Strait-Line Hitch
Amateur Radio K3EXU
RichR is offline   Reply With Quote
Old 12-03-2015, 08:33 AM   #4
Moderator
 
RichR's Avatar
 
Join Date: Feb 2010
Location: NW PA
Posts: 3,386
Default

I found this post from PopRichie77 back in 2010:

"I replaced some of mine several years ago, I stopped at the factory repair place, which is now J&R Repair. The fellow there told me to remove the guide rails on the side opposite the broken ones also remove the guide rails where the blocks were broken, you do this with the top up. Then lower the top and push a piece of wood between the top and bottom of the trailer, this swings the top over just enough to use a 90 degree driver to remove the 4 screws. He said it isn't easy to do but he assured me it can be done as that is how they do it. It wasn't easy but I got them replaced."
__________________
My Great Wife Joyce
2018 Jayco Jay Flight 21QB
Formerly owned 1705T and 2310H
2012 F150 4X4 SuperCrew EcoBoost w/Leer Cap
Reese WD Strait-Line Hitch
Amateur Radio K3EXU
RichR is offline   Reply With Quote
Old 12-04-2015, 05:51 PM   #5
Senior Member
 
Luckydog671's Avatar
 
Join Date: Apr 2014
Location: Tehachapi Mountains, Calif.
Posts: 817
Default

Thanks for all your replies. Due to lack of time, I think I'm going to hold off on this project until the spring. Time to get the camper buttoned up for winter!
__________________
Greg
2004 4x4 Chevy Tahoe
Former owner of a 2407T
Luckydog671 is offline   Reply With Quote
Old 12-04-2015, 06:09 PM   #6
Senior Member
 
hilltool's Avatar
 
Join Date: Feb 2012
Location: Wisconsin
Posts: 1,256
Default

Very Wise, if you can lower it in configuration you have it now??? CAn you lower it for winter with the guide rail off, and get it back up?

Rick
__________________
2201 TL

2010 Nissan Titan king cab SE
4x4
hilltool is offline   Reply With Quote
Old 12-04-2015, 06:26 PM   #7
Senior Member
 
Luckydog671's Avatar
 
Join Date: Apr 2014
Location: Tehachapi Mountains, Calif.
Posts: 817
Default

Quote:
Originally Posted by hilltool View Post
Very Wise, if you can lower it in configuration you have it now??? CAn you lower it for winter with the guide rail off, and get it back up?

Rick
Hi Rick,
Yes, I was able to reinstall the guide rail and lower it. My trailer has a total of 7 guide rails so having one broken glide block is probably not a big problem anyway.

I'm gonna wash and wax it next, then cover for the winter. We have another snow storm coming in next week.
__________________
Greg
2004 4x4 Chevy Tahoe
Former owner of a 2407T
Luckydog671 is offline   Reply With Quote
Old 04-30-2016, 11:47 AM   #8
Member
 
Join Date: Dec 2015
Location: Spring texas
Posts: 43
Default

Where are the glide blocks located? What do they do?
Wannafishmore is offline   Reply With Quote
Old 04-30-2016, 01:15 PM   #9
Senior Member
 
hilltool's Avatar
 
Join Date: Feb 2012
Location: Wisconsin
Posts: 1,256
Default

Located in side of the outer walls on the upper section. They fit in the guide rails and allow the top to raise and lower in an orderly fashion.

Rick
__________________
2201 TL

2010 Nissan Titan king cab SE
4x4
hilltool is offline   Reply With Quote
Old 06-09-2020, 07:56 PM   #10
Member
 
Join Date: Jun 2020
Location: Boone, Iowa
Posts: 9
Default

Thank you all for your timely comments. Just knowing that it has been done gives me encouragement. I've got a good idea now how to do it.. Good to know there is a little give in the sides. I know it is framed all around with one inch square tubular steel Thanks again. Will let you know how it goes.. Jack
quikchip is offline   Reply With Quote
Old 06-11-2020, 05:31 PM   #11
Senior Member
 
Join Date: Nov 2018
Location: Fort Worth, Texas
Posts: 100
Default

I very simply raised top up and inside I remove a small piece of the wall panel, cut out a small piece of the insulation and drilled 4 small holes in the outside wall of camper. I unscrewed the guide block and let it drop down and off guide rail. Put new guide block on from bottom of guide rail, lift it up and screw into place. I filled the outer holes with almond colored caulk ( do this from inside camper )and replaced the piece of paneling. With top raised when you do this the patched holes in the outside will never be seen. A 30 to 45 minute job.
Freddiefreeloader is offline   Reply With Quote
Old 06-11-2020, 11:00 PM   #12
Member
 
Join Date: Jun 2020
Location: Boone, Iowa
Posts: 9
Default

Thanks Freddie, That gives me another idea to check out.. Sounds easier than trying it from the outside.. Quikchip
quikchip is offline   Reply With Quote
Old 10-20-2020, 06:15 AM   #13
Junior Member
 
Join Date: Aug 2020
Location: IN
Posts: 2
Default

Looks like this happened month ago, any chance you have some pic of what you did? I have an 1986 funchaser that looks like it is missing 3 of 4 guides. we are already striping out most of the insulation due to extensive water damage.
Redxiii13 is offline   Reply With Quote
Old 10-20-2020, 10:09 AM   #14
Moderator
 
RichR's Avatar
 
Join Date: Feb 2010
Location: NW PA
Posts: 3,386
Default

Quote:
Originally Posted by Redxiii13 View Post
Looks like this happened month ago, any chance you have some pic of what you did? I have an 1986 funchaser that looks like it is missing 3 of 4 guides. we are already striping out most of the insulation due to extensive water damage.
Go to the top of this thread to see what has been done by others.
__________________

__________________
My Great Wife Joyce
2018 Jayco Jay Flight 21QB
Formerly owned 1705T and 2310H
2012 F150 4X4 SuperCrew EcoBoost w/Leer Cap
Reese WD Strait-Line Hitch
Amateur Radio K3EXU
RichR is offline   Reply With Quote
Reply


Posting Rules
You may not post new threads
You may not post replies
You may not post attachments
You may not edit your posts

BB code is On
Smilies are On
[IMG] code is On
HTML code is Off
Trackbacks are Off
Pingbacks are Off
Refbacks are Off


» Featured Campgrounds

Reviews provided by

Powered by vBadvanced CMPS v3.2.3
Disclaimer:

This website is not affiliated with or endorsed by Hi-Lo Trailers Worldwide or any of its affiliates. This is an independent, unofficial site.


All times are GMT -5. The time now is 09:24 AM.


Powered by vBulletin® Version 3.8.8 Beta 4
Copyright ©2000 - 2024, vBulletin Solutions, Inc.
HiLoTrailerForum.com Copyright 2010
×