 |
|
 07-25-2011, 11:56 PM
|
#41
|
|
Member
Join Date: Apr 2011
Posts: 54
|
 externa bond roof repair
Quote:
Originally Posted by sam

See if externa bond has a website to get your question answered.
|
best thing to use
if your using it by yourself
don't use pieces longer than 3 ft.at a time
it is extremely sticky
no mistake corrections
and you sure don't wanta waste any
cheapest place is ebay
$50 for 50ft of 4 inch
2 inch is close in price
so i used a long straight edge and cut some in half
but it's the stuff....i used paint thinner to prime
the repair areas
take your time
the externa bond can take on a lfe of it's own
so to avoid a 911 call...lol
take your time
youtube has videos for how to use
__________________
|

|

|
 07-29-2011, 07:26 PM
|
#42
|
|
Senior Member
Join Date: Jan 2011
Posts: 109
|
Thanks for the advice, that is exactly what I wanted to hear, it's going to be 85 and sunny for the next few days so I have opened all the windows and will let nature do the repair, I have already put coats of sealer on the roof and will put two more on in the roof and will put 2 more in the next week, I guess i'll have to use the popup next week when I go to the track
Quote:
Originally Posted by JackandJanet

The fact that wood is wet does not require it to be replaced. If the wood is not "rotted", it can be dried out and left in place. Even small rotted places can be repaired with a product like "Bondo", once the wood is dry.
Naturally, you need to locate and seal the source of the water leaks. But, you have to do that anyway.
I'd really try to use a fan powered heater and dry some of that before you start ripping things out.
- Jack
|
|

|

|
 08-03-2011, 12:43 AM
|
#43
|
|
Member
Join Date: Sep 2010
Location: Tennessee
Posts: 72
|
We are replacing a section of wet wall also and it looks like yours except our outer walls are fiberglass. Yours are aluminum? (Looks silver) Anyway, the fiberglass was originally stuck to the cardboard that we have now pulled off.
Did you replace the cardboard with anything and did you stick it to the outer wall? If so, what did you use to stick it with? We have foam insulation to replace what we removed. What I am wondering is if that cardboard provided any vital structural support to keep the outer wall from moving in the wind.
Any info from anyone is appreciated! We have not had our Hilo very long.
(1993 Funlite)
|

|

|
 08-03-2011, 09:10 AM
|
#44
|
|
Senior Member
Join Date: Jan 2011
Posts: 109
|

Hi Tom, the cardboard is part of the structural support but I didn't use any, but the camper hasn't moved out of the driveway yet  , I just used some poly for a vapor barrier and will try and add a 1x1 for support where needed, the problem I have right now is that the bottom part of the upper piece has so many voids in the skin it will never be water tight so I have put the restoration on hold and have talked with somebody that can reskin it this winter, it shouldn't be that hard to put a new outer skin on it
Quote:
Originally Posted by Snappy Tom

We are replacing a section of wet wall also and it looks like yours except our outer walls are fiberglass. Yours are aluminum? (Looks silver) Anyway, the fiberglass was originally stuck to the cardboard that we have now pulled off.
Did you replace the cardboard with anything and did you stick it to the outer wall? If so, what did you use to stick it with? We have foam insulation to replace what we removed. What I am wondering is if that cardboard provided any vital structural support to keep the outer wall from moving in the wind.
Any info from anyone is appreciated! We have not had our Hilo very long.
(1993 Funlite)
|
|

|

|
 08-04-2011, 12:10 AM
|
#45
|
|
Member
Join Date: Sep 2010
Location: Tennessee
Posts: 72
|
Ours looks like it was leaking where the awning bracket is attached. We will find something to glue to the wall in some way for reinforcement-not sure what yet!!
If you do the eterna bond, please post pics. I am wondering how it would look. I'm thinking it should go over the edges of the Hilo but will it look weird? Like it's taped together? lol
|

|

|
 10-03-2011, 10:27 PM
|
#46
|
|
Senior Member
Join Date: Jan 2011
Posts: 109
|
Finally had the time to start finishing the inside again, installed the paneling back around the front window, had to rebuild the window frame as it was just a piece of mush when I pulled it out from the rot, installed the window but the inside trim won't pull the window back in all the way, oh well have to pull the window next spring and try it again, also installed the paneling on both the walls in the bathroom.
I had no power to the lights that were supplied by the battery, found out where the fuses are and found a 20 amp fuse that was out, went by the hardware store and grabbed 5 of them for $3.00 and now have lights once again.
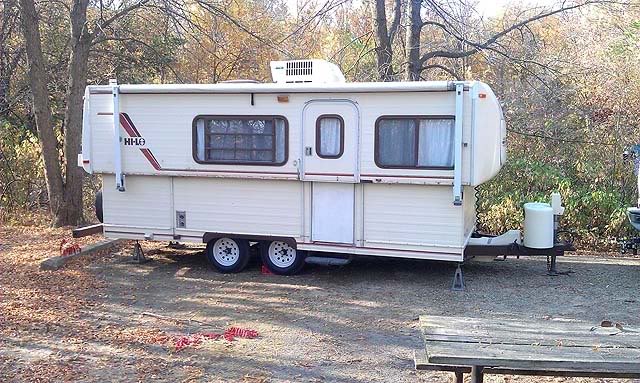
I can't believe it but it is now October in Minnesota and they are calling for temps in the 70's during the day and middle 50's during the night, I just may have to take the kids camping this weekend for the first time in the hi-lo 
|

|

|
 10-04-2011, 12:12 AM
|
#47
|
|
Senior Member
Join Date: Mar 2010
Location: Niagara Falls,NY
Posts: 4,226
|
 90HiLo restoration
Dirtfan,looked at your pictures of your restoration again. Enjoy the weather
and go camping any chance you get. We are ripping apart our 90 HiLo Classic 25ft. Didn,t work on it for several days as it was very rainy and cold. We are strugling to get the last pieces of soggy underlay and wallpaper from the bottom part of the top half. I used my locking Nurses forceps to get out some of the goo. Much remaines. All I can think to do is jack up the top half,release the cables. We also need to replace the seal. I absolutely feel I must get all the goo out between the top and bottom layers. Any advice would be greately appreciated. Can,t convince hubby that we should rip out the 21 year old insulation. He will speak to our HiLo dealer and maybe JR in Ohio. The information I found on the internet says to rip out old insulation. I realize the fiberglass,1/8 underlay and the 1/8 vinyl coated paneling were laminated together. I took some more pictures and will post again soon. Yea our reseal on the escape window was Hi and Dry. Today we ripped out the top half section where the Air conditioning plug is The wood around the electrical box is half rotted out. Hubby will more extensively take this apart on the outside and reseal. Lots of good weather is forcasted and we have two more windows to take out and reseal. One more question. What is the thin,long metal strip that runs all along the top half bottom..Is this for electrical grounding? Seems in rough shape would like to replace. Thanks for any advice you can give me.
|

|

|
 10-04-2011, 09:39 PM
|
#48
|
|
Senior Member
Join Date: Jan 2011
Posts: 109
|
Sorry Sam don't know what that is, fortunately I haven't had to tear apart anything that has to do with that
One more question. What is the thin,long metal strip that runs all along the top half bottom..Is this for electrical grounding? Seems in rough shape would like to replace. Thanks for any advice you can give me.
|

|

|
 10-04-2011, 10:22 PM
|
#49
|
|
Senior Member
Join Date: Mar 2010
Location: Niagara Falls,NY
Posts: 4,226
|
 90 HiLo restoration
Thanks for the reply,dirtfan. We'll be able to work on the trailer today and I will take a zoomed in picture of the metal strip. It could be reinforcement. Today ,I called my HiLo dealer and he didn't know what the strip is for.Never saw this. Couldn't visualize my question about getting the last of the soggy underlay and paneling between the top and bottom halfs. Will try and get a close up picture today. What did we ever do before we had the ability to take and post pictures?
|

|

|
 10-09-2011, 09:36 PM
|
#50
|
|
Senior Member
Join Date: Jan 2011
Posts: 109
|
Made it to the camp ground yesterday, can't believe the weather we are having here in Minnesota, never thought I would even think about going camping in October, anyways I did get the chance to run the AC yesterday and it worked great, next will be to finish off the inside and do the fridge fan mod

|

|

|
 10-17-2011, 09:55 PM
|
#51
|
|
Senior Member
Join Date: Jan 2011
Posts: 109
|
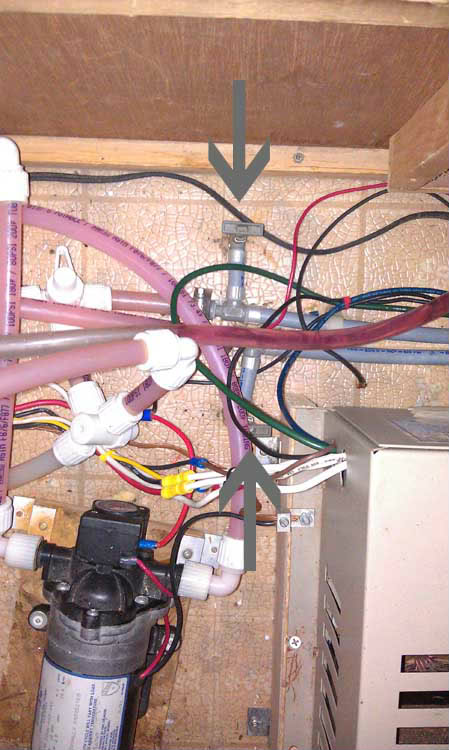
Just winterized the camper tonight, man that was way easier than I thought it would be, it was already setup with the winterizing tubes and I just turned all the valves the other way and i'm good to go I hope  I was just wondering what these valves are for?

|

|

|
 10-17-2011, 10:01 PM
|
#52
|
|
Senior Member
Join Date: Jun 2011
Location: SLC Utah
Posts: 294
|
Drains water from the lines. Mine are under the counter at the back. You don't need to with the anti freeze.
|

|

|
 10-17-2011, 10:12 PM
|
#53
|
|
Senior Member
Join Date: Jan 2011
Posts: 109
|
Thanks for your help there Rolff, guess I never had a real good look underneath that side
Quote:
Originally Posted by Rolff

Drains water from the lines. Mine are under the counter at the back. You don't need to with the anti freeze.
|
|

|

|
 10-23-2011, 06:44 PM
|
#54
|
|
Senior Member
Join Date: Jan 2011
Posts: 109
|
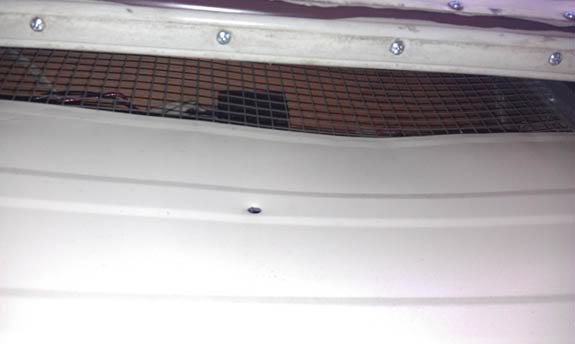
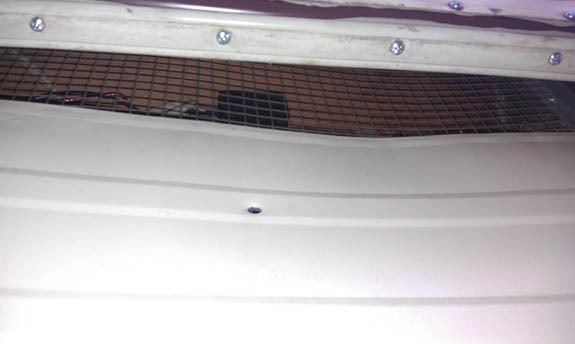
I was just having a look at the camper tonight and was wondering if there should be a seal here? It is behind the fridge vent

|

|

|
 10-25-2011, 08:41 PM
|
#55
|
|
Senior Member
Join Date: Jan 2011
Posts: 109
|
Can anybody help me here??
|

|

|
 10-26-2011, 07:49 AM
|
#56
|
|
Senior Member
Join Date: Jul 2010
Location: Greensburg, PA
Posts: 345
|
My seal runs along the top of the refrigerator cabinet, not below the vent.
__________________
2016 Toyota tacoma TRD sport
Classic 2693 RD
Luke 1:49
|

|

|
 10-26-2011, 08:14 AM
|
#57
|
|
Senior Member
Join Date: Jan 2011
Posts: 109
|
Thanks for the help VANNOOCH, I guess i'll have to figure something out as I don't have one there
|

|

|
 10-26-2011, 11:57 AM
|
#58
|
|
Senior Member
Join Date: Aug 2010
Location: Salina, KS
Posts: 256
|
Quote:
Originally Posted by dirtfan

I was just having a look at the camper tonight and was wondering if there should be a seal here? It is behind the fridge vent
 |
You could place a pillow in there but I dont see a reason why, except to keep wasps from building nests outside the screen. The temp inside will be as cold as outside when stored.
Vanooch was stating, that the top half camper seal, runs above this opening, of course, so fridge will vent..
__________________
From Kansas: 29ft '95 5th, converted to toybox in rear, by Hilo. Pics soon, Some Here.
|

|

|
 10-27-2011, 06:15 AM
|
#59
|
|
Senior Member
Join Date: Jul 2010
Location: Greensburg, PA
Posts: 345
|
You may be able to partially lower the top and install the seal along the top where it is intended to be.
__________________
2016 Toyota tacoma TRD sport
Classic 2693 RD
Luke 1:49
|

|

|
 10-28-2011, 12:07 AM
|
#60
|
|
Senior Member
Join Date: Mar 2010
Location: Niagara Falls,NY
Posts: 4,226
|
 HiLo restoration
Dirtfan, We had a wet wall on the dinette side and had to strip away the paneling foam and soggy brown paper. We scraped the brown paper off as it was totaly drenched(useless). The Multi tool is the greatest invention besides sliced bread lol. Today we checked the trailer and this wall/fiberglass was dry. Did you scrape away all of your brown paper? Doe4s anyone know what the brown paper is called (some kind of vapor barrier)? Looked in big orange today for some type of water barrier paper with no luck. It is essential to replace this brown paper that would sit on the inside of the fiberglass wall.? I'll have to stop by the trailer when it is dark and shine a flashlight through the fiberglass on the outside. We haven't seen any holes in the fiberglass skin. I will just use externabond products to fix any holes in the fiberglass. Hubby is sure that the metal strip on the top bottom wall is a grounding electrical strip. I took some more pictures and will get our computer expert(daughter) to post them for me.
__________________
|

|

|
 |
|
 Posting Rules
|
You may not post new threads
You may not post replies
You may not post attachments
You may not edit your posts
HTML code is Off
|
|
|
|
 » Recent Threads
 |
|
|
|
|
|
|
|
|
|
|
|
|
|
|
|
|
|
|
|
|
|
|
|
|
|
|
|
|
|
|
|
|
|
|
|
|
|