Journey with Confidence RV GPS App RV Trip Planner RV LIFE Campground Reviews RV Maintenance Take a Speed Test Free 7 Day Trial ×


General Hi-Lo camper discussion The perfect place to discuss your Hi-Lo camper
Reply
 
Thread Tools Search this Thread Display Modes
 
Old 12-04-2011, 07:05 PM   #1
Senior Member
 
Join Date: Jul 2011
Location: Fredericksburg, TX
Posts: 382
Send a message via Yahoo to jcurtis95
Default Crack in Rear Shroud

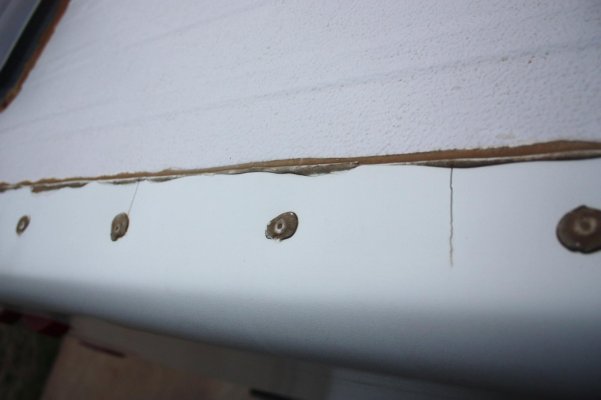
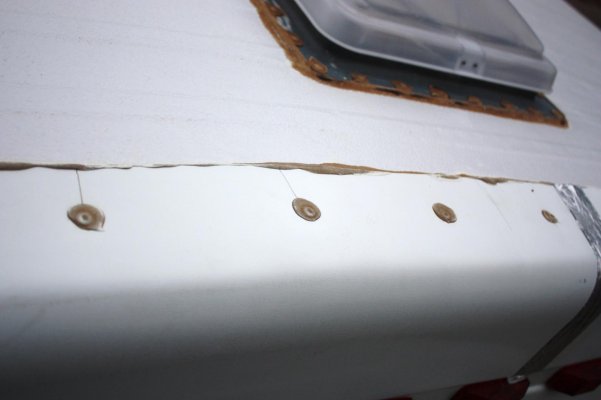
I'm just wondering if anyone has run into this problem before. We just arrived in the beautiful [and very cold] shores of Lake Eufaula, in Eufaula, Oklahoma. It is cold and going to freeze tonight so I didn't hook up any outside hoses [water or sewer]. As I was finishing setting the Hi-Lo up, I noticed something that was not there before. A crack has developed on the rear shroud covering of our Hi-Lo. When we awoke this morning it was raining and I arose and did my normal bathroom thing, a drop of water hit me on my head. It was coming from the vent above the toilet. I pulled at the edge of the interior frame, and a considerable amount of water leaked into the bathroom. It eventually stopped and I thought it must be because of the high winds and rain we experienced all night.

After arriving in our new campsite today and as I was seting up this afternoon, I looked up at the back of our 2406 Towlite and I saw a crack in the back shroud that I had not noticed this morning. We had traveled some back highways in Oklahoma and they were pretty rough but not anything that I thought could have caused this. My wife, Carol, said it must have happened last Saturday when we had the RV detailed and the guy was on top of the RV cleaning the black off the roof. Maybe so, but I think I would have noticed it at the time. The man who was on the roof weighed only 160 pounds which should have been okay at that weight.

Anyway, there is a crack that has develeoped n the rear cover just over the running ight lens and I can clearly see daylight through it.

Aside from the obvious, that is, I must make some quick temporary repairs with some caulking, I'm wondering if anyone else has had this problem, and.. what is the suggested fix?

I appreciate any suggestions.

Jerry & Carol Curtis Fredericksburg, TX
2406 T Towlite F250 4x4 7.3 Diesel
Attached Images
File Type: jpg IMG_0190.jpg (81.9 KB, 108 views)
File Type: jpg IMG_0188.jpg (101.8 KB, 99 views)
File Type: jpg IMG_0189.jpg (88.9 KB, 89 views)
__________________

jcurtis95 is offline   Reply With Quote
Old 12-04-2011, 08:13 PM   #2
Member
 
Join Date: Jul 2010
Location: San Antonio, Texas
Posts: 78
Default Crack repair

Jerry, as far as a temporary repair, you can go to any hardware store (maybe even Wal Mart) and buy a roll of aluminum faced tape. This tape is mainly used for air conditioning duct work. Clean the area thoroughly with alcohol, let it dry and apply a strip of the tape over the crack, then apply an additional strip of the tape just off center of the crack, this should provide a sufficient patch unless you get into a severe thunderstorm. As far as a permanent, I would check with a reputable fiberglass repair shop (boat repair), they should be able to make this repair for you. It is very possible that the crack occurred because of a rapid drastic drop in temperature which may have caused the plastic shroud to shrink unevenly.

Hope this helps, Richard and Barbara

2003 27' Towlite
2002 F150 5.4 Super Crew
ror007@aol.com
__________________

Richard is offline   Reply With Quote
Old 12-04-2011, 09:05 PM   #3
Senior Member
 
Join Date: Jul 2011
Location: Fredericksburg, TX
Posts: 382
Send a message via Yahoo to jcurtis95
Default Crack in rear shroud

Thanks Richard,

I did come prepared for anything [I have a roll of Duct Tape in my tool box] LOL.. I have some of that tape you described but it is 600 miles away in my work shio. I am hoping to be able to borrow a tall ladder so that I can get some duct tape on it tomorrow before the rain really sets in. If not, I did bring a shorter step stool but it is co cold I just didn't want to have to suck in the slide out and let all the heat out.

Yes, I would think a professional should be able to repair it and hopefully do a match on the colors so it won't look too bad.

I am thinking I should remove the frame around the vent and possibly place some heat and a fan on it to prevent roof and interior deterioration. WE both have family here so I should be able to borrow some tools and make some temporary repairs.

I appreciate your help, Richard.

Jerry
jcurtis95 is offline   Reply With Quote
Old 12-04-2011, 09:42 PM   #4
sam
Senior Member
 
Join Date: Mar 2010
Location: Niagara Falls,NY
Posts: 4,218
Default Crack in shroud

Sorry to hear about your cracked shroud. I think it would be worthwhile to stop at walmart and get a roll of aluminum tape. Thay cary Ductbrand tape(silver) that would be great for this temp. repair. Costs about five dollar. You also might consider a close by RV place that sells Externabond tape. Get externabond tape even if you have to pay for expediated shipping for where you are. I don't think the guy up on your roof did this dammage. The fiberglasses flexes a lot as you bounce down the road. Get this covered up today. Use a folded cheap shower liner if you have to. Prevent any further water intrusion. We developed a serious propane leak on the inside of our stove(cracked fitting). Our can of plumming putty was at home. Had to purchase one anyway. I think I will purchase a small roll of externabond tape for emergency repairs. Just remembered JB Weld it comes in a tube in the automotive section at Walmart or any hardware store. A great product to have on hand. Hope these ideas help. Your trailer will defeniately be fixable by a professional fiberglass body person. Boat shops seem to be the best.
sam is offline   Reply With Quote
Old 12-04-2011, 09:56 PM   #5
Member
 
Join Date: Jul 2010
Posts: 20
Default

Cracks in the front and rear end caps were epidemic when Hilo changed the plastic material in their caps in (I think) early 2000's. This is a well known problem.

We replaced the rear end cap, and took off and patched the front, of our 2005 27' Hilo. The cracks will get worse, and they magically appear - probably not the result of anyone walking on the roof.

You can get some of the cracks repaired by plastic welding - check our local RV dealer, maybe they know.

If you take the end caps off, you can reinforce the inside with fiberglass cloth and epoxy like we did on the front cap. Let me know if you are going this route - I took extensive pics of the 'operation'.

Good luck!
Reno is offline   Reply With Quote
Old 12-04-2011, 10:18 PM   #6
Member
 
Join Date: Jul 2010
Location: San Antonio, Texas
Posts: 78
Default Crack in end cap

Jerry, you mentioned using regular duct tape, this probably not a good idea, duct tape doesn't like either water or cold temperature. If aluminum duct tape isn't available you might consider using a good grade of silicone bathtub seal.
Richard is offline   Reply With Quote
Old 12-04-2011, 11:10 PM   #7
sam
Senior Member
 
Join Date: Mar 2010
Location: Niagara Falls,NY
Posts: 4,218
Default Crack in end cap

Had to leave and get my daughter from Target(seasonal job). Hubby said your end cap is made out of plastic. I was going to look up old posts because I seem to have a recolection of this problem. He also said to use caulk to temporarily fix the problem. WallMart carries bondo.ect. for this type of repair. I would be really mad at HiLo for changing to inferior parts and still charging top doller for new units. Tried and true stands the test of time. Glad to have others that have done this repair advise you.
sam is offline   Reply With Quote
Old 12-04-2011, 11:20 PM   #8
Site Team
 
JackandJanet's Avatar
 
Join Date: Jul 2010
Location: Pine, AZ
Posts: 4,682
Default

I'd also try to get to the end of that stress crack and drill a small "stop" hole there to keep it from extending further!

- Jack
__________________
Hi-Lo 1707T - Tire Minder TPMS on Tow Vehicle and Trailer, 300W Solar Battery Charger, Equal-i-zer WDH, Progressive Dynamics Converter, Fan-Tastic Fan, LiFePO4 battery 12V DC Electrical System, SoftStartRV mounted on A/C
2024 F150 Platinum FX4 3.5L PowerBoost SCrew
JackandJanet is offline   Reply With Quote
Old 12-05-2011, 08:17 PM   #9
Senior Member
 
Join Date: Jul 2011
Location: Fredericksburg, TX
Posts: 382
Send a message via Yahoo to jcurtis95
Default Crack in rear shroud

Jack & Janet,

I went to the local end cap repair shop [Wal-Mart, LOL] and purchased a roll of weatherproof/waterproof aluminum tape and cut it the 10-1/2" length of the split and made temporary repairs. There was no need to place a 'stop hole' as it began at the very top and stopped right at the right lens cover of the running lights. While on the ladder, I did notice that it appeared that almost every other screw hole, that holds the end cap in place, had mini-splits beginning to appear. There were even two mini stresses that were not associated with a screw hole!

I'm thinking that I should follow the advice of Reno and remove the shroud [cap] and use a fiber glass cloth and epoxy and strengthen the underside of the cap possibly all around the full measure of the circumference to prevent future such events. Or, as I recall reading a post a while back of an older Hi-Lo that was being scrapped, I'm wondering since it was pre-2000 if it was made of the stronger material and if they are all the same size? If so, I should consider seeing if he is willing to take the cap off and sell it to me and replace this shoddy, cheap plastic material that Hi-Lo used?

I hope the new Hi-Lo owner is paying attention to these posts. The material got weaker and the cost still went up! Something is wrong here.

Thanks for everyone's input.

Jerry & Carol Curtis
2406T Towlite Ford F-250 4x4 Diesel
jcurtis95 is offline   Reply With Quote
Old 12-06-2011, 08:20 AM   #10
Moderator
 
RichR's Avatar
 
Join Date: Feb 2010
Location: NW PA
Posts: 3,386
Default

Beginning with the 2010 models the end caps were made of fiberglass. Whether this will be continued is yet to be seen.

ABS was used on Coleman popup roofs and they had many problems with stress cracking. The repair was much the same as with the HiLo, drill holes at the ends of the cracks and seal the cracks with a flexible sealant.

I have a question as to how fiberglass repair will work on the ABS material, will it stick?
__________________
My Great Wife Joyce
2018 Jayco Jay Flight 21QB
Formerly owned 1705T and 2310H
2012 F150 4X4 SuperCrew EcoBoost w/Leer Cap
Reese WD Strait-Line Hitch
Amateur Radio K3EXU
RichR is offline   Reply With Quote
Old 12-06-2011, 11:11 AM   #11
Site Team
 
JackandJanet's Avatar
 
Join Date: Jul 2010
Location: Pine, AZ
Posts: 4,682
Default

Quote:
Originally Posted by RichR View Post
Beginning with the 2010 models the end caps were made of fiberglass. Whether this will be continued is yet to be seen.

ABS was used on Coleman popup roofs and they had many problems with stress cracking. The repair was much the same as with the HiLo, drill holes at the ends of the cracks and seal the cracks with a flexible sealant.

I have a question as to how fiberglass repair will work on the ABS material, will it stick?
That's my concern too. I honestly don't know the answer to this. If it does, reinforcing the holes and repairing any cracks would of course be the obvious thing to do. I do know that silicone caulk will adhere, but I also know that there are people on this forum who don't like the concept of silicone on trailers. Would anyone care to tell me why?

One other approach though, once you stop the crack from spreading with the stop drill technique, and have filled the crack with whatever works, would be to cover the cap with an elastomeric membrane of the kind that is used in roofing, under the white rubberized coating. I think that would adhere, and the final product should be totally weatherproof.

- Jack
JackandJanet is offline   Reply With Quote
Old 12-06-2011, 10:46 PM   #12
Member
 
Join Date: Jul 2010
Location: San Antonio, Texas
Posts: 78
Default End Cap crack

Quote:
Originally Posted by RichR View Post
Beginning with the 2010 models the end caps were made of fiberglass. Whether this will be continued is yet to be seen.

ABS was used on Coleman popup roofs and they had many problems with stress cracking. The repair was much the same as with the HiLo, drill holes at the ends of the cracks and seal the cracks with a flexible sealant.

I have a question as to how fiberglass repair will work on the ABS material, will it stick?
Rich:
Fiberglass will adhere to most anything, but the prep work is extremely important. The surface has to be thoroughly cleaned and surface roughened. The biggest problem is the same in welding, usually the weld won't break, but the material on both sides very well may.
Richard is offline   Reply With Quote
Old 12-22-2011, 12:32 AM   #13
Senior Member
 
Join Date: Jul 2011
Location: Fredericksburg, TX
Posts: 382
Send a message via Yahoo to jcurtis95
Default

Today I winterized our 2406 T Tow lite and I read through various posts on winterizing and 'took notes. 'I have to say, I don't think I have ever winterized an RV as quickly and easily as this one. They had placed a clear hose onto the water pump that you just drop into the anti-freeze container and after closing all the valves, it took no time at all to run the antifreeze through all the water lines. 15 minutes and it was done!

We have just returned from a trip to Oklahoma and had a BIG problem. One morning we woke up in a blizzard like condition and 16 degree temps. I found the gray and black water tanks were frozen. Actually, it was just the exterior drain pipes. Fortunately, I had brought some heat tapes with me and after about three hours, the pipes thawed and all was well. We started using the camp shower after that. We were pleased at how comfortable we were in the cold temps, although we did have to place towels and blankets over some of the areas where cold air was entering, especially around the door.

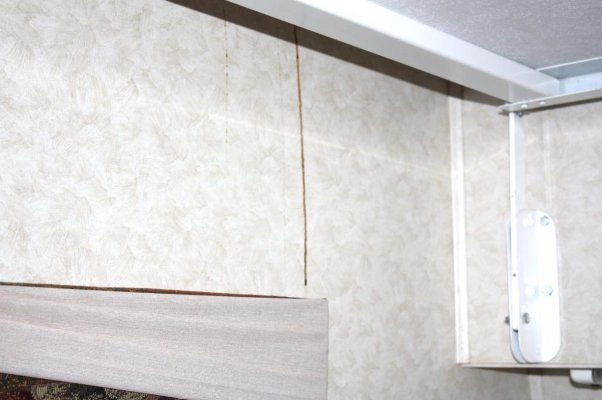
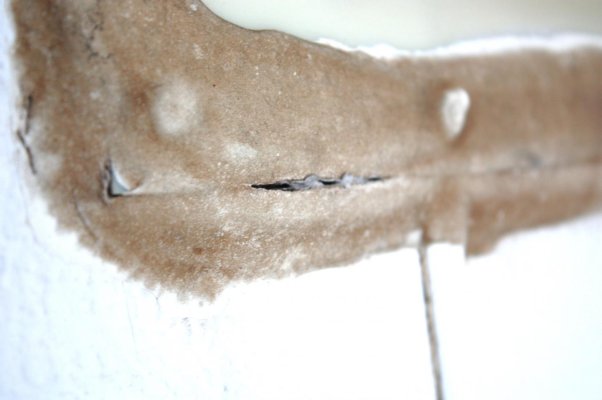
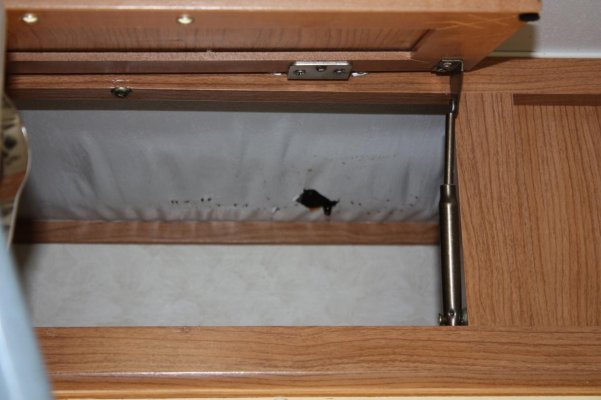
As we were winterizing today, Carol noticed a black streak running down the interior wall just above the dining table. I have attached pictures of what I had found and felt it was worthwhile to let the forum know that we should not neglect to check the roof vent areas and all along the sides and ends of the roof for potential problems. My inspection disclosed several areas that need immediate attention.

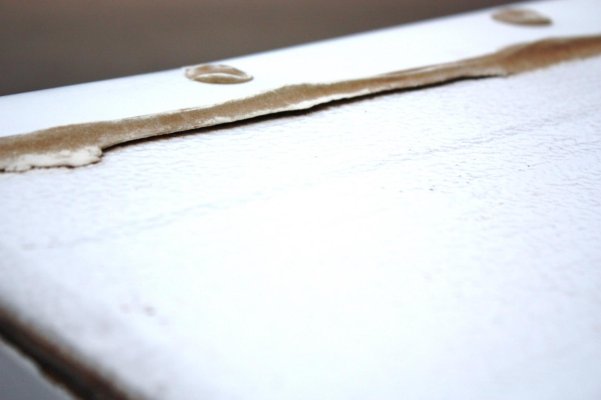
You may recall I posted a problem with a crack on the end cap of our Hi Lo a couple of weeks ago. Today I got the ladder out to check it out and plan for repairs. Good thing I did. The attached pictures show what I was explaining about the end cap and you can see in a couple of the photos the cracks emanating from around where the screw holes that hold the end cap onto the top surface. The 10" crack I mentioned in the previous post can be seen in the second picture of the end cap. It still has the weatherproof tape over it. I also noticed several weather cracks around some of the vents and on the roof's edge just above where that black mark on the wall that indicated a leak.

Tomorrow is supposed to be a fair day so I plan on using a polyurethane sealant to cover the areas shown in the pics. The type I got is supposed to adhere to 'anything' and should work especially well on the plastic end cap to repair the cracks around the screw holes.

Thanks to everyone for the advice you have posted.

Jerry and Carol Curtis
Fredericksburg, TX
1406 T Towlite Ford F250 4x4 7.3L Diesel
Attached Images
File Type: jpg Roof Leak.jpg (93.0 KB, 78 views)
File Type: jpg Rear End Cap Cracks 2.jpg (85.9 KB, 79 views)
File Type: jpg Rear End Cap Cracks 1.jpg (88.9 KB, 79 views)
File Type: jpg Roof deterioration3.jpg (86.9 KB, 77 views)
File Type: jpg Vent deterioration 4.jpg (83.3 KB, 78 views)
jcurtis95 is offline   Reply With Quote
Old 12-22-2011, 10:29 AM   #14
Senior Member
 
Join Date: Oct 2010
Location: San Bernardino, Ca.
Posts: 224
Default

Thanks for keeping us up to date Jerry and Carol. I have the same caps on my 02 towlite and after reading about your first crack, I checked mine over really well. Sure enough, I have several small cracks about 2 inches long on mine. I drilled them and sealed and will keep a better eye on the caps from now on. I don't have the large gaps in the sealant that you do but I'm due for a re-seal.
Fireballsocal is offline   Reply With Quote
Old 12-22-2011, 09:45 PM   #15
Senior Member
 
Join Date: Jul 2011
Location: Fredericksburg, TX
Posts: 382
Send a message via Yahoo to jcurtis95
Default New Post on Crack in End Cap/Roof Repair

I am just a little confused about how to post a "new thread" or a new subject. This is actually not a new post but a continuation of a problem I encountered as explained in last night's post regarding a crack I discovered in our rear End Cap. I had tried to post this information on an earlier attempt and had all my information together to post but instead, I chose the preview option [after uploading pictures] and hit a wrong key and everything I had prepared just disappeared. This time, I am copying the data and making sure I don't have to go through that ordeal again. LOL. I'm certain it was no problem with the forum's procedures, but a mistake on my part as I was moving from one tab to another and exited the forum before it was ready to post.

I sent in a post last night and showed several pictures about a leak that developed on our Hi Lo. Today, as I was beginning to do repairs, I ran into this problem. I was removing the remainder of our 'stuff' on the Hi Lo so I could lower it and begin my repairs. When I opened the right side cabinet over our slide out, I reached in to retrieve the blanket and it was wet, not damp, but wet! There was a large 'blister" in the ceiling inside the cabinet that not only filled most of the compartment but extended out beyond the cabinets about 6 inches just over the window by the dining table. I got the tall ladder out and immediately found the cause.


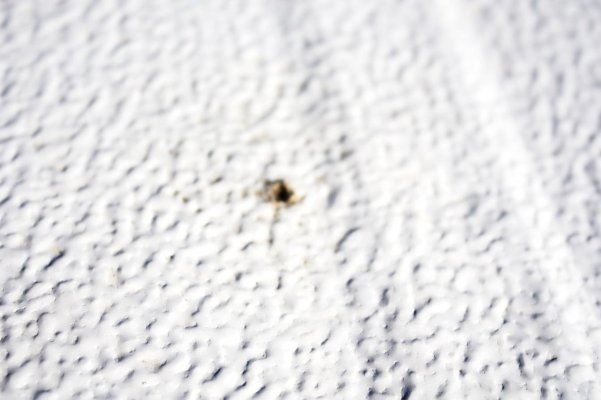
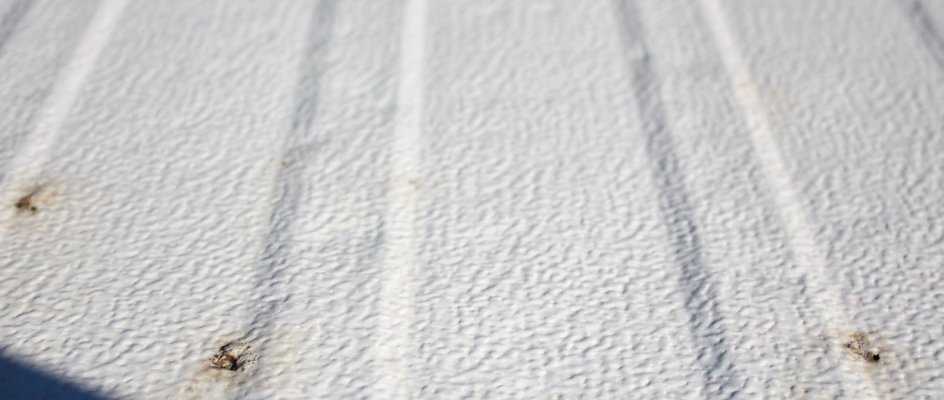
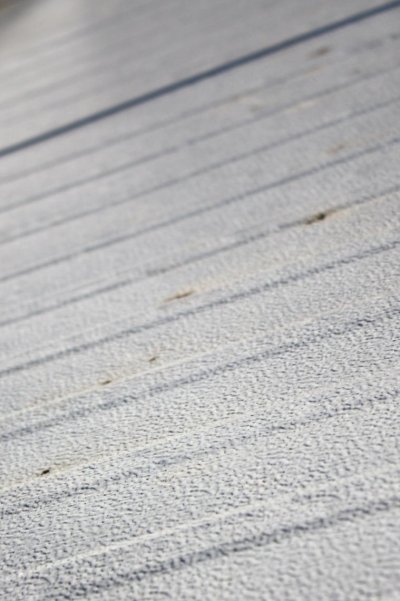
Beginning at the front driver's side of the camper, nearly all the way rearward to the AC unit, there were [39] small holes in the roof! Some of them were tiny, nonetheless, they were there. A conglomeration of them were just above the area of the blister I had just discovered. Another grouping of them was over the area in which we noticed a tell-tale leak yesterday [on the driver's side] just toward the front of the window of the dining area and which Iposted last night.

I took several pictures of the 39 holes in the roof and will post them tonight. I'm wondering if anyone out there has experienced the same problem?

We bought the trailer this past July without any knowledge of how it had been maintained, but it looked almost new inside and had none of the telltale signs I discovered today. Regardless, as I surveyed the roof discovering the small holes, I knew I had to do some repairs, and real quick.

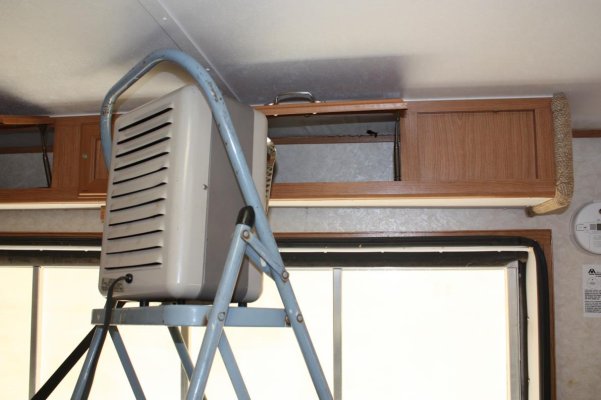
I made several puncture holes in the blister and removed a bit of the ceiling inside the small cabinet material to allow the water trapped inside to dissipate. I then set up a space heater to draw the moisture out of the ceiling area. It has been about 4 hours since I did this and the blister has actually shrunk quite a bit. I plan on leaving the heater on the small cabinet overnight [on low] just to keep drawing the moisture out. I also used an ice pick to puncture holes on the outside of the cabinet so moisture could escape. I may move the space heater over to that spot in the morning to continue the drying process.

Now, to the pictures; as I said, I counted [39] visible puncture wounds in the roof on the driver side, all within a direct line about 18" from the outside edge of the driver side roof extending all the way back just short of the AC unit. These holes, looked to me to be a result of electrical sparking, like a bare power wire skipping about the roof surface in a direct line, all the while burning small holes in the fiberglass roof. That being improbable, another cause might have been a low lying limb partially resting on the roof and moved about by tbe the wind, may have caused it, or, possibly a larger limb fell onto the roof and caused penetration of the roof in several different locations. The holes do resemble an effect caused by an electrical current that was seeking ground [through the trailer jacks] and leaving small holes where it a touched the surface of the roof.

Now to the gist of the problem. I purchased a tube of BASF Polyurethane to repair the cracks in the end cap. I got on line to check it out and they stated it was very good for bonding and sealing numerous types of material and included plastic and fiberglass siding. Will this work on the roof or do I need a different sealing product? Should I prepare each of the holes in any particular manner like sanding or buffing, or just make sure the holes are clean and dry and proceed to just fill in the holes?

I am letting it dry out tonight and the weather overnight is very favorable, but I do have to begin the repairs tomorrow. I would appreciate the advice and expertise of the forum members who might have had some experience in this area.

Thanks to all,

Jerry & Carol Curtis
Fredericksburg, TX
jcurtis95@austin.rr.com

P.S. Ladies, we had to remove a curtain and will eventually clean it because of this. I'm sure Carol would appreciate what you have done in the past to remove water stains on the fabrics used for window coverings in the Hi Lo.
Attached Images
File Type: jpg The worst Spot.jpg (89.0 KB, 72 views)
File Type: jpg Typical Burn Hole.jpg (78.5 KB, 77 views)
File Type: jpg More Burn Holes.jpg (93.1 KB, 69 views)
File Type: jpg From Front looking to AC.jpg (88.5 KB, 73 views)
File Type: jpg Drying out with Space Heater.jpg (88.6 KB, 68 views)
jcurtis95 is offline   Reply With Quote
Old 12-22-2011, 10:11 PM   #16
Moderator
 
Join Date: Apr 2010
Location: Napa,CA
Posts: 933
Default

Jerry,

I moved your post here from the exterior wall corner thread.

There is a naturally occuring phenomenom when you have two dissimilar metals in contact with each other which can cause small holes. Sounds like that may be happening on your roof.

There is another thread on this forum that describes this in great detail, but I cannot locate it. Anyone remember where that was?

http://www.hilotrailerforum.com/f25/...intenance-203/
__________________
Les & Patricia
2006 22ft towlite (replaces 97 21TL)
2006 Toyota tacoma pre-runner 4.0 L V-6 quad cab
w/ 98 chevy Powervision towing mirrors
2017 Chevy Silverado 1500 5.3 v8 (replaces Toyota)
2 Hobie mirage pedal drive kayaks
campthewestcoast is offline   Reply With Quote
Old 12-22-2011, 10:49 PM   #17
sam
Senior Member
 
Join Date: Mar 2010
Location: Niagara Falls,NY
Posts: 4,218
Default Roof repair

I am so sorry that you have roof problems on top of your cracked shroud. I will let someone who is better able to describe how to post a new topic do so. Many of the forum members have had to repair their roof. I know they will respond. The problems you are having are all fixable by you. We all love our HiLo's no matter what!!!!
sam is offline   Reply With Quote
Old 12-23-2011, 12:28 AM   #18
Member
 
Join Date: May 2010
Posts: 33
Default

Jerry and Carol,

Regarding your end shroud cracks, someone posted that this was a well known problem with Hi-Lo's products in the 2000s. I also experienced it on my 2007. After three end cap replacements paid for by Hi-Lo under warrenty before they went under, still have the cracking problem. Paid my dealer 100 bucks to do some plastic welds, but they broke again. Further, the overlaps of the edges to the horizontal portion of the roof started to buldge, causing more gaps. So, I inserted many more screws to fasten it down. And I am caulking liberally and monitoring the situation. I also store it with a cover. But really not sure what to do for permanent fix at this point, and I don't think there is one.

Regarding fixing the holes on the top of your roof, the worst kind of holes are pinholes that one cannot see. I am not aware of any on my unit, but had them on a 1999 unit. On that one, I used a product called FormFlex 6000:
FORMFLEX 6000 RUBBERIZED ELASTOMERIC ROOF COATING (5G)

Many others recommend Kool Seal which is certainly less expensive. Can't say which is best approach.
__________________
Bruce, formerly 2707T
Bruce is offline   Reply With Quote
Old 12-23-2011, 02:30 AM   #19
sam
Senior Member
 
Join Date: Mar 2010
Location: Niagara Falls,NY
Posts: 4,218
Default Roof coatings

Wow what a web site!! Sounds like a good product for any type of roof sealing/repair. The only drawback I see is the size (five gallon pail).We only used half a can of roof sealer on our 25ft. classic
sam is offline   Reply With Quote
Old 12-23-2011, 08:47 AM   #20
Senior Member
 
Join Date: Jul 2011
Location: Fredericksburg, TX
Posts: 382
Send a message via Yahoo to jcurtis95
Default Crack in rear shroud

Bruce, etal,

Thanks for the information and advice. Considering the low daytime temperatures and expected rain, for now I am going to make individual hole repairs with what I have on hand. I do have a good cover for the trailer so the combination of the two actions should get me through until next spring when the warmer temps will be better for applying the rubberized paint which I think would be the best solution and also give me some peace of mind.

I thank all the forum members for your advice.

Jerry & Carol
2406 T
__________________

jcurtis95 is offline   Reply With Quote
Reply


Posting Rules
You may not post new threads
You may not post replies
You may not post attachments
You may not edit your posts

BB code is On
Smilies are On
[IMG] code is On
HTML code is Off
Trackbacks are Off
Pingbacks are Off
Refbacks are Off


» Featured Campgrounds

Reviews provided by

Powered by vBadvanced CMPS v3.2.3
Disclaimer:

This website is not affiliated with or endorsed by Hi-Lo Trailers Worldwide or any of its affiliates. This is an independent, unofficial site.


All times are GMT -5. The time now is 08:40 AM.


Powered by vBulletin® Version 3.8.8 Beta 4
Copyright ©2000 - 2024, vBulletin Solutions, Inc.
HiLoTrailerForum.com Copyright 2010
×