2008 15T A&E Awing bottom bracket broken

Johnnie-HILO

Advanced Member
Joined
Sep 2, 2011
Messages
71
Location
Plymouth, Michigan
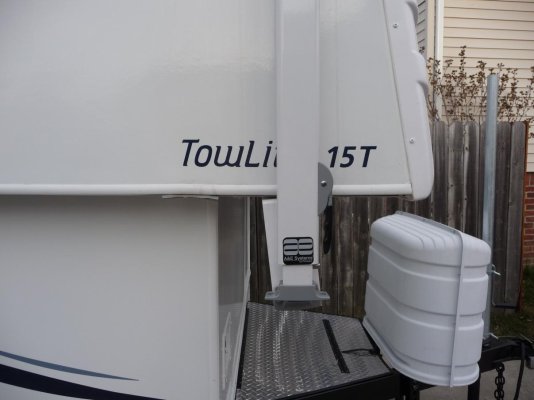
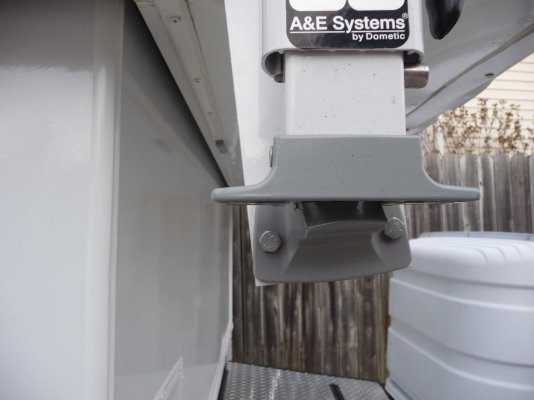
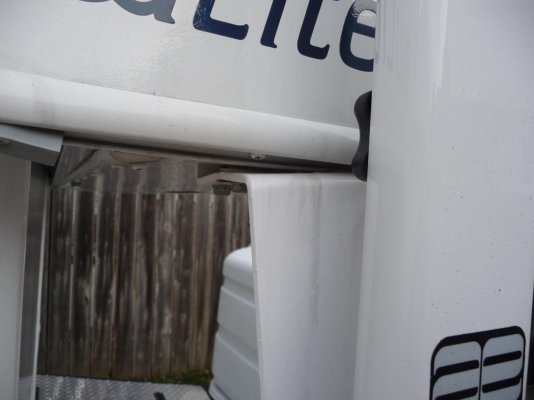
I was trying out my awning today and discovered that the front bottom bracket is broken. Upon further inspection, it appears that the flange that hangs down from the trailer top, is too far rearward. It appears that the factory, instead of remounting the flange, some how bent the bottom of the flange forward. In doing so, the bottom awning bracket was not mounted level, thus causing a side load on the bottom bracket. The bottom bracket, which is a die cast, cracked and as soon as I released the awning foot it fell apart. I ordered a new bottom bracket today. It looks like I have two options: 1) remount the hang down flange where it should be and fill the old screw holes. The problem is that the flange is bent. (I don't know how they bent it.) or 2) make the flange rear hole a slot and the mount the rear of the mounting bracket with a screw, washer, lock washer and nut. I am, this point, planning on going with option two. I don't know where I would get one of those hang down flanges. I also don't know why the flange was mounted too far rearward. Was it a mistake or is there a structure issue?

Has anyone experienced this issue? Am I make the right choice?

Thanks
 
I see in most of the awning posts that what I called an awning flange, every one else calls, an awning bracket. The reason I called it a flange (the L shaped bracket hanging down from the top half) is to distinguish it from the awning bottom bracket that holds the awning foot. I'll try taking a picture and posting it. I have never posted a picture.

In my case the improper mounting of the awning bracket to the upper half of the trailer caused the awning bottom bracket (die cast) to fail. The awning bracket (L flange/bracket) is a well built piece of metal with a welded gusset. It must be hard to bend on purpose. I see that they are available for replacement for approx. $24.00. I am concerned that if I replace the bent one that I have I would have to drill new holes in the upper half very close to the existing holes.
Easier to modify the A&E bottom mounting bracket hole to a slot in the awning mounting bracket. I'll have one hole an one slot.

It would have been nice if they would have made up an assembly gauge for each size awning that they installed and they wouldn't have created a problem like this.
 
The three files show the bent awning bracket and the effect on the bottom awning bracket. You can't see the break but it is above the left screw behind the awning foot.
 

Attachments

  • P1000710.jpg
    P1000710.jpg
    83.2 KB · Views: 65
  • P1000711.jpg
    P1000711.jpg
    78.3 KB · Views: 62
  • P1000712.jpg
    P1000712.jpg
    77.4 KB · Views: 62
By the pictures, it looks like the awning bracket hit something while the trailer was backing up. Maybe a curb or steep driveway.I haven't seen one bent in that direction before. You would have to remove the awning bracket, you could try to straighten it by putting it a bench vise and a big hammer or buy a new one. It looks like it's bent at were the lag bolts mount it the upper half of the trailer. Compair it to the other awning bracket. Inspect the gray foot that locks in the bottom of the awning arm in place, by the look of the pictures I couldn't tell if this part was damaged. You might be lucking and not have to replace this part.
The lag bolt mounting, the 2 lag bolts at the outside edge of the upper half lag into the alumium inter framing of the trailer. If one of these lag bolts snapped or broke, you could try removing it with a pair of locking vise grip plyers, drill it out and use a larger diameter lag bolt, or move the bracket over to get some new mounting holes( you have to this if the awning arm wasn't straight down in the first place). The other 2 lag bolts screw into wood, the problem is the factory used scrap wood with two wood screws and this becomes a weak point. I'm sure with the pressure that was forced onto the awning bracket that bent it that this part of the mounting will have to be repaired and the wood replaced. Other people have used carriage bolts through the outside of the trailer,through the alumium frame and through a new piece of 2x4 to hold the mounting for the second set of lag bolts. I designed my repair in another post so I wouldn't have carriage bolt heads exposed on the outside of my trailer. I would remove a section of the underbelly of the upper section where the front awning bracket mounts and inspect the 2x4 and replace then you would have new wood to drive the lag bolts into. I hope this helps, let me know if you have any questions.
 
Thanks for the comments. The reason I thought the problem was caused in assembly is that the awning arm appears to be perfectly vertical. If I removed the bracket and straighten it or replaced it and then remounted it in the same holes the bracket would be slightly reward of the awing arm. But I still think that you observation could be right and that maybe the length of the arm is long enough that if I remount a straightened bracket that a slight reward load would line up with the bracket.
 
Les,

I have decided to take your advise and try replacing the awning bracket. I ordered a new one. I have already ordered the broken awning bottom bracket. It is broken you just can't see the break because it is hidden behind the awning foot above the left bolt.
 
also, check between your "L" bracket and the bottom mounting edge, they were suposed to have 4 mounting insulators (rubber strips). 2 of mine were missing and my bracket was also on an angle. I put in new strips and bolted it back up and is better than new
 
I checked mine and there are no rubber isolators between the L bracket and the bottom edge of the trailer top. Just four screws driven into the trailer. There is a gap between the bracket and the bottom edge due to a small flange on the bracket. I expected to see something there like a gasket or calking but there is nothing. When I replace the bracket I plan on putting some sealer on the screws before I drive them in. The gap is approximately three sixteenths. I could get some rubber gaskets from the hardware.
 

New posts

Try RV LIFE Pro Free for 7 Days

  • New Ad-Free experience on this RV LIFE Community.
  • Plan the best RV Safe travel with RV LIFE Trip Wizard.
  • Navigate with our RV Safe GPS mobile app.
  • and much more...
Try RV LIFE Pro Today
Back
Top