Roof Repair

applying Kool Seal

Great Dog story,glad you shared it. I can only guess that by going in different directions you will be sure to not miss a spot and get full coverage.
 
Great Dog story,glad you shared it. I can only guess that by going in different directions you will be sure to not miss a spot and get full coverage.

Sam, You were right. In applying the paint and doing as the instructions stated, going north-south on the first application and east-west on the second, necessitates getting on the roof for one of those operations. When I got on the roof for the second application, I saw that I had missed a couple of spots which I covered on the second attempt.

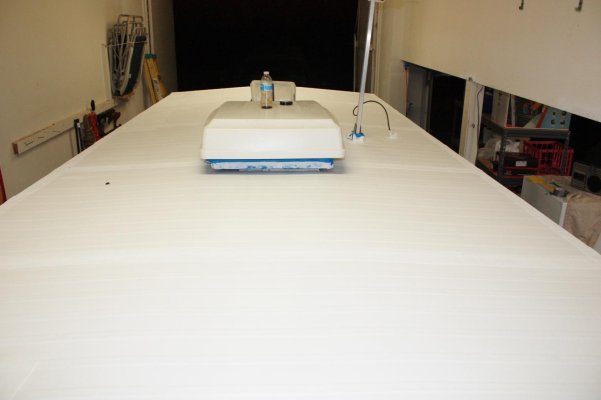
I finished up the roof this afternoon and it looks really great! I will be able to use our RV without having to worry about any moisture getting inside the roof or walls [after I re-do all the windows].

I also took your earlier advice and removed all the tape [except on the roof penetrations] once it had dried enough and before it became a permanent part of the process.

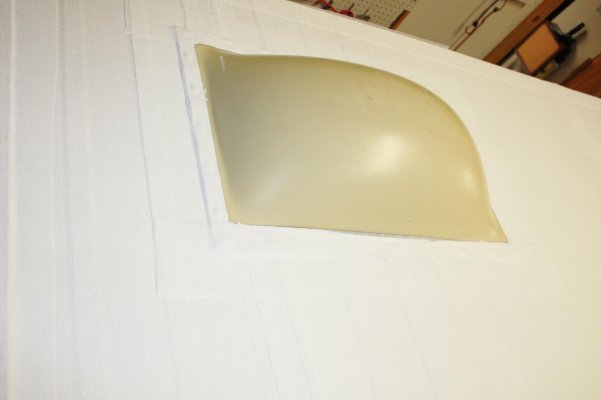
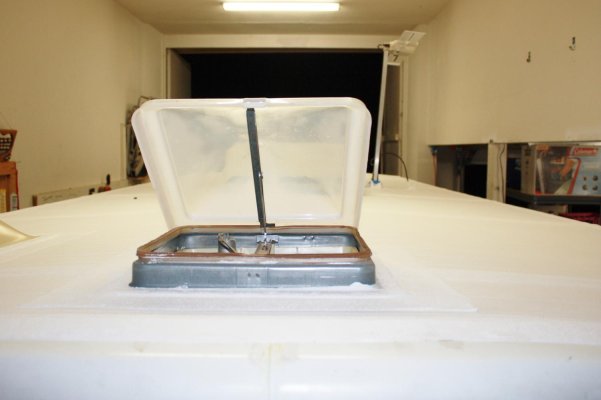
The second coat went on a lot faster and more smoothly than the first. I am attaching a couple of pictures of the finished roof.

Eye surgery tomorrow, then I will finish by replacing the awning, gutter and moving outside in a couple of days, after it has cured, and begin replacing the caulk on the windows.

Jerry Curtis
2406 T
 

Attachments

  • IMG_0006.jpg
    IMG_0006.jpg
    83.2 KB · Views: 169
  • IMG_0009.jpg
    IMG_0009.jpg
    92.9 KB · Views: 160
  • IMG_0010.jpg
    IMG_0010.jpg
    81.3 KB · Views: 147
Roof repair

The roof looks brand new!! great job. Just relax and take it easy after your eye surgery. You will get the rest of your to do list done soon. Could you send some of your 90 degree weather our way? It is in the 40s and we wish for 80 degree days again. Yesterday we had rain,sleet and hail all at once. Our grass needs to be cut. We are predicted to have some dry weather 50.DH will have to bundle up and go mow.
 
the roof really looks good - i have a 1969 Aristocrat Landcommander that i need to paint the roof. i used the tape but never thought of painting the bare aluminum - going to do it now after reading this thread.

thanks for all the great pictures and text.
 
the roof really looks good - i have a 1969 Aristocrat Landcommander that i need to paint the roof. i used the tape but never thought of painting the bare aluminum - going to do it now after reading this thread.

thanks for all the great pictures and text.

Heron2000,

Be sure to clean the roof well before painting. I failed to do so on a couple of spots and had to replace a section of tape and repaint. Do-overs are not much fun!

Jerry Curtis
2406 T
 
Hi Jerry,
I am actually very interested in the roof damage that you are talking about. We just bought an 1980 20' HiLo and are just beginning to try and repair the roof. I have also noticed the pin holes that you are talking about. they are actually along the the metal edging that wraps from the top of the roof to the side panel. I actually thought that they may be caused from tree sap??? We are trying to decide what we will use to repair it. While I would like to keep the trailer roof as original as possible I have no idea what it would entail and cost to remove that edging and replace with new. Would love to know if anyone has replaced these??? Leticia
 
Jerry,

If we could get a couple weeks of nice weather here in Pa, I might be able to get mine done. Cold nights and dreary days are not good for doing anything to the roof.

Two Questions

1 Did you not remove the AC and just paint around it?

2 What was the size of the paint roller nap you used for the koolseal?

Thanks
Gary
 
Roof repair

Garyk52, Good to hear from you. I to am anxious for the good weather on a consistent basis. We need to do some more exterior things to our HiLo. I remember Jerry posting that he did not remove his air conditioner as it would be a lot of work and then it might cause a leak around the seal of the AC. My ac weighs 100 lbs. That is why we decided to have our dealer replace and we got a warranty. Besides DH was working fulltime plus. DH says he used a 3/8 " roller. Can't read our can as sealer is slopped on it. Dh also cautioned me to tell you that you can't coat the roof with any sun on it. If you have a little morning dew on that is okay. You could always dry the roof off with an old towel. Any more that a little wetness and the Kool Seal won't flow properly. Kool seal Elastomeric coating is what our RV dealer carries for our rubber roof. He also had to use a brush to paint around ac,vents and solar panel. We also did not remove aour Ac.
 
roof repair

Hi Jerry,
I am actually very interested in the roof damage that you are talking about. We just bought an 1980 20' HiLo and are just beginning to try and repair the roof. I have also noticed the pin holes that you are talking about. they are actually along the the metal edging that wraps from the top of the roof to the side panel. I actually thought that they may be caused from tree sap??? We are trying to decide what we will use to repair it. While I would like to keep the trailer roof as original as possible I have no idea what it would entail and cost to remove that edging and replace with new. Would love to know if anyone has replaced these??? Leticia

Leticia,

Sorry I couldn't respond earlier. We dropped our RV off on lake Eufaula [in Oklahoma] and continued on to a convention in K.C. and just returned late yesterday. At the present time, I am getting a real good test on my roof project as we are getting some very heavy rain, the first since we completed the roof repair. I will know soon whether my efforts were successful or failed.

Regarding the holes along the side, there were just a couple of spots along the roof/wall juncture that I noticed on our roof, most were on the flat portion spread over a section about 7 feet long and 18" wide. I removed the gutter and awning and there were a couple of spots where the metal roof was crimped and folded down causing a rupture. I used Erna-bond web seal tape along the entire length of the trailer and folded it down to where it covered over the bend of the roof metal and would be hidden [aesthetically] when the gutter and awning were replaced. I can only emphasize here that it is important to insure the surfaces are clean before applying the tape. I would also recommend that you not overlap the eternabond tape where the lateral's [roof metal junctures] extend out to the wall. Rather, do the longer wall roof juncture, then cover these roof seams and just butt the tape up to the long wall run. We did have a small rain after I pulled it outside and the overlap failed to adhere well and the rainwater caused it to separate. I had to redo these areas and redo work is messy!

The tree-sap spots you spoke of are fairly discernible from the actual pin holes as when you run a fingernail over the electrolysis area, it will flake away exposing the metal. every one of these that I covered [around 45 holes] seemed to hold well. The only problem areas I had were in the overlapping eterna-bond tape areas.

I didn't remove the AC unit as it showed no visual signs of leaking and the cover for the unit covered the penetration and it sloped downward to the outer walls in what I thought was sufficient to not allow pooling. Right now we are having a driving rain that could possibly get underneath all that cover so I will check for any leakage and if any is evident, I will remove the unit and treat it also.

I can provide you the information where you can get the best deal on the tape if you want to email me at jcurtis95@austin.rr.com. I also experimented with a cheaper aluminum tape that might work just as well as the more expensive eterna-bond tape and can be purchased in the automotive department of Wal-Mart.

Presently we are experiencing one heck-uva rainstorm that will be a good test for our repair job. About 2" per hour and we are supposed to move to an RV park today!

Good luck on your roof repair.

Jerry & Carol Curtis
2406 T
 
roof repair

Jerry,

If we could get a couple weeks of nice weather here in Pa, I might be able to get mine done. Cold nights and dreary days are not good for doing anything to the roof.

Two Questions

1 Did you not remove the AC and just paint around it?

2 What was the size of the paint roller nap you used for the koolseal?

Thanks
Gary

Hi Gary,

Sam answered for my reasoning on not removing the AC Unit. I'll find out soon if I was correct as we are having a very hard driving rain for the past 45 minutes and still coming down hard!

I used a good quality medium nap roller brush in applying the Kool-Seal. As I remember, that was what they recommended.

I hope you get that break in weather there. We are presently in an Oklahoma down-pour and I sure wish we would get some of this in Fredericksburg. We are still under a stage 4 water rationing program that has been in effect for the past 10 months!

Good Luck.

Jerry Curtis
2406 T
 
Kool Seal application

Jerry, I answered Garys question as I knew you were on a road trip and didn"t have interne access. I sure wish we could send you some of our rain. The weather is going to be rain for days. DH beefed up our awning support arm. It has always rubbed on the exterior electrical box. He bought a new electrical cover and just needs to replace the electrical box. Wewill do this this afternoon as it is cloudy and no rain is predicted until tonight. Hope all your hardwork and repairs hold up. When we mowed our lot where we park the trailer part of it was muddy and wet.
 
update on roof repair and a new problem

Sam,

Yes I saw you had answered for me; thanks. We picked up and moved after the rain stopped yesterday. I had brought a 4' ladder with us so before I raised the Hi Lo at the RV Park, I checked the roof. Everything looked great, all the seal tapes held up as expected. The interior places where it was obvious water had leaked in were clear and the cabinet where the 'sag' took place was dry as a bone. We were treated to an even more intense storm this morning accompanied with lightening and high winds. We are getting a good field test on our roof job! So far, so good, on the AC Unit!

I had another problem develop as I set up the sewer hose yesterday. I noticed the Black Water Tank was dripping. It was centered around the large 6" pipe that extends from the tank to the valve. I quickly emptied the tank and as the pressure reduced, the dripping stopped. Looks like another project when we make it back home. For now, I am having to leave the black water valve open, not a good idea I know, but I don't think the owners would appreciate black water in their RV spot.

When I applied pressure to the pipe, the entry point into the tank was loose and water seemed to be present all around the 6" circumference as if the seal or glue has failed or it has broken away from the tank. It was not leaking while it was parked at my brother's place. Looks as if the terrible country roads have taken their toll. It looks as if I will have to drop the tank to make the repairs. Has anybody ever experienced this before? I'm hoping it can be repaired rather than having to be replaced. I will search the forum to see if anyone else has had this problem.

Jerry Curtis
2406 T
 
Roof repairs

Glad to hear you are hi and dry. Seems like just abou time we go camping something needs to be repaired. The last time iwas in my hilo checking clothes for my upcoming campout i found a broken cabinet catch on the wardrobe. It is plastic and has broken before. This is why i have spares. Probably should replace with a metal one if possible. Several years ago iwas helping dh back into our storage spot and put the 2x4 down too soon and it riped a hole in the sewer tank. Our trailers are quite low and I said oh "Sh..." because the "sh..." was pouring out. Didn't have a full tank. All i could do was pour a jug of water on it and let the rain do the rest. Spent $50.00 to 6.00 on two different patching materials. We have a sl. exterior smell if the tank is really full. After that we had a bobcat come in and bring in more stone and level the drive thus eliminating the need for 2x4,just use a few "legos" if needed. Someday i suppose dh will be forced to drop the tank and either repair or replace. A bear of a job from what i understand. Hopefully you will just be able to repair your tank yourself. I would try and secure it before you travel so you have no further dammage. Duct tape to the rescue. This is why we have to carry a tool box with us.
 
Roof coatings

If you are looking for RV roof coatings, you have to check out Ames Products @ Roof Coatings and Deck Paint, Basement Waterproofing and Basement Paint - Ames Research Paint Manufacturer

The specs on their products have been verified by independent test labs and far exceed those of the many other products i have researched... Ive have used Ames on my stucco home, with amazing results. And even better, they are all water soluble, environmentally friendly, which offers easy clean-up.

The product for aluminum roofs is called Ames' Iron Coat... I am having the roof of my year 2000 Towlite 22FD completely rebuilt, and plan to coat it with this as a preventative measure as soon as I get it back from the shop. Thanks for all the great tips. mark s.
 
Last edited:
Mark,

You didn't state in your post but did your roof also show signs of electrolysis as did mine? If so, you will have noticed on one of my posts that a neighbor who is in the building business said he uses scads of the identical roofing that is on our Hi Lo roof. He further said he could have sent me all the roofing material I would have needed to completely replace the aluminum panels and saved a lot of work. Just a thought. Even if I had replaced all the metal, I would have painted the roof with an elastomeric paint.

I looked over the site you provided and Ames looks to be a good product. Do they also offer a tape to work in conjunction with the Iron Roof? When you begin your project, you might keep a picture record and share your experience with the forum.

I have had our Hi Lo in storage for the past 4 months and will be taking the cover off today as it is due for a new set of tires and annual inspection. I will check and see how the roof repair has been holding up. So far I have been very impressed with the the adherence of the tape and the Kool-White elastomeric paint.

Good luck with your project.

Jerry Curtis
2406 T
 
I uncovered the RV yesterday and raised it to check on the ceiling that had gotten wet through the roof leaks I had just repaired. The summer heat had done its work and the ripples I had in the ceiling had expanded even more. My 'ironing' job didn't do all that great as the adhesive has been diluted to the point that it is evidently non-existent. One panel had basically erupted where the leak had been near the wall juncture. It looks like I will have to replace two panels; another winter project. :(

While I had it up, I did check the battery water levels to make sure it hadn't 'boiled out' due to the constant charge and heat and all was okay.

Got my trailer inspection done for another year and I did have new tires installed and used the information provided on raamw's post. I went ahead and bought the 8-ply tires just for added strength [and price] and according to the process provided by raamw, the tire pressure range for my vehicle weight after loading should be somewhere around 35 psi. I discussed with the manager and we decided on 40 pounds. The max psi for this particular tire was 65 psi. When the workers had finished putting the tires on, I asked one to check the pressure and every one was around 55 psi. I had each tire brought back down to 40 psi per the recommended pressure for expected load. When we take our road trip in September, I will certainly check the tire temp until I am sure this pressure setting is correct.

What raamw said regarding over pressurization makes sense. Like so many RV'ers, I just set the tire pressure to the maximum rather than adjust tire pressure for the axle loading. Thanks raamw for that informative post.

Jerry Curtis
2406 T
 
Wall dammage

Jerry,sorry to hear some of your wall repairs didn't hold up. Sometimes we have to go to plan "B." The bottom line is it is fixable. Good thing you discovered this before you went to pack and leave for a big trip. Best of luck in finding something suitable for wall replacement. Take pictures and post as I'm sure it will help others.
 
Sam,

Actually it is the ceiling panels that will need to be replaced. Insofar as the roof repairs, they showed no signs of additional leaking as it sat in the rain yesterday. The ceiling panels are damaged at the wall junctures and a result of the leaks prior to my roof repair. I guess the heat and the drying out caused the laminate to turn loose and deteriorate.

Jerry Curtis
2406 T
 
Ames roof products

Mark, thanks for the link to the Ames roof products and other applications. I printed it out for future reference. We might be able to use this product for some repairs we need to do around our church. It it is always good to learn new things-products.
 

New posts

Try RV LIFE Pro Free for 7 Days

  • New Ad-Free experience on this RV LIFE Community.
  • Plan the best RV Safe travel with RV LIFE Trip Wizard.
  • Navigate with our RV Safe GPS mobile app.
  • and much more...
Try RV LIFE Pro Today
Back
Top