|
|
08-08-2011, 09:12 AM
|
#1
|
Member
Join Date: Apr 2010
Location: Abita Springs, LA
Posts: 20
|
Refrigerator Fans, internal
JackandJanet,
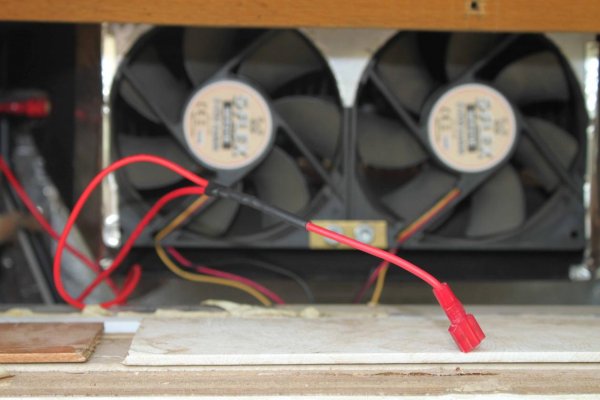
There is an existing drain hole in the back wall of the refrigerator. It was plugged with a little clay plug which I simply removed to run the wire and then replaced it with a little calking. If the fan ever fails, I can just snip off the tie wraps, unplug the fan inside the fridge and plug in a new one without uncalking the lead-in wires. I had previously used one of those little rectangular battery powered fridge fans, but it corroded and failed last year. Not only does this 12v design take up a little less room (I can fit in one extra can of beer, uh I mean coke), but I never have to worry about last year's batteries failing in the middle of this year's trip.
Rather than tie into these lead-in wires I decided to use a self-contained interior light to avoid a maze of wires running everywhere. Besides, the interior fan only has power when I throw the switch inside the camper to provide power to the rear fans (so it doesn't run when I don't want it to.) This means that if the switch wasn't thrown I wouldn't have an interior fridge light. I decided to use one of those little clip-on 5 LED hat bill lights. I drilled 2 holes in the light to run wires to connect to the door switch. They run about 3 1/2 hours on their little button batteries. Since the fridge door is only open for a few seconds at a time during use (so I don't lose too much cold air) I forsee the batteries lasting for several years before needing replacement. If they do fail in the middle of a trip, so what? It's not as critical as the fridge fan failing. It will probably corrode and fail before the batteries go dead (based on prior experience). I will screw the microswitch out of the way by the door for a semi-permanent mounting. The tiny light assy will be secured by velcro to make it easier to replace batteries or the whole assy if necessary (I have a spare, if needed). I'll post up some pics when done.
Chip
__________________
|
|
|
08-08-2011, 10:04 AM
|
#2
|
Site Team
Join Date: Jul 2010
Location: Pine, AZ
Posts: 4,693
|
Thanks, Chip - nice explanation. I'll have to see if my refrigerator has the drain hole you describe. I really like the idea of a 12V fan in there.
Your idea for the LED lights is spot on too. I imagine they'll last several seasons on batteries.
I have a wireless temperature transmitter in my refrigerator, in a zip lock plastic bag, and the batteries in it last a full season.
- Jack
__________________
|
|
|
08-08-2011, 05:15 PM
|
#3
|
Senior Member
Join Date: Aug 2010
Location: Quakertown, PA
Posts: 1,074
|
The drain hole in my 2209 is functional, the tray under the coils drains into it and the there is a tube that runs down under the trailer, no more water on the floor like what happened in the 95 when you defrosted.
__________________
Rich
------------------------------------
(215TL) - 1995 21' TowLite
(2209T) - 2009 22' TowLite
(2510 ) - 2010 25'
|
|
|
08-08-2011, 06:37 PM
|
#4
|
Member
Join Date: Apr 2010
Location: Abita Springs, LA
Posts: 20
|
Quote:
Originally Posted by PopRichie77
The drain hole in my 2209 is functional, the tray under the coils drains into it and the there is a tube that runs down under the trailer, no more water on the floor like what happened in the 95 when you defrosted.
|
Yep, mine too, but there was room for 2 thin wires too.
Chip
|
|
|
08-08-2011, 08:44 PM
|
#5
|
Senior Member
Join Date: Aug 2010
Location: Quakertown, PA
Posts: 1,074
|
Chip, Took another look at your internal small fan picture and the drain tube is visible, I should have saw it before. I like the way you mounted the fan, looks like I have another mod to do. Thanks, Richard
__________________
Rich
------------------------------------
(215TL) - 1995 21' TowLite
(2209T) - 2009 22' TowLite
(2510 ) - 2010 25'
|
|
|
08-10-2011, 11:58 AM
|
#6
|
Site Team
Join Date: Jul 2010
Location: Pine, AZ
Posts: 4,693
|
Following in my "mentor's" footsteps, I just finished mounting a small PC fan in our refrigerator too. I used a 50 x 10 mm fan, and think a 40 mm fan would have spanned two of the shelf wires perfectly. But, this one is very secure as is.
In my case, there is a split grommet down beside the drain tube where an existing wire goes out (possibly a temperature sensing probe to a thermostat?). Anyway, it was a simple matter to pry that split grommet out of the hole and then feed the two fan wires through it before reinserting it.
Like Sushidog, I used a 3-pin connector inside the refrigerator to connect the fan.
Outside, I ran the two power wires to the "capped" molex connector that I had left in place when I connected the two external fans together. (See my original pictures in this thread.) This way, the internal fan comes on anytime the exterior fans are running. I suppose it would be better to have the internal fan on all the time and I MAY rewire the positive feed to the external fan's positive feed upstream of the thermostatic switch, but for now, it seems good enough and using the molex connector simplified things.
- Jack
|
|
|
08-10-2011, 04:39 PM
|
#7
|
Member
Join Date: Apr 2010
Location: Abita Springs, LA
Posts: 20
|
Jackand Janet,
I wired my internal fan to the external fan power wire before the fan limit switch so the internal fan comes on when power is supplied to the external fans via the inside rocker switch. This way I can turn the interior fan off when not camping by simply throwing the rocker switch, yet it remains on whenever the switch is on, independant of the fan limit switch cycling the external fans off and on.
I guess your wiring would be better if concerned about the internal fan's current draw when boondocking, but my 40mm fan only draws .06 amps so it could run for a couple weeks without significantly impacting battery charge. Your 50mm fan probably draws .08-.10 amps, so it's still not a significant current draw on your battery, as long as you don't plan on boondocking for more than a couple weeks between recharges. If you are on that tight of an amperage budget, I recommend adding a small solar charger or a second battery.
Chip
|
|
|
08-10-2011, 07:31 PM
|
#8
|
Site Team
Join Date: Jul 2010
Location: Pine, AZ
Posts: 4,693
|
Quote:
Originally Posted by sushidog
Jackand Janet,
I wired my internal fan to the external fan power wire before the fan limit switch so the internal fan comes on when power is supplied to the external fans via the inside rocker switch. This way I can turn the interior fan off when not camping by simply throwing the rocker switch, yet it remains on whenever the switch is on, independant of the fan limit switch cycling the external fans off and on.
I guess your wiring would be better if concerned about the internal fan's current draw when boondocking, but my 40mm fan only draws .06 amps so it could run for a couple weeks without significantly impacting battery charge. Your 50mm fan probably draws .08-.10 amps, so it's still not a significant current draw on your battery, as long as you don't plan on boondocking for more than a couple weeks between recharges. If you are on that tight of an amperage budget, I recommend adding a small solar charger or a second battery.
Chip
|
Thanks, Chip - I quite understand, and will probably rewire the positive lead when I work up the energy.
My wiring solution was purely "lazyness". I had a 3-pin male connector (the one inside the refrigerator) that was connected to a 4-pin molex connector (it's a 3-pin to 4-pin adapter I had on hand) and since I had the unused molex connector on the exterior fans, it was simple to just plug the thing in there.
My inside fan pulls 0.09 Amps, no big deal - in 24 hours, that's only a 2.16 Amp drain. My generator will easily replace that.
I just didn't feel like "cutting and splicing" when I installed this thing. But, it's already "bugging" me, so I WILL splice the positive feed wire into the line upstream of the thermostatic switch, just like you did.
It was interesting, I turned the refrigerator on (AC power) once I had the wiring completed, and as soon as the inside fan came on (blowing up into the cooling fins), I could feel the cool air bouncing off the bottom of the freezer compartment down into the refrigerator. It's clear to me this will both speed up cooling, and, will make it more uniform. It has to improve the heat transfer function in the cooling coils.
Now, I just have to keep Janet from "blocking" the fan with food. Actually, I just had a thought - I wonder if it might be possible to mount the fan on the bottom of the cooling fins, using the same wire tie approach? That way, air would be pushed up onto the "roof" and then down through the fins and it would not impact the storage area. I'll look at that tomorrow, and will post pictures if this seems reasonable.
- Jack
|
|
|
08-10-2011, 09:08 PM
|
#9
|
Member
Join Date: Apr 2010
Location: Abita Springs, LA
Posts: 20
|
The thing to do would be drill 2 holes in the cooling fins and mount 1/2 of the fan on the fins and the other side to the edge of the upper shelf.
Chip
|
|
|
08-10-2011, 09:35 PM
|
#10
|
Site Team
Join Date: Jul 2010
Location: Pine, AZ
Posts: 4,693
|
Quote:
Originally Posted by sushidog
The thing to do would be drill 2 holes in the cooling fins and mount 1/2 of the fan on the fins and the other side to the edge of the upper shelf.
Chip
|
So it would blow in "sideways"? Without looking at it, I'm working on memory here. I think I'd rather see it blowing up. (And, I'd rather not have to do tricky drilling on the fins.)
I'll get back to you tomorrow - I don't want to put the top up tonight since we have a 40% chance of thunderstorms (wish, wish). It's down and covered now.
- Jack
|
|
|
08-10-2011, 09:42 PM
|
#11
|
Member
Join Date: Apr 2010
Location: Abita Springs, LA
Posts: 20
|
No, you'd be better with the fan blowing up. I'm just suggesting that instead of mounting it entirely to the condenser fins, you split the difference between the fins and the shelf mount like I have. I couldn't do it with my little 40mm fan but your 50mm fan might just span the gap. The only thing you might have problems with is condensation from the condenser fins dripping into the fan. That's why I didn't mount it any closer to the cooling fins myself.
Chip
|
|
|
08-11-2011, 02:34 PM
|
#12
|
Site Team
Join Date: Jul 2010
Location: Pine, AZ
Posts: 4,693
|
The New Interior Fan Mod
OK, I mounted the fan to the bottom of the cooling fins. (Chip I didn't see your remarks about condensation before I did the mod, so it MAY be a problem. Simple to move and replace the fan though if it is.)
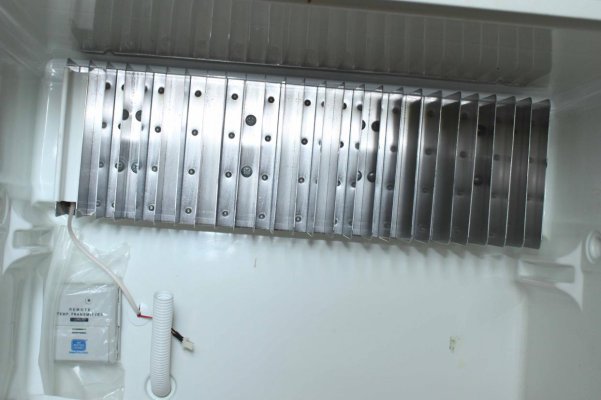
The first picture just shows the inside of the refrigerator with the top shelf and drip pan out. You can see, in the lower left next to the drain line, where the fan wiring comes through the split grommet and the male connector that is there. The thing in the plastic baggie is the wireless temperature transmitter so I can monitor the temperature inside at any time.
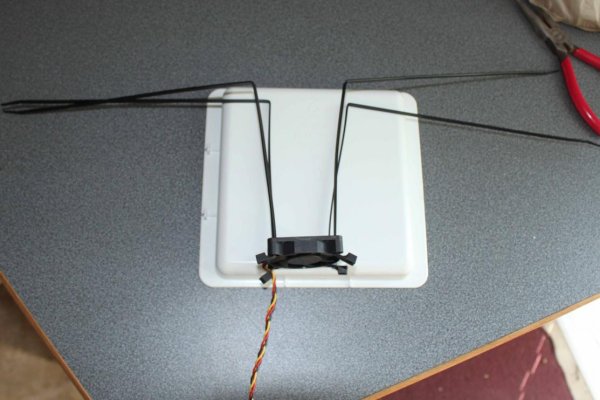
Next, I used 14" cable ties and "preformed" them just a bit to make installation easier.
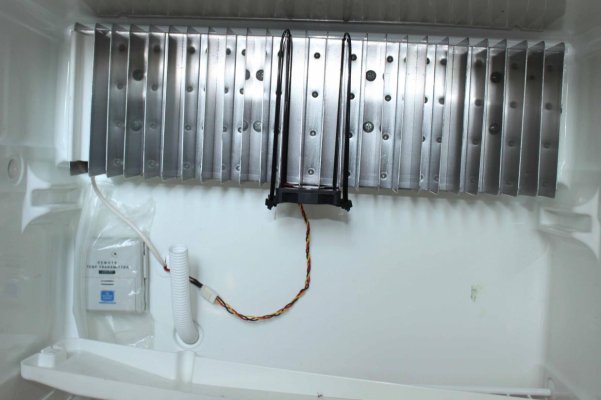
The third view is with the fan installed.
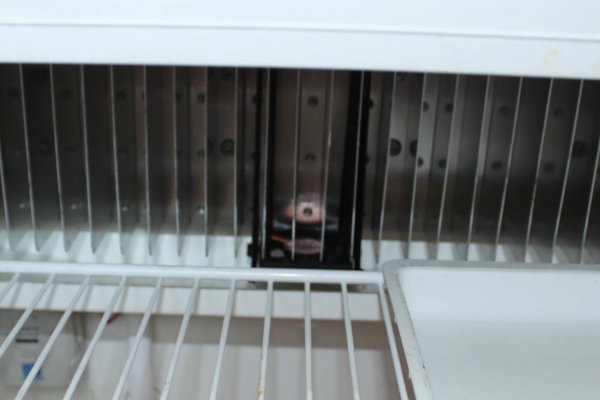
The fourth is with the drip pan and shelf back in place. Since the fan is rotating at high speed and blowing up, I doubt much water will "stick" to it (except maybe around the frame).
Finally, I DID rewire the positive supply so that the fan is on anytime the internal ventilator switch is on. The line I used is the one from the inside switch to the thermostatic switch in the external coils. The inside switch is fed by a 1 Amp inline fused line that you would NOT want to tie into, because if you did, the fan could not be turned off. The spade connector you see plugs into the thermostatic switch to the left of the fans (kinda blurry) behind the one that's still plugged in.
Anyway, thanks again, Chip, for some great ideas!
- Jack
|
|
|
08-11-2011, 05:00 PM
|
#13
|
Member
Join Date: Apr 2010
Location: Abita Springs, LA
Posts: 20
|
It looks like a sweet job - very professional. It makes me want to move mine.
I think I'll wait a while and see if you have any problems with condensation. If not, I might add a second 40mm fan and mount both to the coils in a similar fashion. That way if one does fail for any reason I've got a back-up.
It looks like you took my good idea and made it better - nice work!
Chip
|
|
|
08-11-2011, 05:42 PM
|
#14
|
Site Team
Join Date: Jul 2010
Location: Pine, AZ
Posts: 4,693
|
Thanks, Chip - I certainly like this approach a whole bunch better than those rinky-dink battery operated Mattel toy fans I've seen in Camping World.
- Jack
|
|
|
08-11-2011, 05:46 PM
|
#15
|
Senior Member
Join Date: Jul 2010
Location: Salida, CA
Posts: 157
|
Try this eBay offering for a dual fan setup with bracket (it is actually intended use is for cooling your 3.5" Hard Drive in your tower PC); DOMETIC 12 Volt Rerfigerator fan for RV for $18.00 including shipping or you can order the same thing from OutletPC.com for $6.85 including shipping. The bracket it approximately 4 inches wide.
I have also ordered a 12V Water Resistant LED Light (White) that I will connect in parallel with the fan ... so yes it will always be on when the fans are running but with a mtbf for LED's of 10,000 hours I do not care, besides do you realy know if the refrigerator light turns off when you close the door? ;o) After I implement this mod and the "Sushi" fan mod I will post photo's and an update.
For the update go here: http://www.hilotrailerforum.com/f35/...tor-mods-1396/
__________________
John
2007-22T TowLite 50th Anniversary
2008 Nissan Frontier SE 4X4 Crew Cab, Snug Top
|
|
|
08-11-2011, 07:37 PM
|
#16
|
Site Team
Join Date: Jul 2010
Location: Pine, AZ
Posts: 4,693
|
Quote:
Originally Posted by NDgent
Try this eBay offering for a dual fan setup with bracket (it is actually intended use is for cooling your 3.5" Hard Drive in your tower PC); DOMETIC 12 Volt Rerfigerator fan for RV for $18.00 including shipping or you can order the same thing from OutletPC.com for $6.85 including shipping. The bracket it approximately 4 inches wide.
I have also ordered a 12V Water Resistant LED Light (White) that I will connect in parallel with the fan ... so yes it will always be on when the fans are running but with a mtbf for LED's of 10,000 hours I do not care, besides do you realy know if the refrigerator light turns off when you close the door? ;o) After I implement this mod and the "Sushi" fan mod I will post photo's and an update.
|
I've found, if you whip the "refrigerator elf" now and then, it keeps him alert and he always turns the light off when the door is closed.
Looking forward to your pictures.
- Jack
|
|
|
08-17-2011, 09:51 AM
|
#17
|
Senior Member
Join Date: Jul 2011
Location: Marietta, OH
Posts: 102
|
Screen over vent opening
I was trying to do this modification on my 2307C. When I took off the vent cover, I found there was a small (ca 1/4") mesh screen over the opening. Anyone know why it's there? OK to leave it off after the mod?
Darryl
|
|
|
08-17-2011, 01:08 PM
|
#18
|
Site Team
Join Date: Jul 2010
Location: Pine, AZ
Posts: 4,693
|
Quote:
Originally Posted by camperD
I was trying to do this modification on my 2307C. When I took off the vent cover, I found there was a small (ca 1/4") mesh screen over the opening. Anyone know why it's there? OK to leave it off after the mod?
Darryl
|
Darryl - I have the same mesh screen over my vent fans. It may be there to keep large insects out, since they could probably get through the openings in the vent cover. I put it back on, once I installed the fans. It was only held there by 5 screws I think.
I just pulled it away on one side when I wired in my new inside refrigerator fan.
- Jack
|
|
|
08-17-2011, 01:29 PM
|
#19
|
Senior Member
Join Date: Aug 2010
Location: Salina, KS
Posts: 256
|
yah that screen is mud dobber/wasp protection... dont leave home without it
__________________
From Kansas: 29ft '95 5th, converted to toybox in rear, by Hilo. Pics soon, Some Here.
|
|
|
08-17-2011, 01:42 PM
|
#20
|
Senior Member
Join Date: Jul 2011
Location: Marietta, OH
Posts: 102
|
Thanks for the info. I'll replace it when I'm done.
Darryl
__________________
|
|
|
|
|
Posting Rules
|
You may not post new threads
You may not post replies
You may not post attachments
You may not edit your posts
HTML code is Off
|
|
|
|
» Recent Threads |
|
|
|
|
|
|
|
|
|
|
|
|
|
|
|
|
|
|
|