Window leak ???

Tony-HILO

Advanced Member
Joined
Mar 1, 2010
Messages
33
Location
Shawnee, KS (KC Metro)
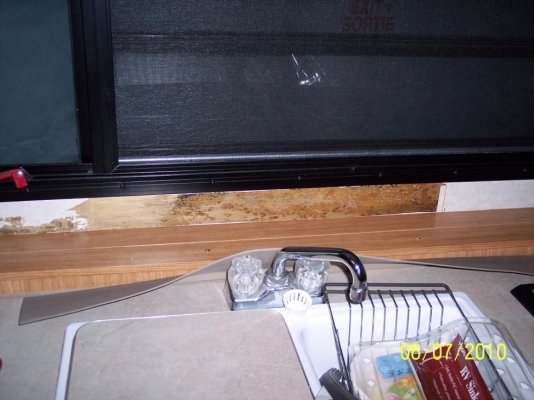
We noticed some 'bubbles' along the bottom of the large window behind
the kitchen area last summer on our trip. Didn't pay alot of attention at first
until it seemed to get worse. Turned out it was moisture trapped behind the
vinyl wallpaper. I caulked the out side of the window at it has seemed to
stop it for the most part. It's only been from the bottom of the window down.
Like if it was coming in possibly at the top and then following the frame to the
bottom. Only thing that I can figure out. There is no sign of moisture coming
from the roof or any higher. Anyone elese experienced this?? Just have to figure how to patchwork the wallpaper.
 

Attachments

  • hi lo alts 005.jpg
    hi lo alts 005.jpg
    95.4 KB · Views: 87
  • hi lo alts 006.jpg
    hi lo alts 006.jpg
    93.1 KB · Views: 79
Window leak

I suggest you check the vent wholes at the bottom of the window frame to see if they are not stoped up. If they are stoped up the sweat or conditation would not drain to the out side and will overflow and get the wall wet. This can happen even if the trailer is stored inside, if you have high humidity. As far as fixing the damage to the paneling you can eather remove the paneling and replace (big Job) or simply install a molding to cover the damage. Most dealers and HILo carry bat molding in the same color's as the wall's of the newer trailers.
Sam
 
Last edited:
OK, thanks Sam. I'll check those vent holes. I guess they're accessed from the inside??? The panelling seems ok once it dried out so it's mainly a cosmetic thing. I got some of that vinyl/rubber baseboard @ Home Depot that
I was going to use below the window - behind the sink - and would kinda work
like a back splash. But I'll have to do something else with the other sections.
Maybe some kind of border instead of trying to match up the wallpaper?
 
Window leak

The vents are located at the botom of the window one on each side. They are best axcessed from the out side. The best tool for cleaning them out is a paper clip . straighten it out and push it through from the out side.
Sam
 
just got alittle more serious

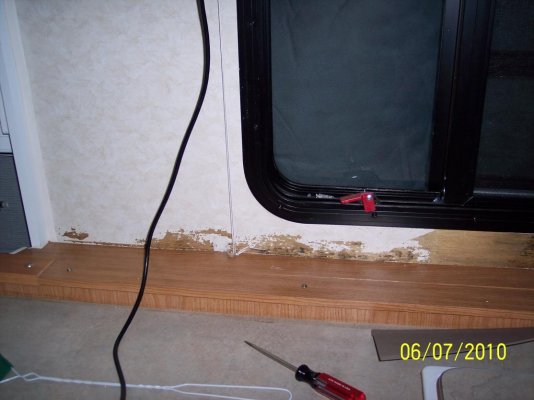
Notice a small area to the right of the window now - soft wall. Peeled off
the wall covering and it was wet and some wood rot. Maybe a 3" x 8" area??
Does the panelling extend below the ledge??? I'm guessing not - and I can
cut out the bad section and patch it with new board??????? I hope!!!!!
If it extends on past the "ledge" I would assume that you would have to take
the top off to repair because you can't access any thing below the ledge.
I checked the drain holes and they seemed to be open although it seemed
like I was butting up against something kind of rubbery. So I didn't know how
far back you need to go to consider it completely open???:eek:
 
window leak

If the wood rott is only in the area of the window frame it is easy to remove the window and replace the wood. If it is in the band board it can be replaced but it would require you to remove the top. This is possable to be done, but would take a lot of work. If you go this route let me know and I will walk you through, step by step.
Sam
 
Thanks Sam - It is basically below and just to the right of the window
corner (facing it from the inside the trailer). Then there is the ledge that
lines up with the bottom part ledge. That's what I don't know, does the paneling extend down just to the "ledge" ? or does it go down further?
If it is just "to the ledge", or a little past, I would imagine that I could cut it there and patch in a new piece??? But what do I know?! ?!*%*^#*. Tony.
 
window leak

First remove the top there are instructions already posted on this forum. Once the top is removed, and sitting on the 2x4's remove the metal covering over the wood by removing the staples and bending it back remove any rotted wood. Be caresfull not to damage the wiring in the chanel behind the wood on the road side. You can make the replacement board by taking a 2x4 and using a router to cut a chanel for the wiring. Reatach the metal covering. With the roof off check the gasket and replace if you see any wear.
I always replace the rotted wood with presture treated to prevent any futher problems with wood rott.
Sam
 
Last edited:
AC condensation

Another possiblity that was brought to my attention - whether it applies now or something to be aware of for the future - I guess there is a drain tube that goes from the AC unit and drains out underneath the trailer. If this gets
plugged up water will get trapped in the roof and wall. :(
 
Please someone correct me if I am wrong, but I don't think Hi-Lo has a tube to drain the A/C. There may be a tube to drain the refrigerator.
 
Rich,

You are right there is NO drain plug for the AC. However there is a drain plug for the refrigerator.
 
window leak

The AC drains directly on the roof through several wholes in the a/c pan. The refg drain goes into a cup that alows the water to evaperate on the back of the refg.
Sam
 
Sam,
My 2004 Hi-LO has a drain pan type of thing in the back of the fridge also but it goes into a drain tube from there and drips outside under the trailer right beneath the fridge.
 
window leak

Sam,
My 2004 Hi-LO has a drain pan type of thing in the back of the fridge also but it goes into a drain tube from there and drips outside under the trailer right beneath the fridge.
The drain in most HiLo's can go into a drain pan or through a whole in the floor behind the refg.
Sam
 
Well OK, scratch that idea :eek: I looked and couldn't find anything ---
I do have another question though, there are two valves in the bathroom
closet. Are they used to drain the system?? I've opened and closed them
when I winterize but are there any other usages??
 
Wall bubble

We have a 2009 HiLo tow lite The large window by the couch to the right side, the wall fabric started to bubble and the wall feels like it is moist. We have it stored in our garage. Do we have to remove the complete wall to repair? Any idea where the moisture came from?
 
2009 Hi Lo

We have bubbles in the wall covering by the couch wall which is next to a large side window. The wall behind the wall Paper feels spongy. Do we need to replace the wall? What do we do to prevent it from continuing? The outside wall is starting to bulge. Very concern with what we need to do. We do have the camper stored in our garage?
 
We have bubbles in the wall covering by the couch wall which is next to a large side window. The wall behind the wall Paper feels spongy. Do we need to replace the wall? What do we do to prevent it from continuing? The outside wall is starting to bulge. Very concern with what we need to do. We do have the camper stored in our garage?

You will need to remove the window and you should be able to see the extent of the water damage and better assess what type of repair is needed. It was probably caused by a leak around the window. It is wise to remove the windows and reinstall with Butyl tape and apply caulk around them. Lexel or equivalent seems to be the caulk of choice.
 
Repairing wall damage.

Dh and I did extensive wall replacement in our 1990 25ft. HiLo Classic. Start by cutting 2x4s as described in this doccument. 3-3-2010 Cable replacement in my 1998 HiLo 24TD. This tutorial shows how to raise the top half enough for wall repair and seal replacement. The wall does extend below what you can see. You will also need to mark the cable bolts with a magic marker in the position they are in. That way you can put them back in the correct position. I can advise you further by phone. PM sent. You can do this repair. It is very common for water intrusion at the windows.
 

New posts

Try RV LIFE Pro Free for 7 Days

  • New Ad-Free experience on this RV LIFE Community.
  • Plan the best RV Safe travel with RV LIFE Trip Wizard.
  • Navigate with our RV Safe GPS mobile app.
  • and much more...
Try RV LIFE Pro Today
Back
Top