|
09-24-2017, 03:52 PM
|
#1
|
Member
Join Date: Sep 2017
Location: OH
Posts: 6
|
1989 HiLo 22 foot repairs
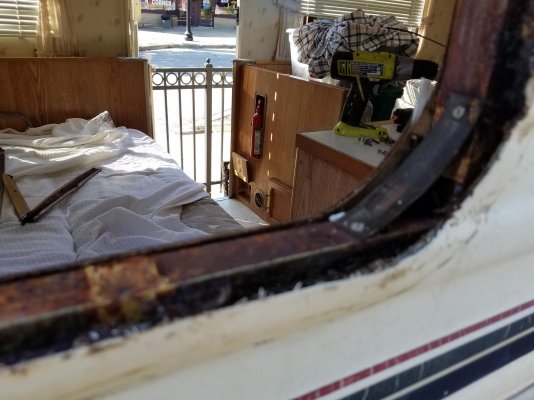
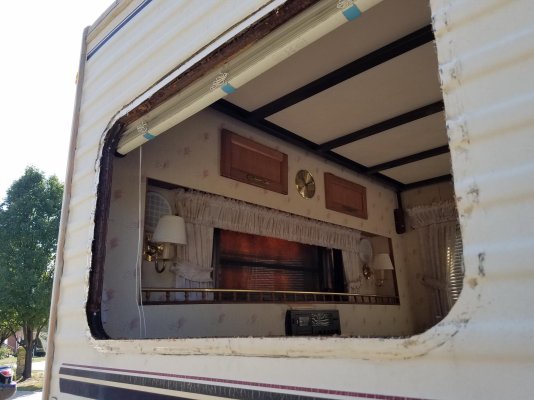
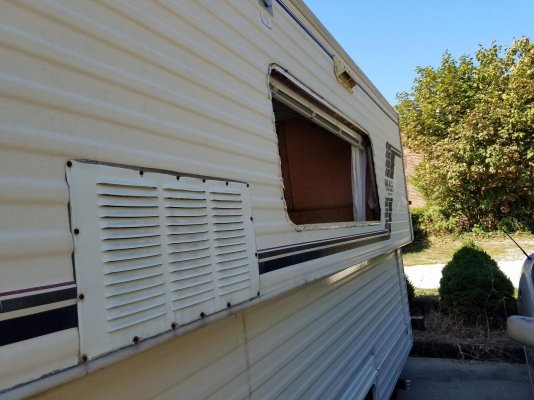
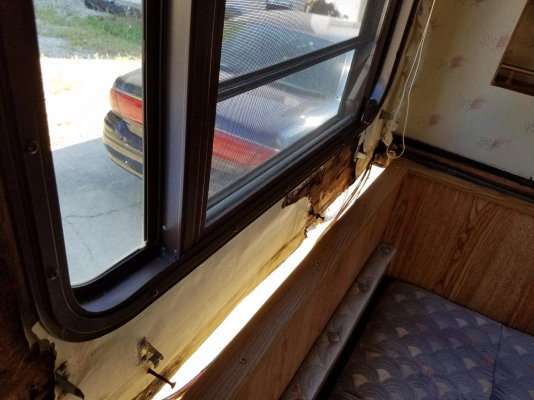
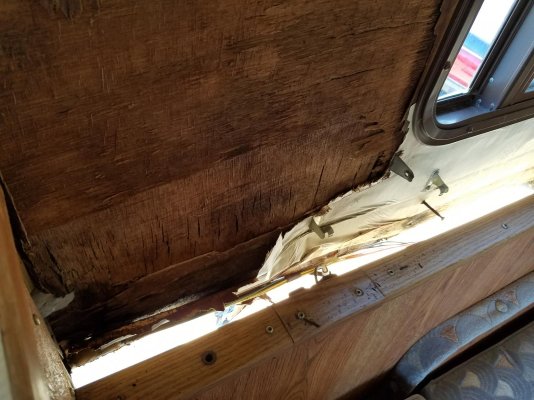
Hi all. Dug in today and here is the status so far. First some pics.
The damage appears to be mainly isolated to the front left lower section. I spent this morning lifted ng the left side enough to get to what I needed to. I removed the guide rails and supporting it front and rear lifted it slowly while ensuring the guides cleared the lower section trim so nothing was damaged on the way up. Removed both windows on the left side and found the foam intact with some of the interior trim wood damaged below both windows and the entire beam of the lower top damaged from the fridge cutout forward. The metal frame while somewhat Rusty is solid. So basically today was demolition. I measured the lower wood as 2 3/4"pieces of plywood and a 1/8 finishing layer attached to the lower wall. Above that there is some wiring. So I knocked all that out and using a new multitool I carefully sliced the inner plywood laayer up high enough to be free of water damage. Luckily my roof is great so no damage from about 1/4 of the way up from the windows to the roof.
So now working on peel in all that old plywood off. The stuff that was wet came off pretty easily but the stuff that wasn't in bad shape sure doesn't want to let go. Any suggestions? I guess so far putty knife and lots of elbow work. Also the lower beam below the kitchen window is semi soft at the top but still pretty solid on the bottom edge. Anyone cut this away partially and just laid a new top half on it? Or should I leave well enough alone lol. The wall still seems quite solid as the metal is strong and still in place. So at this point it's mainly just closing out the edge near as I can tell so if I clean it up and recap it I'm guessing it will be fine with resealed windows.
__________________
|
|
|
09-24-2017, 09:07 PM
|
#2
|
Senior Member
Join Date: Mar 2010
Location: Niagara Falls,NY
Posts: 4,219
|
Repairs
Dh looked at your description/pictures. Scoop out all the soggy wet plywood. Determine where the wood is solid on the wall. Make small cuts with your multitool. Small slices will alow you to keep the foam as you will be gluing board to the foam. Any soft wood needs to be replaced. We got our multi tool at Harbor freight. I remember going through several scrapper blades. Any wall that is totaly soggy needs to be demowed until you just have the inside fiber glass exposed. Then you would use bondo to seal the inside fiberglass of pin point holes that you can't even see. Start by cover your floors and counter tops with cardboard. Use duct tape so you don;t trip on them. Take some pictures and measured drawings of curtain hardware. Cover your furniture with plastic. Any rusty metal in the walls should be painted with Rustoleum or a like product. You should be okay with rusty window frames because you will be sealing with butyl tape. I hope this makes sense to you. Have Lexel caulk and expanding foam on hand to seal up any holes. When you demo a wall see if you can take the material off in big pieces to use for patterns. Keep the questions coming. You can do these repairs.
__________________
|
|
|
09-24-2017, 09:32 PM
|
#3
|
Senior Member
Join Date: Jun 2016
Location: Ruston, LA
Posts: 276
|
Looks like you've got a good start going. Just a quick word: you may want to consider replacing the white foam because it can hold water when it gets wet. Pink or Blue extruded is solid, but the white stuff HiLo used has porosity to it ... so if there's doubt, don't hesitate to yank it too until you hit the dry wood. Then build it back layer by layer.
I found that Lowes and Home Depot both carry 1" thick blue/pink foam board.
The wood beam that's soft on the top is 'probably' built with 1 piece of wood along the top, a second separate by a gap making up the bottom if it's like my Classic. You could probably cut out the top piece and replace it if you're not happy with it. There are some lag bolts in there though so it can be a bit of a hassle.
Keep us posted, looks like a nice trailer.
__________________
--
2000 24' Classic, "We have the technology, we must rebuild it"
Also in the garage, some stuff to pull it:
1999 3/4 ton 'Burb
1993 Roadmaster wagon (well, it probably won't pull it)
|
|
|
09-25-2017, 08:38 AM
|
#4
|
Member
Join Date: Sep 2017
Location: OH
Posts: 6
|
thanks for the advice. almost might be easier just to cut out the foam than trying to remove this damned plywood off of it! its really stuck on there. there is some outer plywood damage at the lower parts near the windows. Its all dry now though and not wet. I am just planning to fill the loose parts with a heavy amount of construction adhesive before installing the windows as its only loose around the window frame area. Then clamping it all using the windows. I am hoping with no further leaks it should be fine.
|
|
|
09-26-2017, 12:00 PM
|
#5
|
Senior Member
Join Date: Jun 2016
Location: Ruston, LA
Posts: 276
|
Good idea, I did that on one of my least damaged sections too.
__________________
--
2000 24' Classic, "We have the technology, we must rebuild it"
Also in the garage, some stuff to pull it:
1999 3/4 ton 'Burb
1993 Roadmaster wagon (well, it probably won't pull it)
|
|
|
09-26-2017, 02:23 PM
|
#6
|
Senior Member
Join Date: Mar 2010
Location: Niagara Falls,NY
Posts: 4,219
|
Your choice on approach to wall repair
Just stating our experience. Most of the walls only had the soggy thin wood removed with a multi tool scraper blade. We did not find that the white foam held water. One or two panels were removed all the way back to the inner fiberglass. Try it both ways and see what you like. Either way it is a lot of work. I wanted dh to strip it all back to the inner fiberglass,but didn't win that argument. Please use liquid Bondo or like product to seal up interior fiberglass. It will seal up any pinpoint holes you can't even see. Use an industrial respirator and a cheap chip brush to apply. This tip came from J&R in OHIO. Bottom line our extensive repairs are leak free after six years.
|
|
|
10-02-2017, 02:45 PM
|
#7
|
Member
Join Date: Sep 2017
Location: OH
Posts: 6
|
Well it all went fairly well. Windows in and resealed, wood rebuilt at bottom. I used pressed wood and am having trouble stapling the new aluminum flashing around the bottom. Top back on and on the tracks.
However.... it looks like I might have gotten something messed up when i lifted the top. I jacked up the drivers side of the camper for the repairs, not disconnecting the passenger side. When I got it all back together and lowered, I heard a "pop" at the bottom. Figured it was just things settling back into place after being lifted. Well when i got to the campground (decided to test it out this weekend) I started lifting it and heard a terrible noise. This time from the passenger side of the camper. Looks like somehow it went a bit too low (maybe from being jacked up etc?) and the aluminum flashing that goes around the lower top wood beam (opposite the side I worked on) got stuck under the lower trim that it looks like the top seals against when its lowered. It cracked that trim and bent out the aluminum so that it was stuck on the lower section. I ran to work real quick and got my cutoff wheel and trimmed the damaged aluminum back and off and now the top goes up and down properly but the wood is exposed on the opposite side from my repair. There is no guide rail there so I am wondering if I have the drivers side spaced out a bit too far pulling the front top section slightly to the left. Or was it just a one time thing and it went too low from having it cockeyed and now its straightened itself out. Ah well just my luck. We are planning on a couple more weekends out so im just going to paint the exposed wood to waterproof it, and deal with it in the spring when I intend to lift the entire top off and redo all seals etc.
Thanks for all the advice guys. I am giving the reseated windows a couple days then im going to trim the Butyl rubber and Caulk. Any consensus on the best caulk?
|
|
|
10-02-2017, 03:04 PM
|
#8
|
Site Team
Join Date: Jul 2010
Location: Pine, AZ
Posts: 4,682
|
Use Lexel caulk, Bill. It adheres very well, is crack resistant and can be painted if needed. You can usually find it at ACE Hardware, or, online.
- Jack
__________________
Hi-Lo 1707T - Tire Minder TPMS on Tow Vehicle and Trailer, 300W Solar Battery Charger, Equal-i-zer WDH, Progressive Dynamics Converter, Fan-Tastic Fan, LiFePO4 battery 12V DC Electrical System, SoftStartRV mounted on A/C
2024 F150 Platinum FX4 3.5L PowerBoost SCrew
|
|
|
10-02-2017, 05:25 PM
|
#9
|
Senior Member
Join Date: Feb 2012
Location: Wisconsin
Posts: 1,256
|
How come you dont have guide on the other side??
Rick
__________________
2201 TL
2010 Nissan Titan king cab SE
4x4
|
|
|
10-03-2017, 07:11 AM
|
#10
|
Member
Join Date: Sep 2017
Location: OH
Posts: 6
|
I was wondering that myself. I have 3 guide rails on the Left side of the camper (drivers side) one at the rear, one approx halfway, and one towards the front. On the passenger Side, I have one at the rear, one behind the door, and one in front of the door, but none towards the front of the camper. It does not appear there ever was one, unless someone modified it for some reason?
|
|
|
10-03-2017, 10:58 AM
|
#11
|
Senior Member
Join Date: Feb 2012
Location: Wisconsin
Posts: 1,256
|
Three and three sounds correct.
__________________
2201 TL
2010 Nissan Titan king cab SE
4x4
|
|
|
10-03-2017, 12:51 PM
|
#12
|
Site Team
Join Date: Jul 2010
Location: Pine, AZ
Posts: 4,682
|
In my little 17 footer, the two guide rails on the curb side are on either side of the door. On the street side, they're near the ends of the trailer.
I suspect, since the door has no "rail" at the bottom edge, that is a weak space and the guide rails help keep that side from "sagging" in the door area.
- Jack
__________________
Hi-Lo 1707T - Tire Minder TPMS on Tow Vehicle and Trailer, 300W Solar Battery Charger, Equal-i-zer WDH, Progressive Dynamics Converter, Fan-Tastic Fan, LiFePO4 battery 12V DC Electrical System, SoftStartRV mounted on A/C
2024 F150 Platinum FX4 3.5L PowerBoost SCrew
|
|
|
07-16-2019, 11:01 PM
|
#13
|
Junior Member
Join Date: Apr 2018
Location: Chattanooga TN
Posts: 2
|
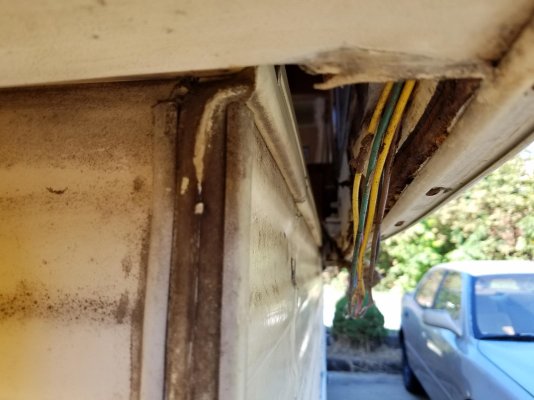
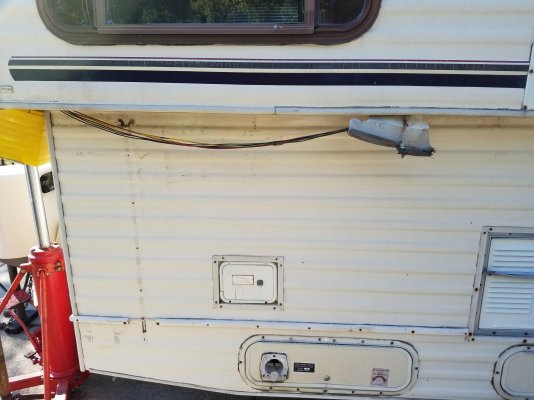
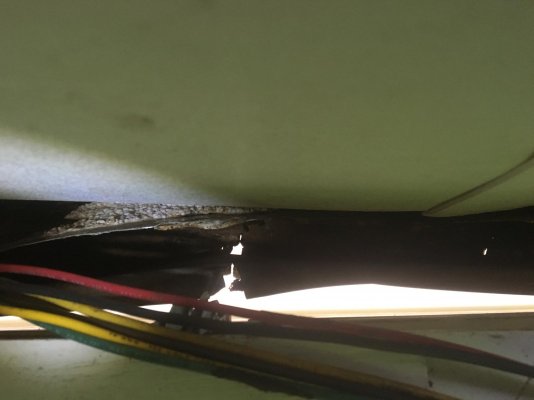
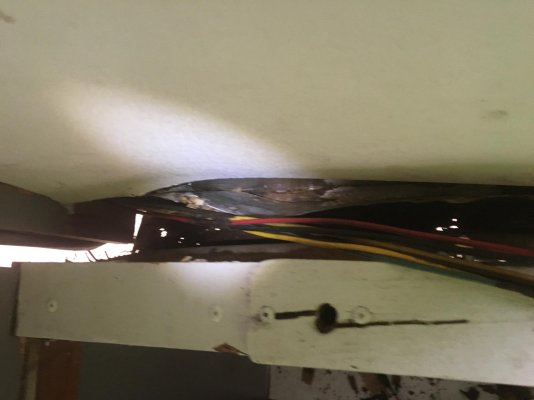
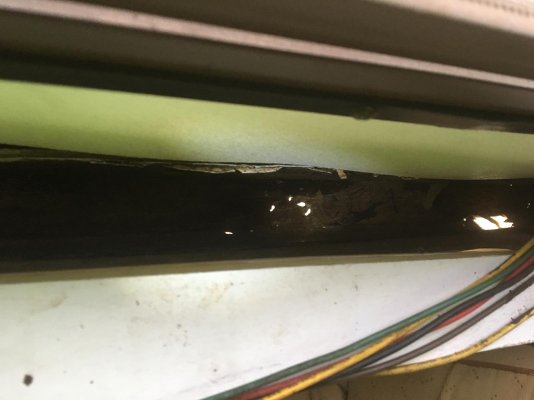
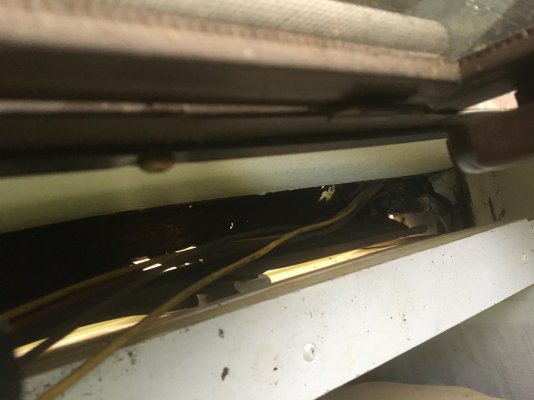
Almost finished with the remodel on our 89 funlite. While showing my wife how to raise the camper. We heard a weird sound and noticed the guide block on the ground. I have removed all of the rotted wood and have exposed the cavity. Wires exposed. What is the best way to install the new wood support. I see the lift cable. How should replace and attach the new wood section? Thanks for any help and advise.
|
|
|
07-18-2019, 01:44 PM
|
#14
|
Senior Member
Join Date: Jun 2016
Location: Ruston, LA
Posts: 276
|
Quote:
Originally Posted by Kevbofive
Almost finished with the remodel on our 89 funlite. While showing my wife how to raise the camper. We heard a weird sound and noticed the guide block on the ground. I have removed all of the rotted wood and have exposed the cavity. Wires exposed. What is the best way to install the new wood support. I see the lift cable. How should replace and attach the new wood section? Thanks for any help and advise.
|
Hi there - can you include a picture to show what you’re looking at? There’s lots of good info and help here and someone can probably give you a good push in the right direction.
__________________
--
2000 24' Classic, "We have the technology, we must rebuild it"
Also in the garage, some stuff to pull it:
1999 3/4 ton 'Burb
1993 Roadmaster wagon (well, it probably won't pull it)
|
|
|
07-18-2019, 10:37 PM
|
#15
|
Junior Member
Join Date: Apr 2018
Location: Chattanooga TN
Posts: 2
|
Pics of the damage. Now how to repair
The pics attached are from the front left side or drivers side of the camper. The wood from the fridge top edge to the front corner has rotted out and needs replacing. Not sure if how and what to replace with. I have a piece of 3/4 in marine plywood. I was planning on cutting two pieces and attach the guide block. Just wondering how to attach. Glue, screws from the outside. Also- the cable assembly is exposed and I thought about lowering the top just a few inches resting the top on a board to relive some pressure off the cable assemble. Any suggestions appreciated
__________________
|
|
|
|
Posting Rules
|
You may not post new threads
You may not post replies
You may not post attachments
You may not edit your posts
HTML code is Off
|
|
|
|
» Recent Threads |
|
|
|
|
|
|
|
|
|
|
|
|
|
|
|
|
|
|
|