|
04-15-2016, 10:49 AM
|
#1
|
Member
Join Date: Apr 2016
Location: mexico
Posts: 11
|
Need advice on replacing wood rot in walls
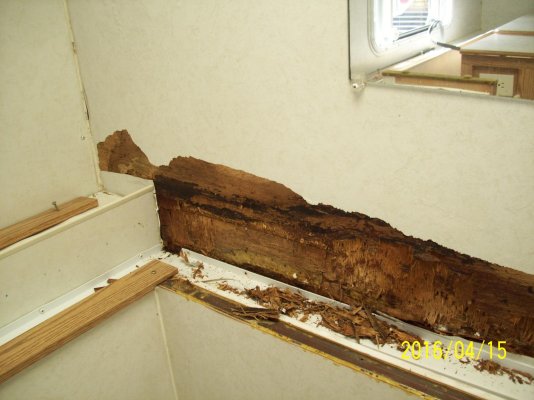
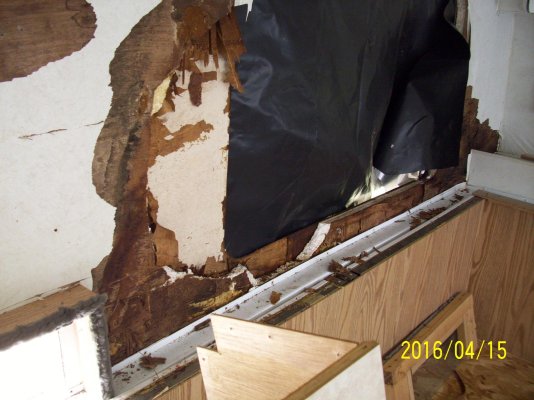
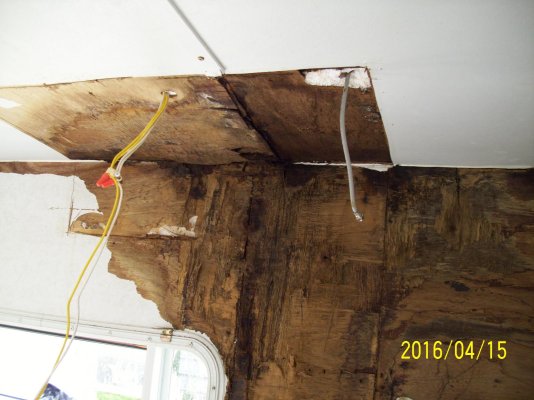
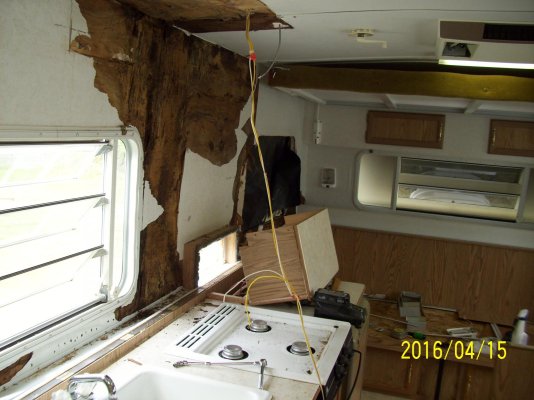
I'm new to camping and just bought a 2002 19TL and need to know how to replace rotten wood on walls. I have started but don't know the best way to replace most of the wood on the left side. Any help would be greatly appreciated... I live in Gainesville, Ga.. Thanks, David
[IMG]www.hilotrailerforum.com/f35/need-advice-replacing-wood-rot-walls-5096-new/[/IMG]
__________________
|
|
|
04-15-2016, 11:21 AM
|
#2
|
Senior Member
Join Date: Feb 2012
Location: Wisconsin
Posts: 1,256
|
DAvid
Could you be more specific? Most of the "wood" in a 2002 is either the cabinets or the "paneling" -----and, I guess, the underpinnings of the roof. Pictures or more accurate descriptions would be a help as there are many here who have done complete rebuilds and could certainly get you headed in the right direction. Sorry to hear about the damage.
Rick
__________________
__________________
2201 TL
2010 Nissan Titan king cab SE
4x4
|
|
|
04-15-2016, 11:35 AM
|
#3
|
Site Team
Join Date: Feb 2015
Location: SWFL Bonita Springs/Andrews, NC
Posts: 1,264
|
Rick, now that your safe and sound, what's the finial damage report?
Tree
__________________
Treeclimber
2703 Tow Lite
2002 Escalade
Bonita Springs, Fl. &
Andrews, NC
|
|
|
04-15-2016, 12:10 PM
|
#4
|
Member
Join Date: Apr 2016
Location: mexico
Posts: 11
|
Rick, I don't know how to attach a pic. I don't know how to find a url of my image. I could text you or email would be simpler for me.
Thanks, David
|
|
|
04-15-2016, 12:18 PM
|
#5
|
Member
Join Date: Apr 2016
Location: mexico
Posts: 11
|
Rick, I forgot to say what is bad.The bad wood is the plywood on both sides of the styrofoam.
I've been trying to post pics and failed. Could you call me @ 770533138six
|
|
|
04-15-2016, 03:20 PM
|
#6
|
Senior Member
Join Date: Feb 2012
Location: Wisconsin
Posts: 1,256
|
david
below where you would post a "reply" are two buttons. One says "post quick reply" the other says "advanced" click on the "advanced". Now, scroll down to where it says "attach files" and below that there is button that says "manage attachments". click on that. You will then see a box that says "upload from computer" and you can click on "browse" and it will allow you to search your computer or whatever device you are on for photos you have stored there. you can upload four per post. once you have selected what you want you can post them to the thread.
Rick
__________________
2201 TL
2010 Nissan Titan king cab SE
4x4
|
|
|
04-15-2016, 08:36 PM
|
#7
|
Senior Member
Join Date: Mar 2010
Location: Niagara Falls,NY
Posts: 4,226
|
Repairing wood wall damage.
Many of us have repaired water damaged walls. I have a heavier Classic model. Do a search in the old posts for wall repairs. You may need to peel back the skin and work from the outside. You may need to do some interior bracing. My wall layers were 1/8wood underlay then a sheet of styrofoam then 1/8th Georgia Pacific paneling that had the vinyl wallpaper on it. I used Heavy Duty Liquid nails to glue each layer together. It has been several years and the repairs have held up. You need to take out all your windows and reinstall. Utube has a video on how to do this. Leaky windows are a big source of water leaks. Post pictures so we can help you. You are wise to ask us questions.
|
|
|
04-16-2016, 05:07 AM
|
#8
|
Member
Join Date: Apr 2016
Location: mexico
Posts: 11
|
wood rot
Thanks for your help. Will I have to disconnect the lift cables to get the skin off? If so, in the upper or lower position
|
|
|
04-16-2016, 01:45 PM
|
#9
|
Senior Member
Join Date: Mar 2010
Location: Niagara Falls,NY
Posts: 4,226
|
Wall repairs
I showed your pictures to DH. He needs to know if your exterior is aluminum or fiberglass. We can better advise you.
|
|
|
04-16-2016, 02:03 PM
|
#10
|
Senior Member
Join Date: Feb 2012
Location: Wisconsin
Posts: 1,256
|
Wow david, you got some issues there but nothing we haven't seen before. There is no reason to disconnect the cables UNLESS you need to separate the two halves to do work. In that case- there are some pretty extensive write ups on how to do that. You can do a search or someone may send you a link. There is a "beam" of plywood that runs along the bottom of the upper section all the way around, and it forms the base, more or less, for the upper section. You would do well to try and ascertain what sort of shape THAT is in and whether or not the water damage got that far. You can get a better look at it by removing the strip of wood that covers it-----siad strip is often stapled and you need to get a prey bar under it to lift while trying not to break it. If you are not sure what I am talking about- look at the finished strip right behind the sink. Thats the one. Where the upper pulleys are mounted in the four corners there is usually a couple of screws that can be removed so you can access the pulleys. If the beam under that is extensively damaged then you are looking at more complicated work which may require separating the halves. In that case, yes, you would have to disconnect the pulleys. In any case, you would want to do your work with the top raised.
Rick
__________________
2201 TL
2010 Nissan Titan king cab SE
4x4
|
|
|
04-16-2016, 03:50 PM
|
#11
|
Member
Join Date: Apr 2016
Location: mexico
Posts: 11
|
It is fiberglass. I need to get approximately 4 inches below the plastic retainer that holds the rubber weather strip that seperates the top and bottom half to get the rotten wood and styrofoam out. It is glued to the fiberglass skin which I have already loosened to see.
|
|
|
04-16-2016, 04:05 PM
|
#12
|
Member
Join Date: Apr 2016
Location: mexico
Posts: 11
|
Rick, I have some of the fiberglass pulled loose to see that I have about 4 inches of the styrofoam sandwitched between the two pieces of rotten plywood which needs to come out. I can't figure out how to get it out. I have removed the screws that hold the plastic, 2 inch wide retainer, that holds the weatherstrip sealing the top and bottom. The screws were screwed into the plywood and styrofoam. You can see in the first pic at the very bottom of the plywood the retainer
|
|
|
05-01-2016, 05:04 PM
|
#13
|
Member
Join Date: Apr 2016
Location: mexico
Posts: 11
|
Rick, Thank you for your help. If it wasn't for you DH and Sam, I would have been in a mess. Going to start working on It again tomorrow
__________________
|
|
|
|
Posting Rules
|
You may not post new threads
You may not post replies
You may not post attachments
You may not edit your posts
HTML code is Off
|
|
|
|
» Recent Threads |
|
|
|
|
|
|
|
|
|
|
|
|
|
|
|
|
|
|
|