Intros and possibly help?

Bravada

Senior Member
Joined
Jul 1, 2017
Messages
144
Location
Adrian, Mi.
Possibly I am one of the crazy ones but I just bought a 2001 TowLite 26'. I see about 5-6 sq ft of delam total on one side. Wish me well.

We have camped for years starting with tents and moved up. The last adventure was a new purchase of an ultralight on 2005 just to have it rot from the bottom up. So we sold it with fully disclosing the base floor last week. So not to cry over spilt milk we are moving on... and we want to camp.

I think we bought this right and can stay ahead of the game. We plan on doing all the work ourselves. The inside shows very little history of water damage. With a well kept interior we're confident that the couple we purchased it from did their best to minimize wear and tear.

We live in south east Michigan and I'll be looking for advice,combing old threads, and praying. My first need is who is the resident Exorcist? Does he / she work cheap?

Thanks in advance, now lets go have some fun.
 
Last edited:
Bravada, Welcome to the forum, you've found THE place to answer ALL you Hi LO questions.
Delam is usually caused by water intrusion of course, so the first item is to isolate the area of leakage. You didn't say where the delamination was, under a window, along the roof trim, or below the awning. Hi Lo windows need to be removed and re-sealed every so often. I've heard anywhere from five to ten years. Each Hi Lo I've owned gets a reseal soon as I get it to my shop just to avoid trouble.
Stick with us and we'll get you through any maintenance situation you come across.
Again, welcome.
Tree
 
Welcome to the forum

Treeclimber said it best. We will help you with what ever questions you may have. Their is sure to be back posts on any issues you may have. Give us more information on where the delamination. Many of us,me included have done major rebuilds for water damage. You Tube has a video on taking out the window and resealing. This is a job you can do at home. DH and I have taken out all of our windows and resealed. Lexell caulk is good to use. It can be purchased at ACE Hardware,Lowes or on line. It is a premium caulk and costs about $8.00 a tube. Then you will need buytl tape for the window reseal. Enjoy your new to you HiLo.
 
2001 TowLite 26'. I see about 5-6 sq ft of delam total on one side. Wish me well.

I picked up an identical one in May, only mine is a 2000. No sign of any damage inside, but on the drivers side beginning at the range exhaust, down toward the window. Haven't measured it, but it's not too extensive yet. Discussed Relaminating here: http://www.hilotrailerforum.com/f25/spot-relamnation-5758/#post39206

I have used the Lexell to reseal around the driver's side windows, etc. plus the joint above the front window/rockguard and the trim on the edged including the roof trim. Still have to do the passenger side windows & door.

Everything else looks good. Just have to remove the Awning so I can put my 18' x 24' Pickin' Parlor / Living Room Tarp on (after parking at the campsite).:)
 
Last edited:
First problem I had was the roof wouldn't raise when I got home. Obviously it worked very well when we looked at it.
So the problem was a an old weak battery but I didn't have it plugged into shore power ( couldn't find my converter plug, it was still packed away with my former camper contents in boxes in the basement). From info gained here I thought I would jump the battery from my tow vehicle. Guess what some PO installed the battery with the terminals away from the service door making that a no go. Further inspection also hides the manual back up pump behind the battery. ( funny how it so easy to see when the top is up it makes so much sense how to use) then it torments you on how to get in there when you need it.
So in utter defeat it was off the the RV isle at Walmart for yet another adapter plug ( third one this year, but that is another camper and another thread).
Well in plugging into shore power the top just about flew off it went up so well. Closer inspection of the battery and to move it with its studs up front for the next round I found it had numbers scratched into the case 4/2011. Well so much for the PO word that he replaced the battery last year. He owned the unit 4 years. I would like to install two 6v if they will fit. So I'm off on a flying adventure and thanks in advance for all the help.
 
Id be surprised if two six volts will fit in that batterey box without altering it- and from what I have seen that means making the battery box deeper- which will impact your clearance. I'm an advocate of dual 12 volt battereis but other have begged to differ.

Rick
 
Hilltool, thanks, I haven't measured for height/ clearance. If that is the case I don't want to spend that much time making the modifications.

My delam is is all on the street side. Suprizing the curb side appears to be flawless. Mine also seems to start at the range/oven exhaust and proceds down and towards the adjacent window then runs below the window going forward. Below the front side window also shows damage. So it looks I will be pulling the two windows out and resealing in the process.

Are the plastic end caps ABS? Mine have cracks.

All appliances appear to be functioning fine.
 
Bravada, Seems to me another member had a leak that originated in that same area. He found that some part may have been installed improperly allowing water to enter. You might want to check that out. Many members suggest that when you remove any fixture, that you replace the screws with good quality stainless screws. (NOT from a big box store!). As for windows, all my Hi Los have gotten a window reseal almost first thing. Search the "search" panel at the top and you'll find several folks who've done this. If you're in a hurry to camp, then do a window at a time. Remember, BUTYL tape is our friend!
Tree
 
Window resealing

I can't encourage you enough to take out each and every window and reseal with butyl tape and Lexel caulk. Utube has a video on how to do this.
 
Great advice. windows are coming out to be resealed. If for no other reason than just clean up the caulk over caulk over caulk job. Slowly going through every system, appreciating the thought and decisions that were made. Then planning my plan of repair and prioritizing what order will best for me.

You folks are great.

Met a couple who invited us to the Michigan HiLo club outin next weekend. We are planning on going to the potluck Saturday pm. We will not go camping as the tires are the original. Want to meet and talk to other nut jobs and listen to what they have to say.
 
Good advice to hook up with a local HiLo club

We learned alot from our participation in our local HiLo club. We have had the pleasure to help another member out on several repairs.
 
Well I think/ feel that it all ours now. The PO left the black tank 3/4 and the grey 1/2 full. Hooked it up and ran up to the State park and used the dump facilities.

One other minor issue.
I don't seem to have the touch to release the ball when unhitching. I have been pulling the pin on the receiver and pulling fwd. then going back and messing with it.
There is got to be something I am not doing correct. Please advise.
 
Sorry the PO left "contents" in the tanks! That's not a friendly thing to do.

It should be easy to unhitch your trailer. You first need to disconnect any Weight Distributing chains or bars from the trailer tongue, so that the tongue is supported only by the Tow Vehicle ball and the trailer jack. Then, lower the tongue by retracting the tongue jack until it's off the ground. At this point, you should be able to slide the receiver latch to the rear, since there won't be any pressure from the ball on it. (If you can't, it's possible you DO have to move the TV forward just a bit to get the ball in the front of the receiver).

Then, just raise the tongue again with the tongue jack. The receiver should slip right off the ball.

- Jack
 
I used to have issues when my hitch was set up so that tongue was too low . This created a bit of an angle and the ball didn't want slide out easily. When I remember these days I usually try to spray my ball with white silicone grease before hooking up.

Rick
 
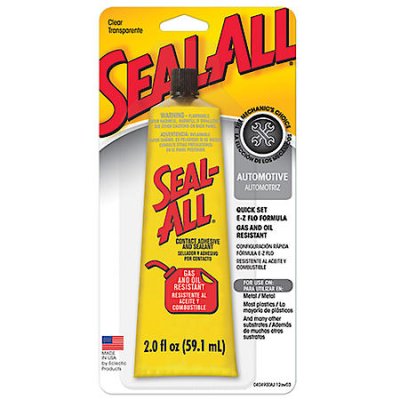
Found the Seal All at ACE. Hopefully later today the sink will be fixed! In no way am I associated with this product.
 

Attachments

  • IMG_0644.JPG
    IMG_0644.JPG
    52 KB · Views: 3
Forgot to mention that I made it to the Saturday potluck of the Michigan Hi Lo club. The DW couldn't make it. I felt very welcome and enjoyed the time spent with them.
 
When we returned home. I went into the camper to work on repairing the cracked sink. When I noticed the the A/C leaked. I tried to remove the interior shroud. No go.

I removed the right and left air filter, then removed the 4 sheet metal screws then the two knobs to control the unit. The shroud would tilt but not come down. It appears to be hung up on the duct that directs air to the bed in the front.

I have had this a week and it has been in the rain before and no leaks. This was an intense little down pour.

How many bolts are on the Duo-Therm A/C to tighten? I see two with the interior shroud still in place.

Should I remove the exterior top shroud and clean anything? Tighten anything ?
Seal anything?

Replace anything?
 
Remove interior shroud there are 4 bolts to re-tighten. I believe their 7/16 just re-snug them.The AC seal is a compression seal that will loosen ( De-compress ) over time. If its flattened out to much it will need to be replaced.If you think it is to flat replace it. New Seals are cheap insurance.
 
I like cheap insurance and being proactive. I was in Toledo today and stopped by one of the dealers there and picked up a seal.
 

Try RV LIFE Pro Free for 7 Days

  • New Ad-Free experience on this RV LIFE Community.
  • Plan the best RV Safe travel with RV LIFE Trip Wizard.
  • Navigate with our RV Safe GPS mobile app.
  • and much more...
Try RV LIFE Pro Today
Back
Top