|
01-02-2016, 07:11 PM
|
#1
|
Member
Join Date: Dec 2015
Location: Spring texas
Posts: 43
|
New owner 1994 funlite
Hi! We are new to us owners of a 1994 hilo Funlite. We have a 29 foot Holiday Rambler we use for the beach. But we wanted something a little smaller to take on a long road trip this year in support of my son who is hiking the Pacific Coast trail. We love to fix up things and my DH is enjoying the process! Our first camper was a popup camper. We loved it, but canvas and bed ends were a pain. So that's why we went with the Hilo!
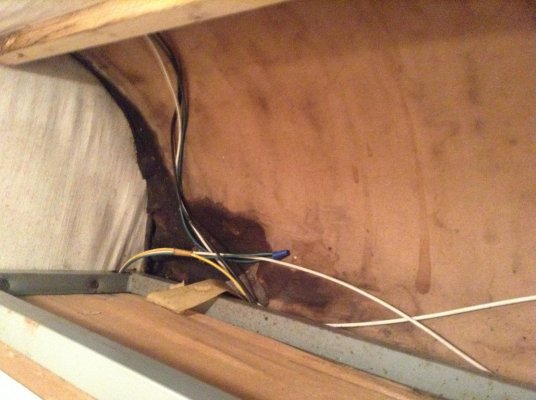
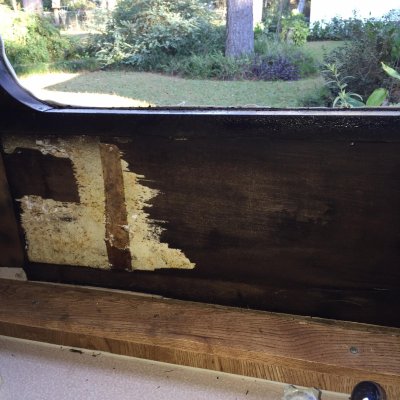
We have found evidence of water penetration in the front right and left corners.
So we will have a little work to do.
I enjoy reading your posts and look forward to communicating and sharing our adventures with you!
__________________
|
|
|
01-03-2016, 02:02 AM
|
#2
|
Senior Member
Join Date: Mar 2010
Location: Niagara Falls,NY
Posts: 4,224
|
Welcome to the forum.
You will have to take out all of your windows and reset with butyl tape and reseal. Lexel caulk is a good product to use. While the windows are out you will be able to see the condition of your interior walls. You tube has a video on this window repair. www.3Sam TLPX'S Library photobucket. Wall repair 4-6-2014. Keep the pictures and questions coming.
__________________
|
|
|
01-03-2016, 11:29 AM
|
#3
|
Member
Join Date: Dec 2015
Location: Spring texas
Posts: 43
|
Thanks!
Thank you for your comment. I figured we would have to reseal those windows. I am not looking forward to a tear down, but if it needs it... I was wondering if anyone knew anything about the cardboard material that is under the front window. Does it pull out easily? How does it structurally affect the camper?
|
|
|
01-03-2016, 09:16 PM
|
#4
|
Member
Join Date: Dec 2015
Location: Spring texas
Posts: 43
|
Ripped out not that much damage
DH got right in there today and started tearing into it. The wood was wet, but it seems we have caught it before too much rot set in. He took out the window and repaired the wood around the window and recaulked everything with caulk tape and butyl. Some more cosmetic work to make it look pretty and then to the next window. MDH wants to know if anyone has used expandable foam around the window frame and if you have had success with it. Oh and why can I only post one picture at a time per post?
|
|
|
01-03-2016, 09:55 PM
|
#5
|
Senior Member
Join Date: Feb 2012
Location: Wisconsin
Posts: 1,256
|
I have not used the foam and would be hesitant to do so because in my experience it is tricky to control. Why do you want to? I had some delamination I repaired using a waterproof adhesive for construction foam board. Others may have used the expandable foam but for that application I'm not sure what you are gaining other than filling n space?
Rick
__________________
2201 TL
2010 Nissan Titan king cab SE
4x4
|
|
|
01-03-2016, 11:13 PM
|
#6
|
Senior Member
Join Date: Mar 2010
Location: Niagara Falls,NY
Posts: 4,224
|
water dammage repairs
I am not computer literate so my link didn;t work. When you go on the website go under off topic Restoration pictures and descriptions 11-07-2012. This will give you a link to our photobucket pictures. We did extensive wall water dammage repairs on our 1990 25ft. Classic. The repairs were done from Sept. 2012 until Feb2013. We have not had one drop of water come since our repairs were completed. I would strongly advise you to rip out all wood/paper until you see the metal framing. Guaranteed the wood will never dry out and the foam insulation/paper backing will be full of black mold. No easy quick fix. We did use a small amt. of expandable foam only as a last resort. Lexel caulk was used. Your sheets of foam will come close to sealing the window. We did not have to repair the inside curvy ends. PM DH Bill if you want a phone consultation. I don't sugar coat the amt. of work that is needed. It is all repairable and worth the effort.
|
|
|
01-03-2016, 11:21 PM
|
#7
|
Member
Join Date: Dec 2015
Location: Spring texas
Posts: 43
|
Water damage repairs
Hmmm. I am more inclined to tear it all apart. My husband's only hesitation is he is afraid he will cut a wire in the wall. This window is the escape window above the sink. Anybody know about any wires there? I agree with you Sam. While you got it ripped apart ya might as well go all the way.
|
|
|
01-04-2016, 01:41 AM
|
#8
|
Member
Join Date: Dec 2015
Location: Southern CA Riverside County
Posts: 11
|
If you take out the screws and rip the panels out by hand you shouldn't harm the wires.
|
|
|
01-04-2016, 04:09 PM
|
#9
|
Senior Member
Join Date: Feb 2012
Location: Wisconsin
Posts: 1,256
|
I had water damage around the same window----in my case I deduced it was coming in from the external vent housing for the hood fan. It came down the wall and hit the window frame then travelled around and settled on the bottom. I would pull that vent outside and see if you dont have water damage up there. That said- I did not run into any wires in that wall. Looks like you may have pulled up the trim covering the beam that is the bottom base for the upper wall. If that is good- you are in decent shape. I used one of those tools that vibrates ( flat horizontal blade) that they advertise on tv for cutting into dry wall etc. works great for cutting out wet particle board or whatever. I was able to cutaway inner bad stuff from outer sheathing- but mine is fiberglass. The wires I encountered ran through top cabinets or along the floor. Have fun
Rick
__________________
2201 TL
2010 Nissan Titan king cab SE
4x4
|
|
|
01-04-2016, 11:32 PM
|
#10
|
Senior Member
Join Date: Mar 2010
Location: Niagara Falls,NY
Posts: 4,224
|
water dammage
Hilltool has given you some good advice as to where the wires are located. We had a lot of leakage around our escape window. A good tool to use for tearout is a multi tool. We purchased ours at Harbor Freight. Extra blades were needed and are readily available for purchase. Even if you were to cut through a wire it is possible to splice/fix.
|
|
|
01-05-2016, 10:30 PM
|
#11
|
Member
Join Date: Dec 2015
Location: Spring texas
Posts: 43
|
Great advice. I have to get in there to see if there is a vent for the stove. Thank you!
__________________
|
|
|
|
Posting Rules
|
You may not post new threads
You may not post replies
You may not post attachments
You may not edit your posts
HTML code is Off
|
|
|
|
» Recent Threads |
|
|
|
|
|
|
|
|
|
|
|
|
|
|
|
|
|
|
|
All times are GMT -5. The time now is 02:46 PM.