Hi Lo Forum Newbee

Dabbler-HILO

Member
Joined
Jun 30, 2012
Messages
27
Location
Caro, Mi.
Hello All:

This message wil be short, but I promise to add more later. I am a retiree... age 79, and I try to keep busy with computer graphics, and pyrography, (2) days ago I picked up a new chore.

I just purchased a 1980 Hi Lo 21' D FunChaser model. Although I have had other trailers, over the years, and have camped in several different types of enclosures as well, from a pup tent; (3) man mountain tent; famlily tent; (2) pop-up (Apache) campers... this type trailer is one I have been searching for. It needs a good bit of TLC, but I'm certain it will make my wife and I happy to be camping in it, when I finish going through restoration.

I have already begun to clean it up. It's sad to see how previous owners would allow a rundown condition to occur.

After spending many hours on the computer searching for information concerning repair and servicing a HI LO trailer, I found H.T.F forum on Facebook, by chance, and copied information from HTF member "Sting32" regarding an owners manual. As others have already done so... I too want to thank "Sting32" for inserting this information. It will certainly save me time and guess work in putting our trailer back into shape.

I will post pictures later, and add more information, but for now I have a patient to attend to outside.

Drive Safe: Dabbler
 

Attachments

  • Dabbler Avatar.jpg
    Dabbler Avatar.jpg
    20 KB · Views: 31
Last edited:
Welcome

Welcome. I am also new to the forum and HI-LO's and in the process of a total rebuild of the entire top half, and need to be done by July 3rd :eek:

This is the best place to go for any information you may need. A great group of people and very helpful. I should know I have asked many questions in the last several weeks :D and have always got a response and very helpful information.

From experience it seems a small job ends up being a much larger job, hopefully it will not be in your case.

Welcome and good luck.
 
Welcome to the forum

Dabbler welcome to the forum. I admire your spunk at your age. We are here to help you in your restoration. Let us know exactly what repairs you need to make. Many of us have older units that are sturdy. Several of have had to do extensive renovations on our units. I too cringe when I see a RV sitting in a yard,field rotting away.
 
Hello... Hi Lo people:

Lengle...Sam, day one of restoration has been off to a bad start.

First however let me say this... I've purchased many different items in my life, and have had pretty good luck in making certain what I was buying was worth the price. One can look a used camper over and over, untill they are blue-in-the-face, and still not know what they are getting, or what they finally bought, until they try using all the immenities it has to offer. As the old saying goes... "when buying an old horse... Buyer Beware".

Still, at this point in time, I'm still certain I got a bargain considering what this model would sell for if in A-1 (not brand new) condition, what I paid for it.

Yesterday started with simple chores at the front on the trailer. A bucket of warm water and cleaner to the walls, cabinets; cleaning dust, nicotine residuals, cooking grease and spider webs from everywhere.

I removed the hinged, split-dining table and wall retaining brackets, and stored them along with the cushions. Surprise... surprise, now I find some hinges for the storeage box lids which the cushions rest on, are lacking screws or are totally without screws. Of course you realize, all screws throughout the trailer require a square end bit to remove or replace them. These particular screws are not available in this small town.

My trip to the supply store led me to purchasing a couple driver bits, some #6machine bolts, nuts, washers, fender washers, and lock washers. Particle board as it ages, loses some of its ability to still be solid. All hinges were replaced and leather covers were stapled back in place over the hinges, to protect cushion bottoms from being cut open on the bolt heads

Another surprise was forth coming; I lifted the table top from its lower level position for traveling. Square tubing supports and hinged brackets were junk. I'll replace them by reinforcing the table top to be a solid piece rather than a folding two piece, and use (2) different length pieces of 3" PVC tubing... painted, as support legs. A flange is screwed to the tables under side. One tube length for the upright position; one length for the bed level position is inserted or removed. The other end of each tube will have an end cap for a foot piece to support the table when in desired position. This is similar to the arrangement Apache trailers were set up.

Tomorrow I'll let you know how the rest of this day went. As of now, due to driving all over creation searching for other necessary items, and the 90, degree plus heat to work in out side; I'm tired. Tomorrow...

Drive Safe
Dabbler
 
Restoring your HiLo

Chin up tomorrow will be better!! Put on your favorite tunes as you work. You can order any screws you need from McFeelys screws on line. Seems like you have the abiliyt to fix things and in some cases better than original. Every time we go out it seems like something needs to be fixed. We call my DH Toolman. We he dies I promised to put some tools in the casket so he won't be lonely. Hope your next work session goes better.
 
Sunday:

My day of rest had just been invaded. Sam, I would like to say things did get better, but... during the moments of checking the fresh water holding tank, I attempted to turn the drain valve to open position. Guess what! It was frozen, or shall I say... seized more than likely, from non-use. Also there was no drain hose attached. The past owner had to be using park water from outside hookup.

Now became a crucial moment; I had two pieces of valve instead of one. Fortunately, it remained in the closed position when the stem and lever came off in my hand. Since there was no way to find out if there was any water in the holding tank; the battery was not hooked up, I couldn't run the pump to force water if any , to the sink. I did not have any AC hooked to the in coming source power source either. I did the next illogical step. I removed the remainder of the valve. Bad decision... There was water in the tank. I wasted no time getting the blasted valve back in place. However water wasted no time doing water does best. It got scared and made a Beeline for the door. Fortunately I had cleaning rags to catch most of it before it got to far.

For the next two hours I chased around town looking for a replacement. I finaly located a small stainless steel valve used in most home to shut off water to individual outlets; sink, toilet and so forth. Not just any valve would do since the distance from the bottom of the tank to floor was very minimal.
I bought clear plastic hose to connect and drop through the outlet in the floor for draining purposes.

I cleaned the slide window tracks in this end of the trailer... could have planted some sort of flowers in the junk that was there. They work pretty good now. Will have to find weather stripping for them, as they are neary dried out. Then came the refrigerator. It looked like it hadn't seen a cleaning since who knows when. The freezer door would not stay closed; the racks... yuck, and its seal disintegrated upon inspection. After cleaning it, I found some strip sealer in my work shop, and replaced the old. As I mentioned the freezer door would not closed. The plastic hinge housings were cracked and the coil torsion springs were very weak. I'll find something before too long to rectify this. The stove... it needs a good cleaning as well.

Moving outside while I still had some day light, I noticed puddling beneath the center of the trailer. The hydraulic lift cylinder is leaking. Minutely, but, non-the-less, it's leaking. I also noticed also the trailer was not lifted to peak position now. Cutting (4) 2"x4"s to 27" lengths, I placed them upright on the frame, for and aft, and lowered the top. Over all... the top rested quite evenly. Checking the lift cables I noticed (2) for the front were slack.

Monday:

Found the lift cable adjustment nuts. Wouldn't you know it... they are located behind the left front tandem tire. Fortunately, I had a old crank up screw jack, I inherited from my Dad years ago. Never had reason to use it, but would not throw it out either. Thanks DAD! He taught me to save even the tinyest of screws, bolts, nut, etc. when getting rid of useless items.

Against all odds, I hoped for better, but not to be. Rented an impact gun to remove the left front wheel. Found the cable adjustment nuts to be rusted and nearly frozen to the cable stems. Soaked them good with liquid wrench. After more searching, I was able to find some sleeve spacers to take up slack on the cable ends before putting lock nuts back on. Removed the other wheel and packed both bearings while there. Will catch the other wheels a bit later. I will still have to go back again to cable adjusting... todays work brought front and rear to within an inch of being even. The rear adjusting cables are next.

You know... this camper was supposed to give Momma and I a break; we were hoping to take a vacation sometime this year. We haven't had one since 1984. That's a whole 'nuther story.

So much for tonight.

Drive Safe
Dabbler
 
Fixing HiLo

Thanks for keeping us posted on all your adventures. I know parts might be available for your Dometic freezer door. Do an internet search for Dometic.Have your model #. No matter what is wrong with the HiLo it is fixable. Many parts are common to any RV. Make sure your Ref. works before you spend $ on parts. I remember what fun we had when we got our HiLo. Picking flies out of window tracks. If you need any parts you could try JR repair in Ohio or my HiLo dealer as theywill ship parts anywhere. Mantelli trailer sales Inc.6865 S. Transit Rd. Lockport,NY 14094. Ask for Jay in parts. He has been at the dealership a long time and is very experienced in HiLo. Fax (716) 625-8599. You can call just to ask questions. Jay@Mantelli.com Phone (716)625-8877. This might also be helpful for you Get a master catalog for camping world. That way you can look up parts and see what is available. Always do a search on the internet to see what is the best price. Take care and keep us posted.
 
Repairing what is repairable.

Thanks for the information Sam. I had already asked for possibilities of obtaining a parts catalog from a local trailer sales/repair center here in town. Politely, but assuring information from them led me to believe I would be cutting into their sales, or repair business. They should have known that was my intentions. Nice people none-the-less.

Today and tomorrow, (4th of July) will give me a reprieve. I spent all day in the 90 degree plus heat crawling back and forth 'neath the trailer. Went through gallons of water. I thought I would not be able to walk today, but I feel fine. This reminds me of remodeling our home. Took me 4 years to go through all rooms; some from sub floor to open ceiling in attic. Especially was the case in the bathroom. I gutted it, and reworked everything from fixtures, furniture, wiring, and plumbing. I didn't do anything fancy, yet tried to keep the appearance similar to its structure when it was built in 1938. The cast iron wall to wall tub was replaced with an extra large walk-in shower. Momma and I are getting older. In the kitchen I had to relocate and build new cabinets to accomodate what utensils and needs that our life style now require. There are still some features I have to attend to, but they are not pressing.

Hey! speaking about Momma and I getting older. Here's a little hint you might want to use. My wife is short and her arthretic hands do not grasp well as she reaches for closely stored cereal boxes or other packaged boxes on high shelves in the kitchen.

3M makes and packages double-sided self sticking 1" x 1" squares, that can be used for wall bumpers when opening a cupboard door. Take 2 of these stickers, leaving the protecting paper intact. Carefully place one edge of sticking sides together, without allowing the full surface to come together. Bend the pads in half... one in each direction, to make the figure of 2 " Ls "... back to back. Press the remaining sticker portion of this configuration to the bottom edge of cereal boxes or what ever, and presto you have a horizontal pull tab to grasp. When the boxes are empty, it's possible to lift the tabs and place them on other replacement boxes to shelve. It works pretty slick.

Will keep posting as work progresses.

Drive Safe
Dabbler
 
Welcome Dabbler to this great Hi Lo Forum.

You will find much useful information here and from the sound of it, I believe you will be providing input later on rather than asking for information.

I had a problem with our table also. When we bought it last July, we drove it about 40 miles to our home. When we got there, the table had pulled loose from the mounting. No wonder since all they used were dinky little staples. I reattached the 1/2" thick mounting to the table top with screws and thought all would be well. The first night out we used it as our bed. As I was crawling across to the inside, the darn table fell off one side of the bench it rests on. I sanded and finished a couple of strips and added to the bench so that it would rest squarely with no way it would work off the wood strips.

We set our table up as a bed and leave it out during our outings using collapsible tables to eat from. I have never seen a split dining table, all three Hi Lo's we have owned have been solid table tops. I agree with you insofar as replacing your split with a solid top.

Good luck with your project.

Jerry Curtis
2406 T
 
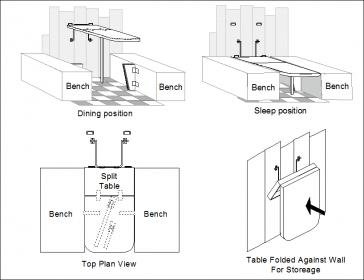
jcurtis95 and all... was going to submit a quick sketch of the split table, but I'm not certain the forums picture size allowance will give you an idea of what it looks like.

Anyway, today we tackeled the wiring service. I asked my brother-in-law; a certified electrician, if he would come out and look at the wiring mess that was passed onto me in my purchase of our Hi Lo. This is one of the troubling factors that could not be recognized immediately, when buying an older trailer.

At 9:00 AM we began to sort things out.

We spent most of the day trying to determine why the wiring system didn't function as it was designed by the manufacturer. I have schematics of both truck harness system and several wiring schematics which I downloaded from the internet for Hi Lo campers.

One major fault was finally realized; a circuit breaker located in a cupboard at the kitchen sink was faulty. It was a combination ground fault interupter/circuit breaker. It protects electrical outlet receptacles located at the kitchen sink and one outlet on a vanity by the bathroom sink. I couldn't buy that exact type locally. So what we purchased a 15 amp. Square-D circuit breaker for the breaker box. Then replaced the outlet receptacle at the kichen with a GFIC outlet plug receptacle. Since the bathroom sink is located in line with the kitchen sink outlet... it too is protected by the same GFIC outlet at the sink in he kitchen.

The pickup outlet plug we agreed was correct as it should be, but a 40 amp. blown fuse in the large fuse box under the hood was a partially a cause for not getting power to the trailer. Another reason we had no power was due to the fact there was supposed to be another power lead through the wiring harness to the trailer outlet receptacle.

It seems during manufaturing of the vehicle, that specific wire is bundled, and taped to the main harness. It is only used if a trailer package is to be operating on the truck. This wire had to be hooked up to the fuse box connection post, in order to serve power to the brake control system of the camper. Now, that much was looking better.

Checking the pigtail wiring to the coiled cord, leading into the camper was something else.

The coil cord had been cut open at one time; busy fingers of an owner with no idea which wires were to be put back in proper position upon reassembly, got things all screw-joyed. As a matter of fact the "white ground" wire was hooked up as a "hot" lead, and the "hot lead" was screwed to the trailer frame as if it was a ground wire. The color co-ordinated wires had been coupled at random.

By 7:30 PM this evening the job was completed. Everything was back to its proper position and functioning as it was meant to. My wife and I took my sister and husband out to dinner. He certainly worked for it.

Tomorrow I go back over the work; permanently solder and tape all new connections going into the camper. After that it's back to work inside cleaning trailer and preparing it for a paint decorating overhaul. There is still much to do.

Hope everyone had a safe 4th of July.

Drive Safe... Dabbler
 
Dabbler,

I believe you are a person that loves challenges and tackle them head on. It sounds as if you have been very busy. It sure helps to have a brother-in-law handy that is an electrician! It gives one a good feeling to clean up a mess left by others and, from your post description, you are doing a great job.

I recall having a problem with that 40 amp fuse to which you referred. The wiring diagram was very vague on the Chevy K-5 as to the location and it had no fuse in it.

By the way, when you upload pictures, drawings, etc., the Forum up loader will convert your mega-byte sized pictures down to a few k bytes.

Looking forward to some pictures when you get the chance. Good Luck with your project.

Jerry Curtis
2406 T
 
Electrical problems

Wow what a mess the electrical on your trailer was in. Every family needs an electrician. Now you should have some peace of mind that everything is in safe working order. Glad to hear you took them out to dinner. Will work for food!! DH has sodered quite a few wires/ights on our HiLo. Especially the back tailights. Many who do some serious travel have climbed under the HiLo and sodered every possible connection wire. Those going to Alaska have done this due to the extra harsh driving conditions. We got our HiLo fron Mantelli trailer sales. They were supposed to have gone through all the systems and checked everything over. Hooked it up to our truck and it had faulty wiring in the tongue area. Gee,I;m so glad they checked everything. They had to fix it right then so we could tow it home. Most all the major systems worked,just found a few minor things. Back to a previous comment. Everything is fixable on a HiLo.
 
Before you paint.

Press on all your walls both inside and outside to make sure nothing is spongy/delaminated. I also would check your roof and do these repairs first. The roof may need to be primmed and then coated with the kind of material for your roof. Specific paint for the kind roof you have. Wash first ,prime and paint following all the directions on the can. You probably won't like me adding to your work list. All your windows need to be taken out scraped of old putty. Butyl tape applied,reinstalled and then Lexell caulk is put around the window where it meets the fiberglass. I would think you would want to consider doing this before you do the interior painting. While the window is out it will give you a "good snap shot picture of the condition of your interior walls." Defeniately you want to purchase a 100 ct. box of stainless steelscrews. I got mine from McFeelys on the net. Replace any screws that are rusted. I tell everyone that you need to do the window fix to all windows that are ten years old. I need to do one more window on my HiLo,it has been so blasted hot I have been staying in the central AC and cleaning my house. Keep the posts coming as we enjoy hearing about all your adventures.
 
Sunday (7th) had a day of rest. Traveled 100 miles to a family BBQ and get-to-gether. Took my mind off of the inevitable tasks still to come. Monday it was back to cleanups.

I must have been pretty tired Monday and Tuedsday. I tried posting both evenings... just nicely got to the point where I could send, and bless it all, I hit close. Yes both days! I gave up, called it a day, and went to bed early.

I did solder all connections at input wiring from the truck to camper. Wrapped each individually, and then bundled all with a sheath similar to that used bundling wires in the truck engine compartment. A neat job if I do say so.

Worked on the cook stove for 2 days. I know, the camper is 32 years old, but darned if I could imagine my wife or I letting an appliance get to looking like this was. The burner tray and cover was never cleaned properly, and the chrome plating was pitted badly enough to allow rust to come through.

After cleaning, I fired up the top burners and oven, to make certain they were functioning properly. I'll have to recheck the oven... I'm not certain how much flame should be seen when asking for 400 or max. degrees temperature. The pilot light works OK. This afternoon I'll have a go at the sink, and counter tops.

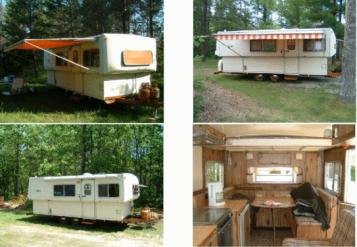
Here is a quick sketch of folding table and camper as it looked when we bought it. The table/bed configuration must have been a late engineering design before building this model camper. It certainly doesn't impress me. Will see it gets changed.

Sam... I appreciate your reminder comments regarding weather stripping before painting. Sometimes most practical measures get way-laid by the hurry to get things done.

JC... in my engine compartment of the 2008 Silverado, the main fuse box has a layout of all fuses and purpose, inside the lid, both for the gas engine and a deisel engine if so installed. It is also cross-referenced with the owners manual. I also realized as you mentioned, HTFs ability to cut all pictures to required size for message format. I usually do that in my graphic software, before sending any pics by Email.

The camper according to these pictures says, "I need someone to come by and give me a nice home." It turned out to be like buying a cute Chihuahua. Sweet as can be to look at, but it proved to have a viscious bite. Oh well I'll tame it. I also didn't at the time of purchase, and still do not like the trim paint job it was given. That has to go.

Finally... on a second post I'll send a few illustrations of what I would be doing in place of cleaning up behind someone elses mess.

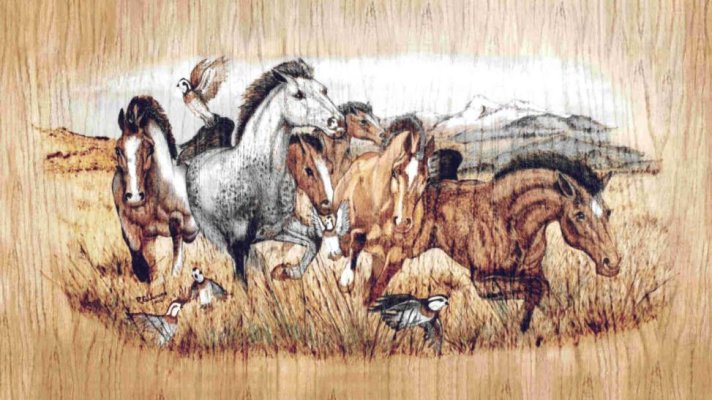
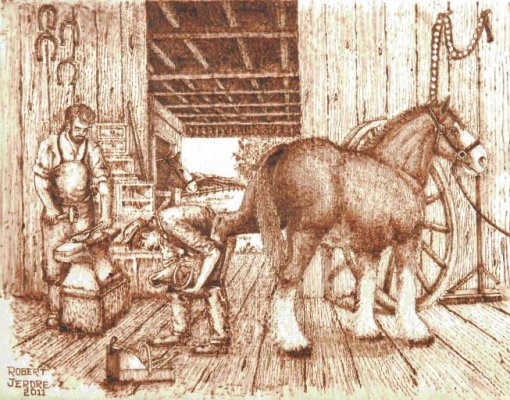
Woodburning (Pyrography) is a hobby I've been occupied with for severals years. Computer graphics of Antique autos has been more recent... like since 1996.

I'll post them on a second page. Hope everyone had a happy 4th of July.

Dabbler
 

Attachments

  • 4 Hi Lo pics.jpg
    4 Hi Lo pics.jpg
    20.4 KB · Views: 61
  • Split Table Top.jpg
    Split Table Top.jpg
    16 KB · Views: 51
Just a few illustrations in Pyrography and Computer Graphics.

Also is a manuscript I put 10 years into of Daisy Air Rifles, B.B guns and other makes and models from 1866/2000. Something like 400 or more computer drawn illustrations.

My big problem is publishing costs. Maybe some day I'll see it finished.

Later... Dabbler
 

Attachments

  • Finished -2 (meant for Email only).jpg
    Finished -2 (meant for Email only).jpg
    21.1 KB · Views: 28
  • Band of Horses.jpg
    Band of Horses.jpg
    102.8 KB · Views: 27
  • Shoeing Clysdale-1z.jpg
    Shoeing Clysdale-1z.jpg
    101.5 KB · Views: 27
  • Dodge and cows.jpg
    Dodge and cows.jpg
    20 KB · Views: 27
  • 59CadHt1.jpg
    59CadHt1.jpg
    81.6 KB · Views: 25
HiLo restoration

Dabbler,Wondered where you were the last few days. Glad to hear you got to do something fun(barbeque.) All work and no play makes jack a dull boy!! DH things you would not have a huge flame at 400 degrees. Use an oven thermometer to check if the oven holds a true temp. One of the benefits to have a working stove/oven is it throws off a little heat while you are cooking breakfast. Just keep all vents open!! Not everyone can earn the (good house keeping seal of approval.) Re: your filthy stove. I've helped friends out and cleaned my share of filthy stoves and refrigerators. Thank goodness gloves have been invented!! One stove/oven was so bad regular oven cleaner wouldn't work. It went to a close by Janitorial supply and bought industrial oven cleaner. It is stripper for greasy deep friers at restaurants. When I get to heaven I know I will get a promotion!!. I had hoped to get to do a few chores on my HiLo. It was not meant to be,spent the last few days on Hospice care with my 18yr.old cat. Today was a real rough day as we had to have her euthanized. She will forever be in our hearts and memories. Thumbalina died from Kidney failure. Any way love your posts,keep them coming.
 
... spent the last few days on Hospice care with my 18yr.old cat. Today was a real rough day as we had to have her euthanized. She will forever be in our hearts and memories. Thumbalina died from Kidney failure. Any way love your posts,keep them coming.


Dabbler--spectacular art! Looks like your HiLo is in good hands.

Sam--Sorry to hear about Thumbalina. We had an old gal--Rosie the Cat--die at 17 yo. My sons promptly dubbed her Saint Rosie Katz of the Royal Order of Arachnobane. Every cat after her had to rise to her standards in order to be included in the Royal Order. I expect to see her in heaven. The older they get, the sweeter they get. You have my condolences.

Ron
 
Sam

So sorry about your cat. Those are hard decisions, but the right decisions, and she needed you to do it for her. TAke care of yourself

Rick
 
Passing of a family member

Tough decisions Sam... I've had to put down (2) dogs. One because of kidney failure, and the other because of severe stroke. We are now faced with that decision again some day in the uknown future. We have a rescue mixed terrier, we believed to be about (8) years old when we got her. We've had her for a little over (7) years now. Never had a dog that could read our minds as she does.

She controls our get up time... go to bed time... when I'm supposed to brush her out in the morning. If my wife's cell phone rings, or should she call my name, and I'm not in the house, Missy comes running and barking to let me know.

The most surprising thing to find out by chance, was when I asked the wife if she would like some K-F-C (Kentucky Fried Chicken.) Missys ears perked up and she raced for the door to go with me. It never fails to get that response from her, and she loves it.

When her time comes as surely it will, she will be the last to bless our home. Your Thumbelina may be gone, but the good memories will always be there.

Later... Dabbler
 

Attachments

  • Missy5.jpg
    Missy5.jpg
    16.9 KB · Views: 12
Sam,

So sorry to hear of your loss of Thumbalina. It is especially heart rendering when it requires one to make the necessary decision to put a furry friend down. Next month will mark the 5th anniversary of the decision we had to make for our beloved Bronco. Bronco was put to rest on August 17th, 2007, 30 days before his 17th birthday. That this 125 pound Akita/English Mastiff lived that long mystified our vet for the normal lifespan should have been 8 to 9 years for his size and breed. He was our constant companion and was known all over the world through our associations conventions. He was a gentle giant, loving kids, and people. Putting him down was akin to pulling the plug on a beloved family member He was a rescue dog, coming to Colorado from California by our neighbors and he adopted us, and our friends soon realized this and made it a permanent arrangement. We enjoyed him for 15-1/2 years. Two years ago we took his ashes and spread them on our former mountain home in Colorado that he dearly loved.

God Bless.

Jerry Curtis 2406 T
 

Attachments

  • scan0046.jpg
    scan0046.jpg
    80.1 KB · Views: 8

Try RV LIFE Pro Free for 7 Days

  • New Ad-Free experience on this RV LIFE Community.
  • Plan the best RV Safe travel with RV LIFE Trip Wizard.
  • Navigate with our RV Safe GPS mobile app.
  • and much more...
Try RV LIFE Pro Today
Back
Top