Wardrobe Storage Ideas?

RichR

Moderator
Site Team
Joined
Feb 26, 2010
Messages
3,385
Location
NW PA
We have been trying to maximize the storage and access to the wardrobe in our 2310H. It is basically the same that has been used for too many years already. I would rather see drawers or shelves or something built in that would be more efficient. We have tried about every form of plastic bin/drawer that will fit in the opening and it still always almost works but not quite. After having had five popups and a 1705T we have collected about every form of storage unit there is.

Has anyone made any modifications or found anything that really works?

Thanks,
Rich
 
Wardrobe Storage

We hang everything on hangers then we run a piece of duck tape across the top of all the hangers to keep them in place on the road.

Kengsr
2306C
 
We have a 2704 TL and do extended stays which requires more clothing and storage. We utilize the hanging closet for laundry and other things and have, when parked, used a ceiling light chain attached to an open screw hook on each side of the bed ceiling area to hang clothes on. When traveling we just lay them on the bed. We also insulated the top shelves with 1/2 styrofoam (side & top), secured with liquid nail, to keep the walls from sweating on things stored there. I caulked the joints to seal the seams. Works fine! We do use plastic trays for underwear, socks, etc in the top bins.
 
We took a canvas shoe holder that is designed to be secured to the bottom of a bed, cut it down and secured it to the inside front wall of the closet. So, when we open the closet door, our shoes are all lined up.

We saw a hi-lo that someone secured zippered mesh bags to the underside of the flip-up counter that held smaller clothing items. When the counter was down, it also prevented the hangers from jumping off the rod during travel.

We have a plastic 3-drawer dresser that we set under the dinette (between the seat and table leg) when we are traveling, and set on top of the wardrobe counter when parked.
 
No, not really. We are more for folding our clothes and keeping them in drawers. But we are trying everything including the hanging things that are like shoe holders. We got them at Ikea, they come close but still don't fit the cabinet. The wardrobe is a space waster the way it is built. I would take shelves or drawers over it.
 
Last edited:
My wife and I have also looked at a number of storage devices designed to hang in a closet and meant to maximize storage efficiency. We've found these at The Container Store, the tent section of Cabella's, and other stores (sounds like you've gone through the same process at similar stores in your area). Frankly, none have been perfect solutions.

I've considered putting permanent shelves in our wardrobe. but haven't because I like keeping the option of hang-up storage. Consequently, I've been looking at wire shelving. Carried by Home Depot, this stuff is actually designed for home closets. The wire shelves latch into vertical support brackets mounted on the rear wall... a design that enables them to be placed at different heights, depending on individual needs, or removed entirely, if needed. The shelves are easy to adjust/remove since they're not permanently attached to the support brackets! The shelves are cut to proper length with either a hack saw, or bolt cutter. Furthermore, since the shelves are wire, if needed it would be easy to use bungee cords to hold shelf contents in place when moving.

One of the best storage ideas I've read here is the plastic three-drawer unit (from Target I believe), that campthewestcoast sits on top of the wardrobe when set up. Very clever!
 
Last edited:
We used a two drawer unit in our 1705T and it fit nicely into the wardrobe. In the 1705T the wardrobe has a flat bottom like a regular cubboard so sliding a drawer unit in was very easy. I just had to remove the slideout clothes hanger bar to give vertical clearance.

I am looking into the wire type shelving also. I saw that Ikea has a free standing adjustable shelving system. The vertical supports attach to floor pieces to form an "L" configuration and then the shelf supports lock into the verticals much like the standard wall shelf design that has been around for years. I may have to take a trip to Pittsburgh to check them out in person.

The quest goes on. :)
 
I removed the hang bar from our 2209T and installed shelves. Works great. I can send photos if you're interested (and you provide your email address).
 
Excelsior!! I found the solution at Sam's Club!

We were shopping at Sam's Club yesterday and came onto shoe racks that they had on display. They have three shelves each and they can be stacked. The cost $19.88 So we bought two of them and took them home. They fit the wardrobe like your hand in a glove. I had to remove the coat hanger rod and that was all. The shelves are 12 inches deep, and about 28 inches wide, the height was just about 1/8 inch short of touching the wardrobe lid. They are made of metal and the shelves are mesh. When I get the photos loaded up I will try to post them here. :)

http://www.samsclub.com/sams/shop/product.jsp?productId=189944&navAction=

Sorry ladies the lovely shoes are not included.
 
Last edited:
Rich, the shoe rack idea looks great! I went a different route because Janet and I didn't see how the "wardrobe" was going to be any use at all to us. I've taken pictures and posted them below.

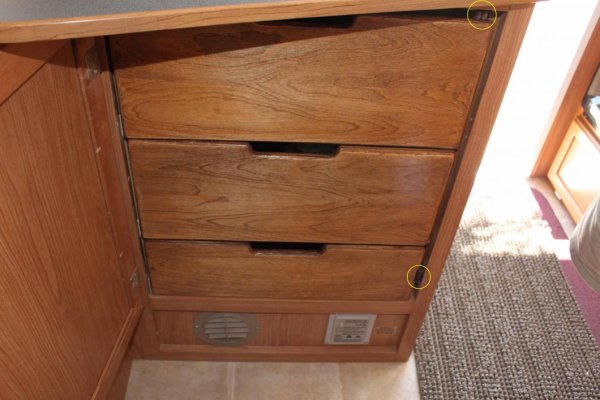
After removing the rod (I left the wooden support it was attached to in place), I constructed three, roll-out drawers for the space. The first picture shows these drawers in place in the closed position. I moved the original door latch to the top corner and added an additional magnetic latch beside the lower drawer (both circled in yellow). We each have one of the two top drawers and the bottom drawer holds things like shoes.

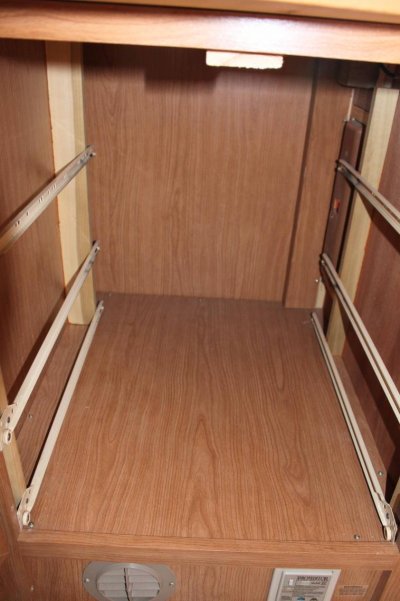
The second picture shows the three roll-out tracks I mounted inside the cabinet. I used two 1x3 birch "furring strips" to support the tracks on the left and 2 1x2 strips on the right. The 1x3s brought the tracks even with the door opening on the left and the 1x2s moved the tracks out enough to clear the pocket for the fire extinguisher which you can see at the right rear.

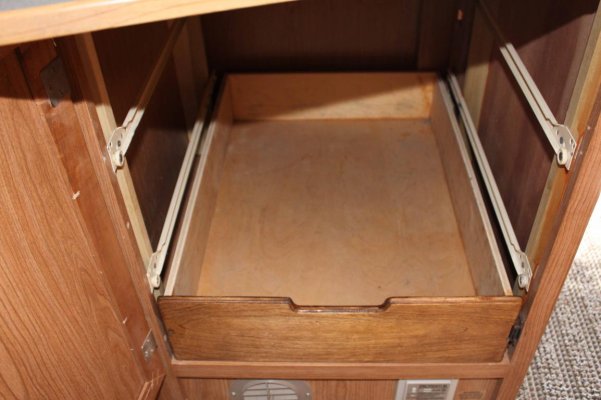
The third picture shows the bottom drawer in place. I tried to size it to take advantage of all the space (width and depth).

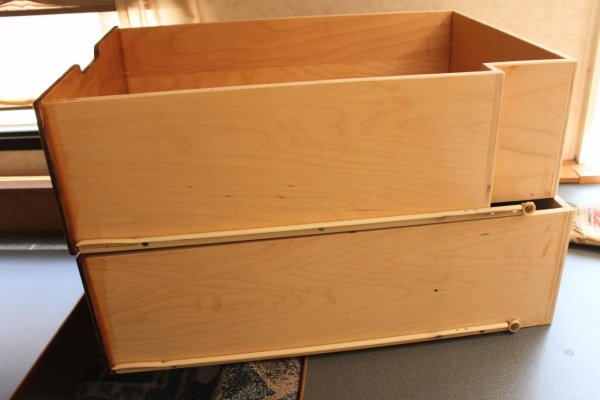
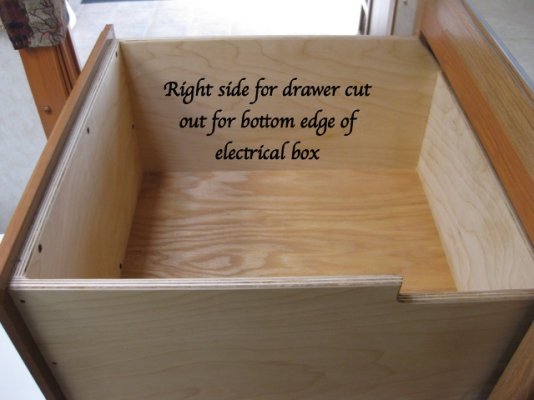
The two top drawers look slightly different. I had to design a "cutout" for the top drawer so it would slide in beside a 110V wall plug that's mounted at the top of the cabinet that projects inside. I constructed all drawers out of 3/8" birch plywood and stained the fronts. No fancy joints.

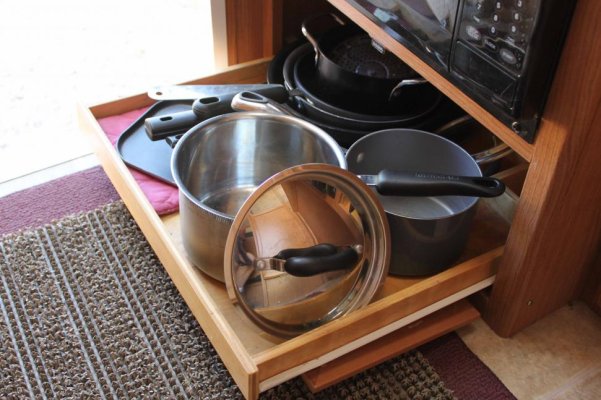
The last picture shows a similar slide out shelf I made to provide easier access to the pots and pans we store under the microwave.

Anyone with access to simple woodworking tools and modest skill could do something similar. Believe me, my woodworking skills are "modest! :eek: It's really improved the space utilization for us when we camp.

- Jack
 

Attachments

  • Drawers 1.jpg
    Drawers 1.jpg
    94.5 KB · Views: 134
  • Tracks.jpg
    Tracks.jpg
    91.6 KB · Views: 124
  • Bottom Drawer.jpg
    Bottom Drawer.jpg
    89.6 KB · Views: 120
  • Top Drawers.jpg
    Top Drawers.jpg
    87.2 KB · Views: 117
  • Pots&Pans Drawer.jpg
    Pots&Pans Drawer.jpg
    95.6 KB · Views: 118
You did a nice job with the drawers. I wish we would have had those on our 1705. It takes good advantage of the space and sure is much more convenient.

Hi-Lo, are you looking at this?
 
Nice Job Jack , I have a 17 and had thought about something like that but just don't have the wood working skills to pull it off. The way you even notched the top drawer for the outlet makes the most of every inch. Looks like built in's from the factory.
 
:eek: You give me WAY too much credit, Tom! All the joints are just simple "butt" joints, no fancy dovetails or anything like that. You never know what you can do until you try!

The nice thing about what I did is that it's completely reversible. It might be a tiny bit tricky to remove the "furring" strips I put in since they're glued (and screwed), but I bet they'd come off.

But, I think this is a whole lot more practical than a little "hanging" space. I doubt many of us take clothes that need to be "hung" on camping trips anyway. We sure don't.

- Jack
 
Storage ideas

Everyone has great ideas ,adaptions for storage. I guess I'm spoiled with so many storage areas in the classic HiLo. When you enter my HiLo there is a short Br. wall on the left. I purchased a hanging shoe bag that was a little long(cut off). Next mI bent the top shoebag hooks to fit over the wall. This eliminates some of the shoe clutter.The Br. has a tub which we never use. Another HiLo owner did this in her RV.I stained/finished up a piece of plywood that fits across the tub. I used heavy duty velcro on one side of the tub(not sure you really need this).This shelf stays in place during travel. We end up putting or food totes and laundry bag here.
 
storage

I removed the hang bar from our 2209T and installed shelves. Works great. I can send photos if you're interested (and you provide your email address).

Can you please send me the pictures of your storage area? Thanks.
 
Rich, the shoe rack idea looks great! I went a different route because Janet and I didn't see how the "wardrobe" was going to be any use at all to us. I've taken pictures and posted them below.

After removing the rod (I left the wooden support it was attached to in place), I constructed three, roll-out drawers for the space. The first picture shows these drawers in place in the closed position. I moved the original door latch to the top corner and added an additional magnetic latch beside the lower drawer (both circled in yellow). We each have one of the two top drawers and the bottom drawer holds things like shoes.

The second picture shows the three roll-out tracks I mounted inside the cabinet. I used two 1x3 birch "furring strips" to support the tracks on the left and 2 1x2 strips on the right. The 1x3s brought the tracks even with the door opening on the left and the 1x2s moved the tracks out enough to clear the pocket for the fire extinguisher which you can see at the right rear.

The third picture shows the bottom drawer in place. I tried to size it to take advantage of all the space (width and depth).

The two top drawers look slightly different. I had to design a "cutout" for the top drawer so it would slide in beside a 110V wall plug that's mounted at the top of the cabinet that projects inside. I constructed all drawers out of 3/8" birch plywood and stained the fronts. No fancy joints.

The last picture shows a similar slide out shelf I made to provide easier access to the pots and pans we store under the microwave.

Anyone with access to simple woodworking tools and modest skill could do something similar. Believe me, my woodworking skills are "modest! :eek: It's really improved the space utilization for us when we camp.

- Jack
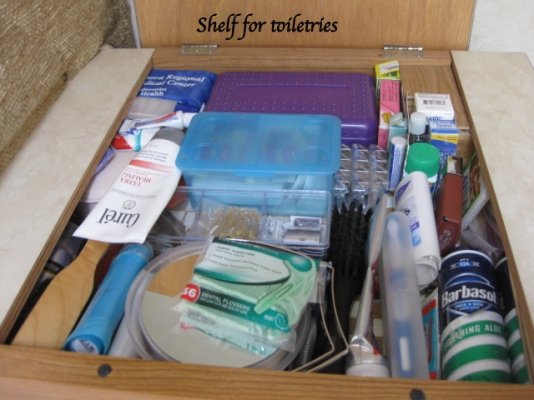
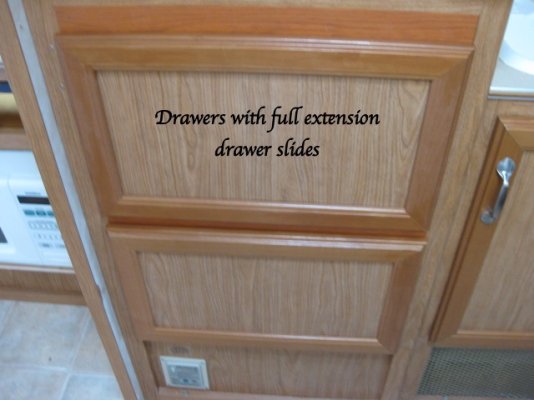
Inspired by your conversion with your wardrobe closet and my DW saying I want that, with one exception, I completed my conversion without too much difficulty. The electrical in the back of the cabinet was a little different than your’s so I did not have to make all of the adjustments you had to make. The exception to my conversion was my DW wanted a shelf several inches below the lid of the cabinet for toiletries, first aid kit, etc. I did use the door of the cabinet, along with some material from my other modification, to make fronts for the drawers.
 

Attachments

  • Shelf for toiletries.jpg
    Shelf for toiletries.jpg
    121.5 KB · Views: 17
  • Right side of drawer.jpg
    Right side of drawer.jpg
    90 KB · Views: 16
  • Drawers with full extension slides.jpg
    Drawers with full extension slides.jpg
    94.5 KB · Views: 14
Nice work, Garry! I approve! It's far more usable than the poky little "wardrobe", isn't it?

- Jack
 
Nice work, Garry! I approve! It's far more usable than the poky little "wardrobe", isn't it?

- Jack
Anxious to put those drawers to work on our next extended trip. In the past we were using large Zip Lock bags for our clothes and placing them in the over head cabinets. Good by to those Zip Lock bags!!:)
 

Try RV LIFE Pro Free for 7 Days

  • New Ad-Free experience on this RV LIFE Community.
  • Plan the best RV Safe travel with RV LIFE Trip Wizard.
  • Navigate with our RV Safe GPS mobile app.
  • and much more...
Try RV LIFE Pro Today
Back
Top