Journey with Confidence RV GPS App RV Trip Planner RV LIFE Campground Reviews RV Maintenance Take a Speed Test Free 7 Day Trial ×


Go Back   Hi-Lo camper travel trailer forum > Hi-Lo Tech > General Repairs, Modifications, Tips and tricks
Click Here to Login
Register FAQ Community Calendar Today's Posts Log in

General Repairs, Modifications, Tips and tricks Show off your modifications, share a great idea, ask a question!
Reply
 
Thread Tools Search this Thread Display Modes
 
Old 04-20-2010, 04:33 PM   #1
Member
 
Join Date: Apr 2010
Location: Abita Springs, LA
Posts: 20
Default External refrigerator fan

I hooked up a pair of 120mm high-tech, magnetic bearing computer fans in the rear of my fridge compartment to improve it's efficiency too. My camper came with a single Dometic fan in the back, which made too much noise when the thermostat cycled at night, waking me up occasionally. The new fans run at 1/2 the speed of my old stock fan, but are super quiet and actually move more CFM of air across the entire length of the upper cooling coil than the single, noisy factory unit. Together both new fans draw slightly less amps than the old, single, high-speed fan.

Here's a pic of the new set-up.


Chip
__________________

sushidog is offline   Reply With Quote
Old 04-20-2010, 08:19 PM   #2
Moderator
 
RichR's Avatar
 
Join Date: Feb 2010
Location: NW PA
Posts: 3,386
Default

The fans used as standard equipment are quite noisy. The muffin tin type fans like shown in the photo are normally very quiet and would work every bit as good as the standard one, if not better. You can buy them from surplus electronics dealers like All Electronics | Electronic and Electro-Mechanical Parts and Supplies at Discount Prices for an average cost of $3. I would like to mount one that I have but I haven't come up with a thermostat to control it like the standard one has.
__________________

RichR is offline   Reply With Quote
Old 04-21-2010, 08:14 AM   #3
Senior Member
 
Neal and Bev's Avatar
 
Join Date: Feb 2010
Location: Nashville, Tn
Posts: 392
Default

DW and I also find that our external refrigerator fan is a little loud when sleeping. Partly due to the fact that the bed is right next to the refrigerator.

This past weekend we camped at "Rock Island State Park" (post coming soon), and on the second night, around midnight, I turned the fan off. I don't know what woke me up but the little fan noise was making it hard for me to go back to sleep.

Is the thermostat for the fan part of the fan assembly? or is it a separate device that controls the fan? In other words, I wonder if we could replace the fan with a quieter one that doesn't have a thermostat with it IF the thermostat is a separate component.

Neal
__________________
2001 Hi-Lo 22TL
2010 F150
Neal and Bev is offline   Reply With Quote
Old 04-21-2010, 09:16 AM   #4
Moderator
 
RichR's Avatar
 
Join Date: Feb 2010
Location: NW PA
Posts: 3,386
Default

That is my question also. I really don't want to remove the vent cover outside to look. Maybe Sam has that information. The muffin fans are noticeably quieter and I think they would be reliable. I think if the fan didn't run at such a high speed it would be much quieter.

We never run the fan at night or when we are boondocking because of noise and battery usage.
RichR is offline   Reply With Quote
Old 04-22-2010, 08:29 PM   #5
Moderator
 
RichR's Avatar
 
Join Date: Feb 2010
Location: NW PA
Posts: 3,386
Default

I found replacement Dometic fans listed on Ebay. They have the muffin fan, switch, thermostat and wire in the kit. I can't say that they are really worth $60 considering the cost of the separate parts.

Dometic Refrigerator Ventalator Fan Kit 3108705751 - eBay (item 390122905746 end time Apr-23-10 14:20:08 PDT)

I wish I could see what the temperature setting is on the thermostat because I found them on the Allied Electronics website. They have different fixed temperature settings.

I'm thinking that the existing fans could be made to run quieter if they had a cushioned or isolated mounting.
RichR is offline   Reply With Quote
Old 04-24-2010, 09:05 PM   #6
Member
 
Join Date: Apr 2010
Location: Abita Springs, LA
Posts: 20
Default

It took me a while to dig out my Dometic ventilator assy. manual (same part # as previously referenced.) The thermostat, called a fan limit switch, is Dometic part #3104723.006. It is set to come on when the compartment temperature reaches 100 degrees F. The manual doesn't state a shut-off temp. For the do-it-yourselfer, the thermostat is positioned alongside and to the right of the condenser coil (upper right hand corner of the back of the refrigerator.) The thermostat is set to interupt the red, power line which feeds the fan, and not the ground. According to Dometic, it should be fused with a 1 amp fuse between the manual fan switch (power supply) and the thermostat.

I agree, rubber isolating the fan would help, however the fan is inherently noisy. The solution I came up with was to replace the noisy (45db) plain bearing stock fan with 2, 23db artic cooling fans I got online from coolerguys.com. Though they are the same size as the stock unit (120mm), they only spin at 1500rpm compared to 3000rpm from the OEM fan. They are rated at 56cfm each, so the pair puts out 112cfm (compared to 88cfm for the single stock fan). Together they draw 0.3amps compared to .36amps for the single OEM fan. They are rubber mounted and use high-tech, fluid dynamic bearings that are ultra-quiet and good for a MTBF of 400,000hrs (20 times the rated life of the stock plain bearing fan).

I hope this helps,

Chip
sushidog is offline   Reply With Quote
Old 04-24-2010, 10:14 PM   #7
Moderator
 
RichR's Avatar
 
Join Date: Feb 2010
Location: NW PA
Posts: 3,386
Default

Sushidog,

You have really been doing your homework. What was the item number for the fans? Did you use the OEM thermostat? I think that type of thermostat has one on/off temperature from what I have seen.
RichR is offline   Reply With Quote
Old 04-25-2010, 03:04 PM   #8
Member
 
Join Date: Apr 2010
Location: Abita Springs, LA
Posts: 20
Default

RichR,

My Dometic fridge had the cooling kit installed from the A-liner factory, so I just took out the noisy stock fan (which I now use as an exhaust fan above the stove in a bubble vent, sort of like a mini fantastic fan - waste not want not). Unfortunately, the cooler guys no longer sell that exact model of fan.

The closest thing I've found is this one: Fan It's the same brand with the same fluid dynamic bearings rated at 57 cfm, however it is PWM controlled for variable speeds. Just wire it to run at the 1500rpm speed for the same results. The extra bells and whistles make it a couple of bucks more, but at $9.95 it's still not too pricy.

A better choice might be this one: Fan w/ temp sensor Its also $9.95 with a built in temperature sensor so there's no need for a seperate thermostat. Instead of turning itself on and of it would just change speed gradually from 400-1300rpm from 32-38 degrees C (90-100 degrees F.) At 1300rpm it won't have quite the airflow as the model above, but dual fans should approximate the stock single fan's performance with much less noise and greater reliability.

Chip
sushidog is offline   Reply With Quote
Old 07-25-2010, 06:57 PM   #9
Senior Member
 
Join Date: Mar 2010
Location: Short Gap WV
Posts: 110
Default

I'm looking to instal a fan on my 94 funlite and came across this post. I have looked at many different ways of doing this but can't seem to decide. I like the idea of the fans with the built in sensor. Would you suggest 2 of them or just 1? Do these operate on 110 or 12 v? My camper is parked most of the time on land power so 110 is fine. Any suggestions are appreciated. I want to do this the best way not necessarily the cheapest.

Harry
__________________
9421FLL
1996 Jeep Grand Cherokee (RIP old friend)
2004 Jeep Grand Cherokee 4.7L V8
wvjeepr is offline   Reply With Quote
Old 07-25-2010, 08:04 PM   #10
Site Team
 
JackandJanet's Avatar
 
Join Date: Jul 2010
Location: Pine, AZ
Posts: 4,692
Default

Quote:
Originally Posted by wvjeepr View Post
I'm looking to instal a fan on my 94 funlite and came across this post. I have looked at many different ways of doing this but can't seem to decide. I like the idea of the fans with the built in sensor. Would you suggest 2 of them or just 1? Do these operate on 110 or 12 v? My camper is parked most of the time on land power so 110 is fine. Any suggestions are appreciated. I want to do this the best way not necessarily the cheapest.

Harry
The original fan in the trailer operates on 12V. Since sushidog didn't talk about reducing the voltage further (say to 5 Volts) I have to assume the new ones run on 12V too. I KNOW they are not 110V devices!

I think this is a mod I'm going to try once I get my trailer back from the RV doctor. Thanks, sushidog!

- Jack
__________________
Hi-Lo 1707T - Tire Minder TPMS on Tow Vehicle and Trailer, 300W Solar Battery Charger, Equal-i-zer WDH, Progressive Dynamics Converter, Fan-Tastic Fan, LiFePO4 battery 12V DC Electrical System, SoftStartRV mounted on A/C
2024 F150 Platinum FX4 3.5L PowerBoost SCrew
JackandJanet is offline   Reply With Quote
Old 08-04-2010, 10:29 PM   #11
Site Team
 
JackandJanet's Avatar
 
Join Date: Jul 2010
Location: Pine, AZ
Posts: 4,692
Default

OK, I just did the "fan mod"! It was fairly simple, once I figured out how to mount the new ones.

For mine, I went to a local computer supply store and bought two "S-FLEX" 1200 RPM fans. They were a bit "pricey" at $16.95 each, but they're designed by Sony, they move 49 CFM each, pull 0.15A each, and they ARE quiet! They're rated at 20.1dB each, but installed and running, they're almost undetectable inside the trailer! (Now that I think of it, sound is rated on an exponential scale, so two 20.1 dB fans will not sound like a single 40.2 dB fan - guess I should have gotten the 28 db 1500 RPM versions! But they would have pulled 0.4 Amps.)

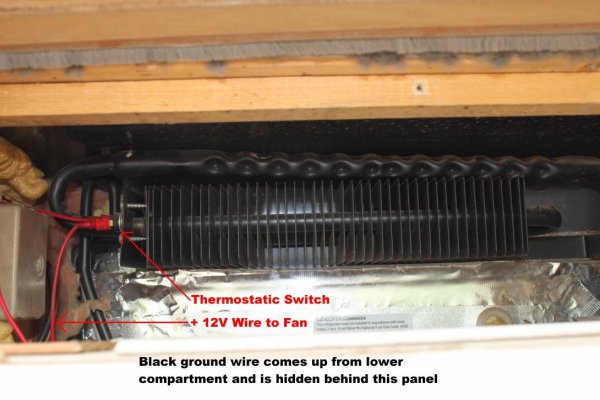
As Chip said, the thermostat is mounted on the cooling coil, as I looked in from the outside, it was on the left side of the coils and a red power lead came from it. There IS an inline fuse in the supply to the thermostat, so if your fan stops working, that's something to check.

The other lead to the existing fan is black and is the ground wire.

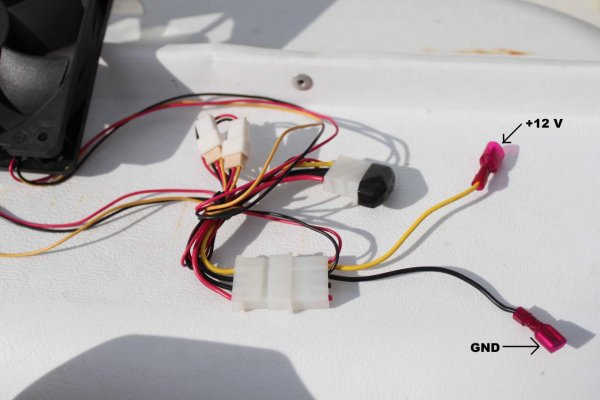
My fans had three wires - Red, Black, and Yellow. The Red is +12 V the Black is Gnd and the Yellow is something the computer needs - I just cut it off. I actually used computer connectors though and wired my trailer's Red wire to the computer connector's Yellow wire! (This actually feeds the red fan wire *shrug*) And, I connected the trailer's black wire to one of the computer connector's black leads - the one that went to the fan. The other black and the red computer lead were not used, so they got cut off too.

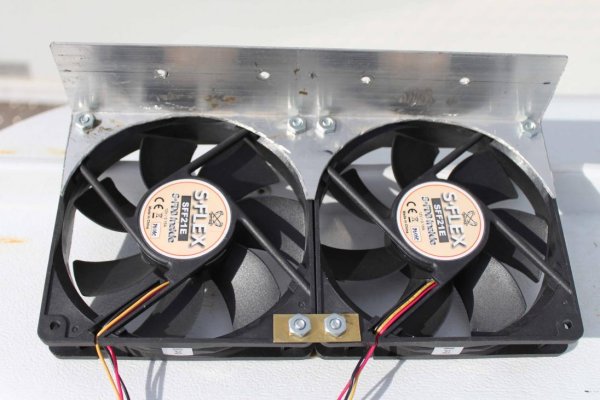
I used a 2x2 piece of aluminum angle "iron" as the mount, which put the fans closer to the coils. I had to cut circles in the angle where it attached to the fans - thank goodness for Dremel tools!

The original fan "sucked" air out of the coils, so I mounted my fans to do the same. I think perhaps this might bring more outside cool air in from the bottom vent than if it "blew" on the coils?

Anyway, thanks, Chip, for a great idea! I think it's well worth the effort.

- Jack
JackandJanet is offline   Reply With Quote
Old 08-05-2010, 11:39 AM   #12
Senior Member
 
Join Date: Mar 2010
Location: Short Gap WV
Posts: 110
Default

Post pix please would love to do this. Mine has no fan so anything would be an improvement. These are 12V fans? I would have thought a computer fan would be 110.


Harry
__________________
9421FLL
1996 Jeep Grand Cherokee (RIP old friend)
2004 Jeep Grand Cherokee 4.7L V8
wvjeepr is offline   Reply With Quote
Old 08-05-2010, 06:21 PM   #13
Site Team
 
JackandJanet's Avatar
 
Join Date: Jul 2010
Location: Pine, AZ
Posts: 4,692
Default

I'm actually in the process of building a "duct" to improve the efficiency of the fans. Not sure it's going to work, but in any case, I'll post pictures when I'm finished.

There ARE 110 V computer fans, but most run off the power supply and it provides 12 V through the Yellow and Black wires in the PC connectors.

- Jack
JackandJanet is offline   Reply With Quote
Old 08-06-2010, 01:24 PM   #14
Site Team
 
JackandJanet's Avatar
 
Join Date: Jul 2010
Location: Pine, AZ
Posts: 4,692
Default My Refrigerator Fan with Pictures, Part 1

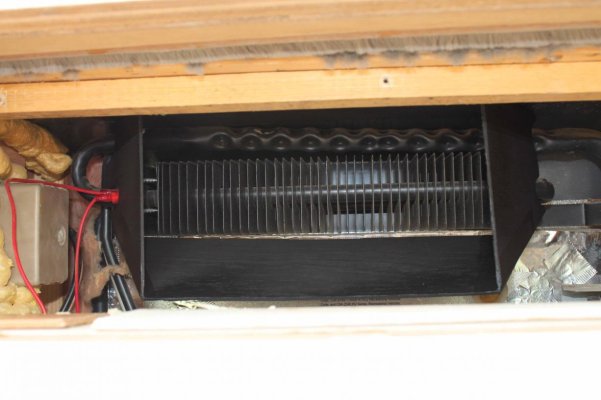
OK, here's my new, improved refrigerator fan with a duct. In my trailer, the fan is in an opening in the upper section. It's behind a sheet metal cover that's held in place by many (18-20?) screws. With the cover removed and an inside screen removed too, the first picture shows the coils that are behind the existing fan. The fan mounted behind the horizontal strip of wood at the top of the opening. The coils are actually fairly high in the opening and quite a bit of the fan is below them, where it cannot move air across the coils. This is why I decided to build a duct.

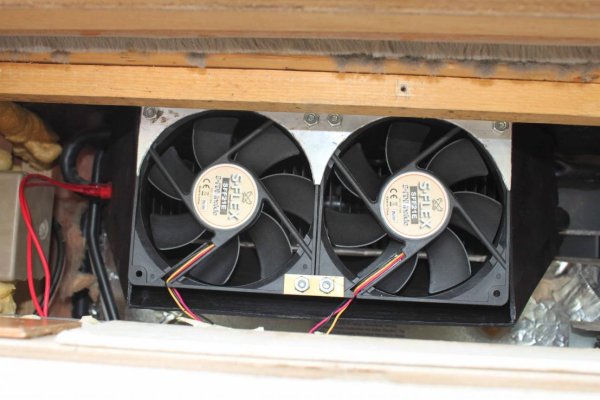
The second picture shows the two new fans I bought and the mounting bracket I made out of the aluminum "angle iron" I had on hand. I also had a brass strip that I cut and used to tie the bottom of the fans together (there's a strip on both sides). You're looking at the front of the fans that will face out the side of the trailer. As I said before, the fans are wired so they PULL air across the coils and blow it out the side.

The third picture shows the fan wiring, using the two computer connectors that came with them. They can be hooked together so that the electrical feed uses only the heavy yellow and black wires. All wires that were not used were simply cut off.

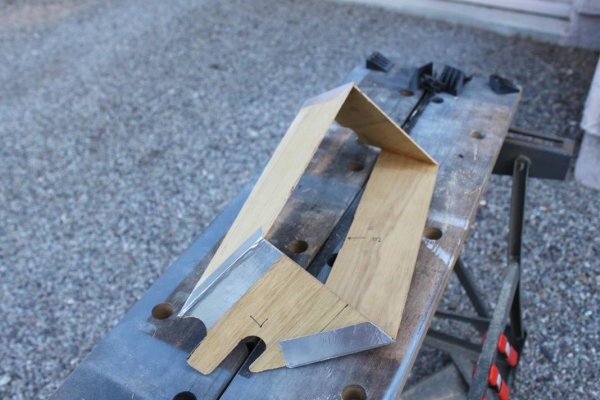
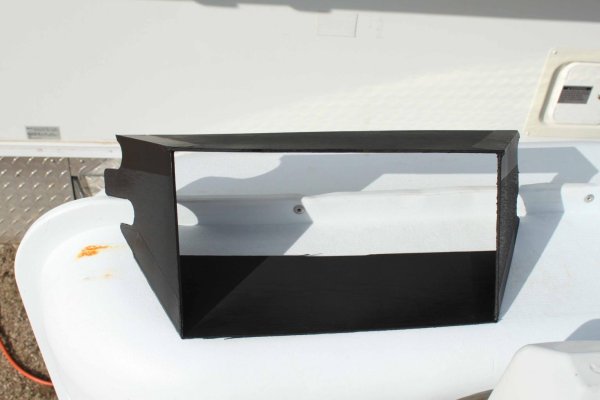
Next, I made the duct. I didn't have any lightweight tin on hand, so I used some thin plywood (part of a door skin) that I DID have. It was a bit of trial and error getting everything to fit. The bottom of the duct stops right at the front edge of the coils and the sides and top go in further to "surround the coils" (and the dimpled tube at the top). The fourth picture shows how it looked before painting.

Then, I painted it to protect it and to make it look "prettier".

I've just reached a picture limit, so this will be continued to the next post.

- Jack
Attached Images
File Type: jpg Cooling coils.jpg (91.9 KB, 296 views)
File Type: jpg Fan Assembly.jpg (91.0 KB, 263 views)
File Type: jpg Wiring.jpg (86.0 KB, 248 views)
File Type: jpg Making Duct.jpg (91.6 KB, 240 views)
File Type: jpg Painted Duct.jpg (83.5 KB, 229 views)
__________________
Hi-Lo 1707T - Tire Minder TPMS on Tow Vehicle and Trailer, 300W Solar Battery Charger, Equal-i-zer WDH, Progressive Dynamics Converter, Fan-Tastic Fan, LiFePO4 battery 12V DC Electrical System, SoftStartRV mounted on A/C
2024 F150 Platinum FX4 3.5L PowerBoost SCrew
JackandJanet is offline   Reply With Quote
Old 08-06-2010, 01:34 PM   #15
Site Team
 
JackandJanet's Avatar
 
Join Date: Jul 2010
Location: Pine, AZ
Posts: 4,692
Default Refrigerator Fan, Part 2

With the duct in place, you can see how far below the coils the fans extend. The original fan was this low too. Since that area of the fan is not moving air across the coils, I thought it was wasting fan capacity.

Finally, with the new fans in place, this is how it all looks. The fans come on when the coils heat up and they are so MUCH quieter than the original fan. Additionally, since together they move 98 CFM, and the duct forces the air across the coils, they should be more efficient.

Again, my thanks to Chip for starting all this with his great post!

- Jack
Attached Images
File Type: jpg Duct in Place.jpg (87.6 KB, 250 views)
File Type: jpg Final Installation.jpg (90.4 KB, 239 views)
JackandJanet is offline   Reply With Quote
Old 08-07-2010, 11:03 AM   #16
Senior Member
 
Join Date: Mar 2010
Location: Short Gap WV
Posts: 110
Default

Looks nice and I think it will work just fine. I plan on doing the same type of thing now that I've seen it. Thanks for sharing.

Harry
__________________
9421FLL
1996 Jeep Grand Cherokee (RIP old friend)
2004 Jeep Grand Cherokee 4.7L V8
wvjeepr is offline   Reply With Quote
Old 08-24-2010, 08:06 PM   #17
Senior Member
 
Join Date: May 2010
Location: Ohio North Coast
Posts: 850
Smile External Refrigerator Fan

Thanks Sushidog for telling me about coolerguys.com. I ordered the Scythe S-Flex SFF21F fan for my trailer. It turns at 1600 rpm and has the "liquid" bearing made by Sony. It was only $12.89. It is the same size (120mm) as the original fan but only half the "thickness". I spliced it into the original wiring. Once the fan switch is turned on at the control panel, the temperature switch attached to the refrigerator fins turns it on and off with the heat buildup. The fan comes with 3 wires, red, black, and yellow. Just cut the yellow wire as it isn't needed. It is a speed wire that tells the computer how fast the fan is going. The red is positive and the black is negative. It moves the hot air out the vents and you can barely hear it run.
retiredcamper47 is offline   Reply With Quote
Old 09-21-2010, 11:42 AM   #18
Site Team
 
JackandJanet's Avatar
 
Join Date: Jul 2010
Location: Pine, AZ
Posts: 4,692
Thumbs up Operationl Test of the "Fan Mod"

I think we should call this the "Sushidog Mod" in honor of Chip who brought this idea to our attention!

Janet and I just completed an 8-night trip to Yosemite National Park with the Sushidog Mod in place on our trailer. It worked flawlessly! There was no time at all that either of us heard the fans running, and, they were on at all times. In fact, several times during the days, I would go outside and listen and "feel" for air movement at the vent just to reassure myself that the fans were indeed working! They were, of course.

Additionally, according to the inside/outside thermometer I use inside the refrigerator, it appears that the refrigerator is actually operating a couple of degrees cooler than before.

Thanks, Chip, for a great idea and suggesting it to the rest of us! *beers*

- Jack
__________________
Hi-Lo 1707T - Tire Minder TPMS on Tow Vehicle and Trailer, 300W Solar Battery Charger, Equal-i-zer WDH, Progressive Dynamics Converter, Fan-Tastic Fan, LiFePO4 battery 12V DC Electrical System, SoftStartRV mounted on A/C
2024 F150 Platinum FX4 3.5L PowerBoost SCrew
JackandJanet is offline   Reply With Quote
Old 09-21-2010, 04:26 PM   #19
Senior Member
 
Join Date: May 2010
Location: Ohio North Coast
Posts: 850
Post

A quick and easy fix if you strickly run off "shore power" at campgrounds is to use a small plastic 110v desktop fan. Take the lower refrige vent cover off, unplug the refrige and place a triple plug adapter into the outlet. Plug your refrige back in and plug the fan in. Angle the fan so that it blows upward. I did this once when my 12v fan quit working. For whatever reason, the 110v electrical outlet that HiLo used for the refrige has only one "open" plug in. The lower plug in is not open. Where the plug goes on the lower half is stamped into the plastic cover. With a steady hand and a dremel tool you can open those slots on the cover plate. The guts for the plug are behind the cover plate. Now you have a double plug outlet like those inside the trailer. Just make sure the trailer is not plugged in to electrical if you try this with a dremel. I prefer the 12v fan and have just recently upgraded it. The 110v fan works great as a reliable backup to keep the refrige cool.
retiredcamper47 is offline   Reply With Quote
Old 09-21-2010, 08:47 PM   #20
Senior Member
 
NDgent's Avatar
 
Join Date: Jul 2010
Location: Salida, CA
Posts: 157
Default

For those of you who would like a manufactured solution for your refrigerator fan/cooling issues, you may find Snyder's http://www.snydersrvrefrigeration.com/page1.php unit to your liking ... at $49.95 plus $10.00 shipping it is affordable too!
__________________

__________________
John

2007-22T TowLite 50th Anniversary
2008 Nissan Frontier SE 4X4 Crew Cab, Snug Top
NDgent is offline   Reply With Quote
Reply


Posting Rules
You may not post new threads
You may not post replies
You may not post attachments
You may not edit your posts

BB code is On
Smilies are On
[IMG] code is On
HTML code is Off
Trackbacks are Off
Pingbacks are Off
Refbacks are Off


» Featured Campgrounds

Reviews provided by

Powered by vBadvanced CMPS v3.2.3
Disclaimer:

This website is not affiliated with or endorsed by Hi-Lo Trailers Worldwide or any of its affiliates. This is an independent, unofficial site.


All times are GMT -5. The time now is 07:25 AM.


Powered by vBulletin® Version 3.8.8 Beta 4
Copyright ©2000 - 2024, vBulletin Solutions, Inc.
HiLoTrailerForum.com Copyright 2010
×