External refrigerator fan

Respectfully, I'd like to point out that the Snyder's unit moves 44 CFM, and the fans I installed move 98 CFM. The Snyder current draw is 0.2 Amps compared to my fan's pull of 0.3 Amps, so Snyder does better there. Both units only run when the coil temp is elevated, so that part's a "wash". My fan's cost was about $34.00 retail for the pair compared to the Snyder cost of about $60.00 (which includes shipping). Snyder gives no specs for noise - my installation of the Sushidog Mod is virtually SILENT - (I guarantee that), and is one of the main reasons I even tried this mod!

Finally, this quote from the Snyder website: "some applications the plenum may need to be trimmed." So, it seems to me that this is not exactly "plug and play".

Personally, I think if you could do the Snyder mod, you are totally qualified to do the Sushidog Mod, and, to me, the choice is obvious! (The duct addition I did is a minor "upgrade" and I did it as an afterthought. I'm sure the fans alone are superior to the original system.)

This, of course, is just my opinion, and is worth exactly what you have paid for it. ;)

- Jack
 
Excellent points ... I agree with your perspective totally ... really, I do! I just thought someone out there would like to know that there is an option ... even though it is not as eloquent nor as efficient. Personally I am going to do as you have suggested and build my own.

I love this site ... really I do! ;o)

John, I'm sorry if I sounded like an "angry parent". I DID understand where you were coming from in your post and immediately went to Snyder's web site to check it out. I never feel an "ownership" for a particular idea, and am very happy when someone comes up with a better approach.

But, in analyzing the Snyder device, I felt I had to point out the differences. And, I really wonder just how simple it would be to adapt that design to our unique trailers? :confused:

Still, it MAY be an excellent option. I tend to reserve final judgment until someone has posted a "user review", or, until I see specific details on how a modification can be applied to our one-of-a-kind RVs.

Thanks John, for checking back in. We DO need information on all possible options if this forum is going to be a valuable resource. I can be a "wet blanket" at times and "naysayers" are not what a GOOD forum is all about. You were "right on" in your post.

- Jack
 
Just ordered 2 of the Arctic Cooling F12's with the temp sensor. Can't wait to install them and check out my Beer temp.


Harry
 
Ref. fan modifications

Thanks for all the information on Ref. fan modifications. I've printed it out to save in case we upgrade our HiLo. Our replacement Ref. was under a three yr. warranty,but we our on our own. Our replacement ref.only runs on electric and propane. Tomorrow I'll have hubby explain why we can.t put in an external fan. Maybe we can brainstorm and come up with an idea.
 
If you are not going to be using the refer during hot weather you can probably get away without the fan for now. Here in NW PA much of the time it isn't hot enough to need the fan. It makes the refer work more efficiently and should be used when possible. We don't use our factory installed fan because it is so noisy. I want to do the conversion soon.
 
Why we can't put in a ref. fran

Our 90 HiLo Classic has the wavy sided fiberglass and the sloted metal top cover is calked and screwed in to the max.Our HiLo dealer said we can"t put in a fan in the top of the ref. because the replacement ref. doesn't call out in the specs. for this (no room)It keeps the food really cold and the freezer works great(good icecubes). We pop the vent cover open on hot daysIn newer Refs. you wouldn't to the cover proped open if you were using propane as the wind would blow out the flame.This year we are only planning a one week trip and one weekend.If need be I could set a small household fan on a table to blow on the (open) back of ref. only if we were going to be at the campsite. My hubby took electrical/electronics in school. You could say he doesn"t feel the we must have a ref. fan.Some day soon I will take some pictures and post.
 
Here's an update on the Sushidog Mod.

After about 3 years the rubber mountings of my old fans decomposed and failed due to heat and vibration, so I replaced them with a pair of solid mounted fans. These new fans have 3 speeds, so in hot weather I can turn them up for better cooling and when it's cooler turn them down for less current draw and noise (25-30db). Rather than use ductwork to draw air directly over the top coil i mounted the fans close ot the exit grate. My theory is to exacuate as much air from the rear compartment as possible rather than just focus on the top coil. These new fans are a little noisier than my original replacement fans 23Db but quite a bit less than the 45Db Dometic the fridge came with.

Here's a link to my new Antec TriCool fans: Antec TriCool 120x120x25mm standard case fan with 3 speed switch

And a pic: http://i55.tinypic.com/2epqa0w.jpg

The stock fan moved 88cfm, whereas the pair of new fans push 78cfm on low, 112cfm on medium and 158cfm on high. On medium, together they draw .03 amp less than the single stock fan yet move more air. Perfect for boondocking with a single battery as I have.

I also mounted a small 25mm, 12v fan inside the fridge to circulate a little air over the inside cooling fins. It takes up less space than the little blue battery powered fan I once used and the batteries won't wear out at the worse possible time. It's wired to a rocker switch inside so I can still turn it on and off on demand (together with the outside fans.)

Here's a pic of the inside fan:
http://i53.tinypic.com/io3vr9.jpg

They both work great together. My fridge/freezer will keep meat, fish and ice cream frozen hard in the hottest weather set on 3-4. In the heat of summer, my milk will ice up in the fridge when set on 4. I've never had to turn it to 5.

My next project, which is almost done, is a small 5 led fridge light that comes on when the door is open - just like my home fridge has.

Chip
 
Last edited:
Chip, those are great mods! *thumbsup*

I just built a brand new high end Windows 7 PC and used an Antec case that came with three of those 120 mm 3-speed fans. They are quiet on low and medium speeds and DO move a lot of air. I wish I had used them now for the refrigerator, but I'm still happy with the single speed ones I used. I think it was an excellent upgrade!

I'm really impressed with the internal fan you put in. I see you simply attached it to the shelf with 4 wire ties, but I guess you had to drill a hole in the rear of the refrigerator to run the wires out? And, I suppose you had to cut the connector off to get the wires through the hole.

What a great idea to install a refrigerator light. Looking forward to seeing it completed.

Edit: On second look, it seems the connector for the internal fan is inside? So, you ran wires from a connection "harness" through the hole?

- Jack
 
Last edited:
Here's a pic of my fridge light mod.

egcw1t.jpg


I used a clip on headlight with 5 leds powered by 2 button batteries. It provides about 3 hours of light per battery change and enough lumens to tell the difference between balogna and salami on a midnight fridge raid, thanks to the highly reflective fridge interior. I got the micro switch from Radio Shack. The little metal thingie on the bottom (made from a 1/4 " Snap-on spring steel socket holder) can swing up to catch the lever and turn the switch off when it is not needed, like when cleaning the fridge or loading and unloading at home. I made the bracket from a small piece of aluminum strapping I had left over from another project. The hardest part was measuring the exact distance from the switch to the door. The light mounts to the bottom of the freezer compartment with Velcro for a quick battery swap when needed. Yes, the light really does go off when the door closes.

There's still no light in the freezer compartment. Maybe I could make one with a mercury switch and mount it to the small freezer door, so it comes on when I pull the door down.... I don't think the mercury would solidify in the fridge as it freezes at -38 degrees. I guess I've got the modding bug.

Chip
 
I made a few more fridge mods. I guess I just can't help myself. ;)

I got to thinking that my small inside fridge fan's airflow could be easily blocked is something shifted over the fan during travel. So I decided to move it from under the shelf to directly below the cooling fins. I should benefit from slightly better cooling in this location too. Rather than attach it directly to the cooling fins, I decided to build a small shelf extension from a small piece of wire clothes hanger. My idea was to mount it slightly below the fins with no part touching the fins which might let condensation get into the fan motor. It may still drip into the fan motor even after this precaution. If this proves to be the case, I will mount a new fan vertically in front of the fins, not horizontally (which is best to augment natural convection air flow) as I did in my current design. Here's a picture:

vrvbex.jpg


Finnaly I added a fridge baffle to prevent the flame from blowing out while running on propane when traveling. My fridge has 12v capability, but it works much better on propane and it allows all the power flowing into my Aliner from my TV to recharge the battery while towing, as I mostly camp without hook-ups. I got the kit from AdventureRV.net for about $30 with shipping. Here's a link to the kit. BAFFLE KIT - $18.95
It basically works by forcing the air take a rather circuitous path to get to the burner, preventing gusts of wind from blowing the flame out while traveling. Here's a few pics of it installed.

28cfrj4.jpg


The kit consists of 4 pieces (2 components). 3, U-shaped pieces of sheet metal (Dometic calls them lower vent baffles) partially block the lower vents as seen here and are held on by one tiny plastic push pin each (easily removable by hand.) The instructions say that these may be removed once you arrive at your destination to improve fridge performance in very hot weather. I was thinking that one could just leave the lower door off rather than remove the door baffles if occasionally needed. My dual, 3 speed fridge fans draws so much air through the cooling coils that I don't think it will be necessary - perhaps if I didn't have forced ventilation behind the fridge.

a4arsi.jpg

The second component to the kit is this metal shroud which wraps around the burner cover and flue. It is secured by 2 small self-tapping screws.

Since this kit is a genuine Dometic item I feel safe using it.

I will be trying it out next month on a 2,000 mile trip to the Smokies, so I'll post up how well it works once I return. Finally, I will trash my cheap inside fridge thermometer for an electronic one with a sending unit, so I can monitor the interior fridge temp inside my TV and while camping without even opening the door and allowing warm air to enter. I plan on getting one like this: http://www.walmart.com/ip/Acurite-Wireless...ometer/16888921

They are only around $11 at my local Walmart and provide cheap peace of mind that those juicy steaks and sweet lobster tails will be fresh and safe when I arrive at the CG.

Chip
 
Clever idea for mounting the internal fan, Chip. It should also "decouple" the fan from the refrigerator so that vibrations are not transferred and amplified. I found I got some vibrations with my original mounting, so I added some vibration isolating silicon washers to the corners of the fan and that seemed to take care of the problem.

I've been using a wireless inside/outside thermometer in my fridge for about two years now. It's worked perfectly and provides a lot of peace of mind.

We'll be FINALLY taking our trailer out on a week of boondock camping into New Mexico in a couple weeks, so we'll be able to see how the inside fan works for us.

Do you think the lower vent baffles are really necessary if you have the burner shroud in place? From the picture, it looks like the shroud would do the trick by itself. I never use the propane feature while driving, but I've sometimes wondered if maybe strong winds would blow out the flame while camping. The shroud will surely protect against that.

- Jack
 
You're probably right. I think I will experiment by removing the door vent shrouds one at a time and see if the fridge remains lit. Of course this doesn't mean that it will suffice for all applications. Which do you think I should remove first (for testing purposes), the upper, middle or the lower baffle?

Chip
 
Chip, I totally missed your post here, and, we just got back from a very successful camping trip with the new internal fan in the fridge. It worked like a charm. I don't know if it really keeps anything colder, but it certainly seemed to speed up the cooling down process. It was quiet and the battery seemed none the worse for having it on 24/7. Maybe, it reduces the need for the external fans to run?

As far as the vent baffles, I think I'd start with the upper one. My reasoning here is that the draft it might permit would be mostly bypassing the flame source since it's up high. I'd think the lowest baffle would be the one to have the greatest effect on the flame. Of course, I might be totally out to lunch here, because I'm working off your pictures and I haven't really looked at the positioning of things in my trailer (which I think are pretty much like yours.)

- Jack
 
I'm leaving on the 4th and I'll be back Oct.13th, so I'll let you all know the results of my testing. I concur that the removing the top vent baffles should least affect the flame going out, at least in theory, so I'll start there.

Chip
 
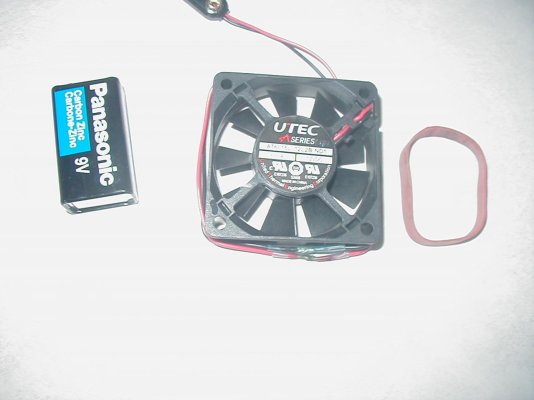
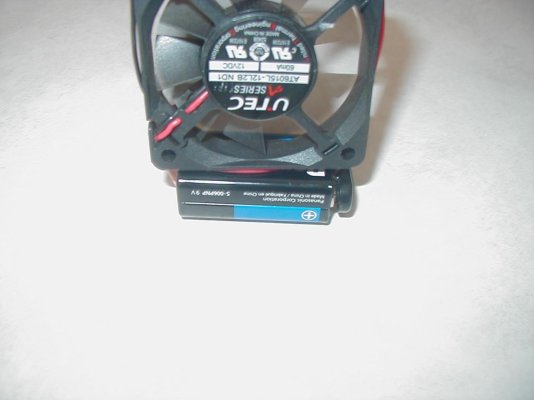
I am a person that looks for the cheapest and easiest solution to everything. I bought some similar PC case fans, and found that they run on 9v - I bought a 5 pack of 9v battery connectors at Radio Shack and some 9v batterys - The rubber bands came on my newspaper. It worked out to about 4 bucks a piece. I put one in the fridge on a shelf and 2 pointed up in the outside fridge compartment.
Sorry about the second picture - I forgot that the eyepiece is off after I dropped the camera.
 

Attachments

  • Sept 11 064.jpg
    Sept 11 064.jpg
    75.5 KB · Views: 55
  • Sept 11 065.jpg
    Sept 11 065.jpg
    70.7 KB · Views: 51
I just returned from a great 1,600 mile trip to the Smokies. I found that removing the bottom baffle did not allow the flame to go out. In fact, I couldn't get the flame to go out even with big trucks flying by at high speeds with the bottom vent baffle removed. I could probably get by with the middle vent baffle removed too, but I didn't test this configuration. I'll bet only the top baffle is mandatory on my fridge. Your experience may differ.

BTW, when stopped and camping the fridge stayed very cold inside (31 - 36 degrees depending on outside temps) with 2 baffles in place. Of course it wasn't very hot out either. I kept the fridge set on its middle setting the entire time. Shrimp kept in the freezer section was rock hard when I took them out to cook, several days into the trip.

Chip
 
my version of this mod...2 full ball bearing fans, bought on fleabay for about $20. I had some serious water damage on this side of the hi-lo. I have fixed everything, but the delimitation remains. I noticed that water had also worked its way in to the fan access panel. The top layer of wood was completely rotted along the bottom. I have had the bottom cap off for a month now trying to get it to dry out (it is still raining every week in Indiana!).

When I buttoned it all up today, I flashed all the exposed wood around the access. I also caulked and butyl taped the cover. I shouldn't have any more water problems in this area.


Try RV LIFE Pro Free for 7 Days

  • New Ad-Free experience on this RV LIFE Community.
  • Plan the best RV Safe travel with RV LIFE Trip Wizard.
  • Navigate with our RV Safe GPS mobile app.
  • and much more...
Try RV LIFE Pro Today
Back
Top