New to this experience

Yeah, I did

have my fresh water holding tank full; initially so full that water dumped onto the camper floor thru the tanks air vent (it wasn't connected to anything/just laying on the floor). Found and fixed that real quick.

I'm thinking later today I'm gonna try reinstallation and try yet again. This time I'll try and insert water onto the delivered side of the pump line by ... dumping water into an open spigot and see if it'll feed back to the pump. I read where that worked for someone on google.

Additionally, what another suggested - and that I'll attempt - is sucking air (tools required: strong lips) from the nearest spigot while the pump is running.

And I'll carefully fill the tank to near max so it won't have to draw so far.

Nothing to lose.
 
If the pump is functioning properly and everything is hooked up right, the pump should prime itself.
 
Looking Good

Wrascal
After a week of watching from the outside did your gmail thing and now I'm in with a new name of course.
Glad to see that you have worked your way through so many things. I'm thinking that your really going to enjoy things when it's all over said and done.
Good Luck on the water lines.

Later Tim owner 18ft 1969 hilo
 
Thanks, and welcome

I guess it should be noted by potential new forum users, you can't use Hotmail to join this site. Also noted, gmail does work.

I finally received notice that my new pump is in the mail (due Thur.) so I abandoned my plans to suck the water up. I'm not sure I would have had enough horse-power (or stamina) for the job.
 
That was quick

I received my shipping notice yesterday and this morning, around 0930, the new pump was delivered. By 1030 it was pumping water.

NOTE: contrary to what it says this is not a direct replacement to my original one, just close; both the water inlet and outlets are physically higher up, perhaps 1/4 to 1/2 inch.

Had my original install used flexible plumbing (instead of hard) it wouldn't have mattered. As it was, I wrestled it into place then somewhat screwed it down. A bit noisy this way but it'll do for now, especially since I likely won't be using tank water.

First final note, before I attempt to re-plumb it correctly I'll just try and stuff absorbing material around it (and the pipes).

Second final note, the entire system is now cooking with chlorinated water, to include the hot lines.
 
Two things you can do for pump noise. Place a thick rubber mouse pad between the pump and the floor, and add the flexible faucet type supply lines between the pump and the attached lines. Get ones that are long enough to put a complete turn in without the danger of them kinking.
 
Rinse cycle

Twice now I've now flushed the lines and drained/re-filled the storage tank. What I've observed is that the pump is only noisy when I draw just a trickle of water, using more (and there's plenty of it) actually allows it to run quiet.

All this draining/flushing filled up the gray water tank. Knowing I just checked it out the other day I simply drained it in place, w/o the sewer hose.

Cooool, clearrrr, waater (chorus: waater).
 
Last check out item (I think)

was the oven. It too appears to have never been used.

I figured out how/WHERE to light (and retain) the pilot then attempted to heat it up. The pilot blew out - I'm guessing because I had the door open trying to watch it?

Try once again, lite the pilot, wait a bit, close oven door and again turn the oven to cooking temp. Check in again after a few min and the oven was heating up.

Gas now off, as it's now the wifes department. We don't use the oven at home much so likely it'll not be used too much.
 
Great

Glad to see that you have taken care of most of your projects. We are just getting started on ours.

Later Tim
 
Thinking back to a few posts ago

the one with a picture of his trailer in the SNOW reminded me that I've yet to check out my heater(s). I believe that'll have to wait a few months.

I also have to repair my leaking black tank. Maybe a hot glue gun will take care of it (Grin).
 
Black tank repair

Today was the day for black tank repair. In order to perform this I had to move the camper for better access. And before I could move the camper I had to trim some branches that originated waaaay up high.

I have an electric chain saw that attaches to a long pole, but couldn't quite reach them. Plan B involved parking my truck underneath and trying once again. Standing in the bed I realized success; of course, now that meant I had to clean up the mess/ drag limbs to the street.

Deciding to play it safe I lowered the top, disconnected all lines, and pulled it forward 6-8 feet. That gave me room to sit (hunched up) under the camper and go to work.

First I used a sand block to scruff all the surfaces. It actually looked good/clean at start, although I found that the metal bracket that runs underneath/surrounds the drain spout was bent upward in the middle. I suppose that's what damaged the tanks joint at some previous point.

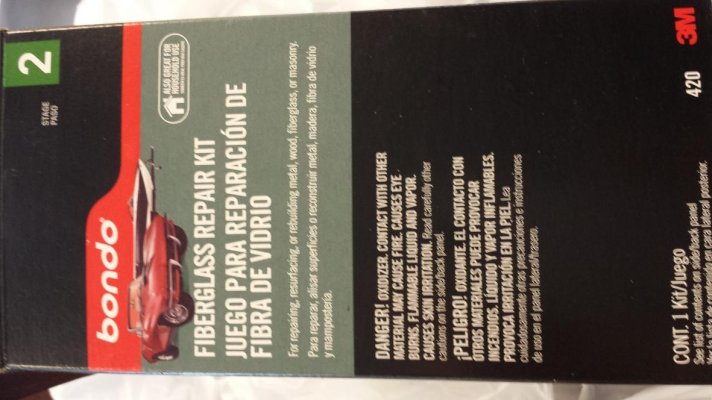
The picture shows the product that I used for repair. I found it at Walmart at about $17. Most of its contents went unused so I'm glad I only bought one ... I had considered two just in case. I also purchased several disposable paint brushes to use with this. I'm glad I did as the brushes made the glue-stuff application much easier.

I mixed up the two parts and Heavily slathered it over my freshly cleaned joint. Then I dunked my pre-cut fiberglas into the supplied mixing bowl, both sides were sopping with this mixture. It was too sticky wet to apply as directed so I used my hands. Then I slathered another dose of the mixture over it and allowed the stuff to harden (recommended 15 min, I gave it 30). I used the extra time to try and clean up my hands ... no go there. After tons of soap and water I started using sand to try and wear it away. No joy.

Getting back to the underside I repeated my previous steps for a complete second coat of goop, fiberglass, and more goop. Final drying time before refinishing is recommended at 90 min, I gave it 4 hours as I could still smell it. And the smell gave me a headache, or perhaps by the actual handling of it I absorbed it. The good news here is after about an hours time it easily cleaned off with soap and water- go figure.

After four hours I relocated the camper back to its spot and filled the black tank full. Several hours later I checked and no drips (so far). I'll leave it alone for several days to be sure.
 

Attachments

  • 20130628_114533.jpg
    20130628_114533.jpg
    95.4 KB · Views: 31
Last edited:
and then I got stupind

Went inside and reset all (6) circuit breakers and attempted to power up the air conditioner. Yes I had remembered to plug it into the outlet. Nothing.
Then I remembered the main switch - I'd intentionally left it in the center position.

Turn off all breakers, throw main back online, power up the breakers and still no AC. NOW WHAT?

Ooops, then I realized, I'd never plugged the camper up to the house. Main off. Breakers off. Plug up the camper, main & breakers on, switch AC to on and SUCCESS.
 
Last edited:
Several hours later,

and again, NO 120V POWER in the camper.

Long story short, earlier I had plugged an air compressor into the same circuit that protects my outdoor (camper) and bathroom outlets.

It provided enough pressure to fill my tractor tires (before blowing) so it went un-observed.

Nite, y'all.
 
Checked my Black tank level

late this afternoon, still registers full and no apparent dripping. Tomorrow I'll drain it and hope that my repair is road-worthy.
 
How does Hi-Lo measure lengths?

Likely many of you know this but I had to see for myself.

Knowing that mine was labeled as 24 feet I broke out the tape measure.

My lower unit measures approx. 18 feet.
My upper unit measures approx. 20 feet.
My tongue measures approx. 4 feet (3 feet beyond the upper box).

Utilizing Sherlock Holmes advanced mathematics, physics, and horse sense tell me they measured the unit closed, bumper-to tongue tip.
NOTE: I EXCLUDED THE BUMPER/ I recon that adds an additional foot beyond the upper box.

I feel cheated out of 4 feet. As a percent, that's quite a substantial loss.
 
Last edited:
That's how they did it. Ball to bumper. Sometimes they rounded up and sometimes they rounded down. Our 2310H is 22'-9" I believe. In 2009 they were called 2209T, both the same length.
 
length

In other threads on this site they talk about the overall measurement being from the outside edge of the rear bumper to the center of the ball coupler.

Later Tim & Nancy and a dog that wants to go camping
 

New posts

Try RV LIFE Pro Free for 7 Days

  • New Ad-Free experience on this RV LIFE Community.
  • Plan the best RV Safe travel with RV LIFE Trip Wizard.
  • Navigate with our RV Safe GPS mobile app.
  • and much more...
Try RV LIFE Pro Today
Back
Top