You are using an out of date browser. It may not display this or other websites correctly.
You should upgrade or use an alternative browser.
You should upgrade or use an alternative browser.
sam-HILO
Senior Member
Welcome to the forum
I have seen HiLOS of this vintage. You should be okay if you are handy. A little TLC goes a long way.
I have seen HiLOS of this vintage. You should be okay if you are handy. A little TLC goes a long way.
Bruce from Kansas
Senior Member
I have a1976 2176B like yours, but a year older. A few years ago, I replaced the Bathroom Upper Wall & Ceiling Panels with shower type paneling. Now, the ceiling mostly at the joints & around the Roof Vent need replacement, which requires removing the Upper Cabinets. The Upper Cabinets near the Door Side need Rebuilt anyhow.
Besides putting a new Coil in the Refrigerator (which I had replaced the whole unit several years ago, removed last year & used a small Walmart refrigerator), last year (problems actually starting a few years ago) the Hydraulic Lift pump wouldn't work at all (I've learned that it's probably just the Brushes, because it's NOT the solenoid). So I had to take it on its annual 200 mile journey while in the raised position and back home. Not doing that again. Because I've now had West Nile Neuroinvasive Disease for a year & a half now, I'm not back in good enough shape to complete that type of work again yet.
So, in May, I upgraded from a 41 year old Hi-Lo to only a 17 year old 2600TFB. Just doing maintenance sealing on the exterior, and nothing else needs any work yet. It's going to be nice for a while NOT to have to do so much annual work on it. All I have to do is complete the sealing work which should be done now, and remove the Awning (which I won't use anyhow, and has been damaged on the lower rear portion due to dragging on the road or something). I thread an 18' x 24' Custom Truck Tarp in, with 8' poles for support, and spread commercial carpeting for a nice Pickin' Parlor and Living Room Sitting area. It makes it nice for a 2 week "annual Festival reunion".
Last edited:
sam-HILO
Senior Member
Just a thought
Awning parts are hard to come by and probably expensive new. Try and sell your awning and parts. Even if the top is ragged out they can be cut and sewed. Best of luck with your new HiLo.
Awning parts are hard to come by and probably expensive new. Try and sell your awning and parts. Even if the top is ragged out they can be cut and sewed. Best of luck with your new HiLo.
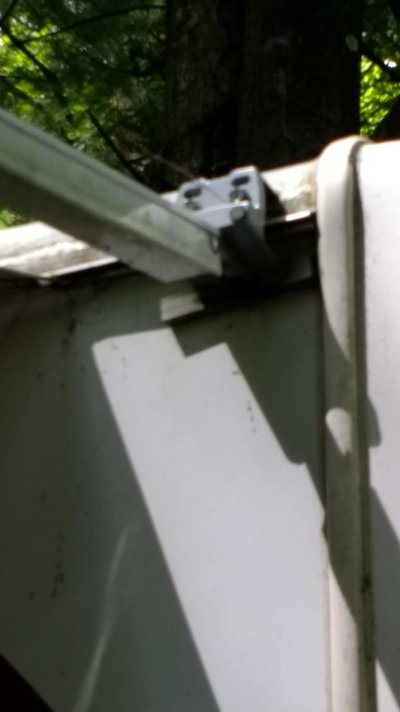
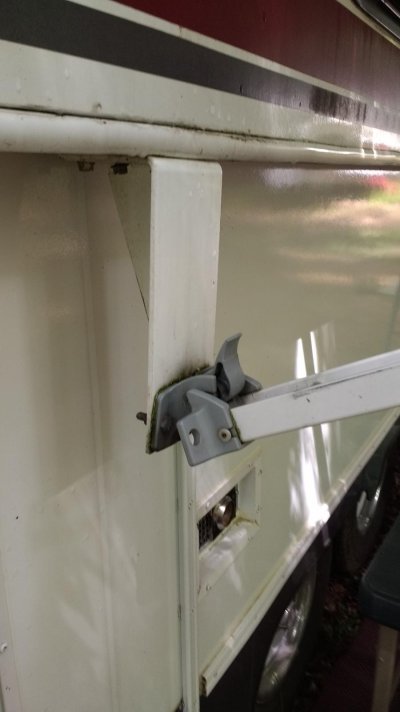
Those would hang to low for arms. Took pics of whats rigged up doesn't look close to right.Saw lots of pics with those hangers. They hang down instead of up. May just have to do a better job with what I have. First is lower bracket
Attachments
Bottom is hooked under what the canvas attaches to. The 2 bolts are wedging it tight. Is it suppose to just bolt to wood or metal behind it? Bottom one is bolted and wedged with a bolt angled thru the siding. Not done accidentally it goes thru the siding about 2 inches. It can't be close to right.
Last edited:
Bruce from Kansas
Senior Member
Awning Brackets
Ed,
That lower one looks like the Top Bracket going over the roof! And, IF the Awning Connects to it when rolled Up, It's Mounted Correctly, although mine is mounted in the"C" section just below where the Awning is supposed to be Threaded. However, I don't see the Awning anywhere close to it. Although as Rich says, it May be upside down.
The Lower Brackets on mine (All to be removed), your 1st pic, are attached to the bottom of the Upper Section, and hang down about 8". That's why the back one on mine is bent, because it either drug on the Pavement or road at a dip or something.
The top mount shown in your bottom photo appears to be upside down.
Ed,
That lower one looks like the Top Bracket going over the roof! And, IF the Awning Connects to it when rolled Up, It's Mounted Correctly, although mine is mounted in the"C" section just below where the Awning is supposed to be Threaded. However, I don't see the Awning anywhere close to it. Although as Rich says, it May be upside down.
The Lower Brackets on mine (All to be removed), your 1st pic, are attached to the bottom of the Upper Section, and hang down about 8". That's why the back one on mine is bent, because it either drug on the Pavement or road at a dip or something.
Last edited:
Bottom is hooked under what the canvas attaches to. The 2 bolts are wedging it tight. Is it suppose to just bolt to wood or metal behind it? Bottom one is bolted and wedged with a bolt angled thru the siding. Not done accidentally it goes thru the siding about 2 inches. It can't be close to right.
It bolts to the wood/metal and the part that is sticking up above the roof is supposed to be resting against the side wall with a rubber strip spacer in between the two.
Ok thanks resealing the roof so they are coming off this weekend.It bolts to the wood/metal and the part that is sticking up above the roof is supposed to be resting against the side wall with a rubber strip spacer in between the two.
So how are your lower mounts attachedEd,
That lower one looks like the Top Bracket going over the roof! And, IF the Awning Connects to it when rolled Up, It's Mounted Correctly, although mine is mounted in the"C" section just below where the Awning is supposed to be Threaded. However, I don't see the Awning anywhere close to it. Although as Rich says, it May be upside down.
The Lower Brackets on mine (All to be removed), your 1st pic, are attached to the bottom of the Upper Section, and hang down about 8". That's why the back one on mine is bent, because it either drug on the Pavement or road at a dip or something.
Bruce from Kansas
Senior Member
Lower Awming Brackets
Bolted UP through the Lower Rail.
For Clarity, Remember that this is on my newly acquired 2000 Hi-Lo, which is coming off. Never had one on my 1976.
P.S. Took some Pics of mine this morning to show you, but with my main PC being non-internet capable for several months now, I have no way to connect my camera to my Laptop. Good Pics too!
So how are your lower mounts attached
Bolted UP through the Lower Rail.
For Clarity, Remember that this is on my newly acquired 2000 Hi-Lo, which is coming off. Never had one on my 1976.
P.S. Took some Pics of mine this morning to show you, but with my main PC being non-internet capable for several months now, I have no way to connect my camera to my Laptop. Good Pics too!
Last edited:
Got my holes in the roof repaired. New fresh air vent in bathroom plumbing vents removed and some weird vent over tub gone also. new Butyl tape under corner trim and fresh air vent. Used Self leveling lap sealant for aluminum patches. Its hot out, so I'm done on the roof today. Still need to remove radio antenna, move TV antenna and apply new Butyl on side trim and front corners before sealing roof.
Attachments
sam-HILO
Senior Member
Reattaching awning bracket.
This information may be helpful for you. By Sam Shields 7-31-2010 We have done as Sam sugested and it works well.
This information may be helpful for you. By Sam Shields 7-31-2010 We have done as Sam sugested and it works well.
nmalozzi
Advanced Member
Got my holes in the roof repaired. New fresh air vent in bathroom plumbing vents removed and some weird vent over tub gone also. new Butyl tape under corner trim and fresh air vent. Used Self leveling lap sealant for aluminum patches. Its hot out, so I'm done on the roof today. Still need to remove radio antenna, move TV antenna and apply new Butyl on side trim and front corners before sealing roof.
Full Disclosure, I'm mostly a rookie to all this. That said, I did just completely rebuild the entire roof on ours. Anyway, the lap sealant is good and all, but I'd also be running Eterna Bond tape over all the seams/screws on those patches. The stuff is amazing. Easy to work with, and really makes a strong seal:
Amazon.com
I like the stuff so much, I actually ran it all along the outside edge of my roof to make a more seamless seal on the roof molding.
You can see the Eterna Bond on our HiLo here:
https://photos-3.dropbox.com/t/2/AA...m-o4RXqGNlj3k?dl=0&size=1600x1200&size_mode=3
The stuff works so well, I used it on the roof of our house after it was destroyed by a hail storm about 2 months ago. Have a roofer lined up to replace it, but I needed to patch up numerous holes to get us by in the mean time. We had holes large enough that I could stick my finger through the shingles AND the plywood under it. Baseball sized hail is nasty! At any rate, the EternaBond patched everything up and we haven't had a single leak during subsequent storms. The stuff just works.
(also, it's super annoying that I can upload photos when replying from my phone, but i can't when replying from my computer).
Similar threads
- HiLo123
- Hi-Lo Links and Useful Resources
- Replies: 0
- Views: 344
- HiLo123
- Hi-Lo Brochure
- Replies: 0
- Views: 126
- Campmiss
- General Hi-Lo camper discussion
- Replies: 9
- Views: 518
Try RV LIFE Pro Free for 7 Days
- New Ad-Free experience on this RV LIFE Community.
- Plan the best RV Safe travel with RV LIFE Trip Wizard.
- Navigate with our RV Safe GPS mobile app.
- and much more...


![IMG_1481[1].jpg](/data/attachments/495/495243-e6e3d0ef8aabb9c2232fe4878d004672.jpg)
![IMG_1480[1].jpg](/data/attachments/495/495244-6ceb49fa7e072dd623eff3d5796b35d5.jpg)
![IMG_1477[1].jpg](/data/attachments/495/495245-de0c15d0446bbc0017b0daaaacfbc63b.jpg)
![IMG_1479[1].jpg](/data/attachments/495/495246-9a7b449da89334909bace8779d6d856b.jpg)
![IMG_1496[1].jpg](/data/attachments/495/495251-47838d1c209d2586a8348eb66ba2760a.jpg)
![IMG_1497[1].jpg](/data/attachments/495/495252-449bf9a1c6dee98001bd26d13cbfeeca.jpg)
![IMG_1498[1].jpg](/data/attachments/495/495254-8a458bf06e74cf1359ab2881e608758a.jpg)
![IMG_1499[1].jpg](/data/attachments/495/495255-d279945eb1ffb4805bf526959a4656f9.jpg)
![IMG_1500[1].jpg](/data/attachments/495/495256-5992922919b93dd486f36e09c34ed072.jpg)
![IMG_1501[1].jpg](/data/attachments/495/495257-5fd205e21c6e0dd4a9b60c848bd9c45e.jpg)
![IMG_1502[1].jpg](/data/attachments/495/495258-f966cb487b3fa849a21ea4374c7eb575.jpg)
![IMG_1503[1].jpg](/data/attachments/495/495259-e8240ca99ff620049260513e3af864c1.jpg)
![IMG_1504[1].jpg](/data/attachments/495/495260-737c7e0f12f25ae0d6f1ebc954399d26.jpg)

