Adjusting cables to get even lift and full height

hookkey

New Member
Joined
Sep 28, 2011
Messages
3
Hi, I just purchased an 1997 21' Hi-Lo. The first time I raised the camper I noticed that when full up the corners were not even - about 1" or maybe even 2" different. Two questions:

1) Two of my adjusting studs appear to be adjusted almost all the way out, is there a way to easily shorten the cable to gain back adjustment or do I have have to try to find new cables?

2) How do I know when I have the Hi-Lo adjusted to max height? Is there a floor to ceiling dimension or do I lift until the base section's upper trim and the top section's lower trim are even?

Thank you in advance for any help provided.

Hookkey in Iowa

DO NOT try to judge correct height be the "trim" or any other "feature" inside the trailer! It is unlikely that you will get the bottom lip of the top half to match the top of the bottom half when things are properly adjusted.

Instead, you need to raise the top so that the rubber seal on it contacts the corresponding part of the bottom which will keep out bugs, wind, and so on. If you try to align things from inside, you will probably raise the top too far and it can distort the point at which the cables are anchored to the top. That may have already happened in your case.

I did that to one of the cables on my trailer when I tried to align things inside. To fix it, I unscrewed the cable at that corner, filled the depression I'd created there with epoxy, then added a short piece of aluminum L-angle plate to strengthen things before reattaching the cable.

I didn't take pictures during the repair, but I'll try to take and post one of the repaired area. I think once you see it, you'll understand what I did.

To adjust things properly, you may need to take some of the inner trim off so that you can see the seal. I was able to see it in a couple of places from the outside and so I simply adjusted the height of the lower edge of the top to match everywhere else per the directions in my manual. I measured from the four "rests" on the bottom half to the top half when I did this.

- Jack
 
Hi, I just purchased an 1997 21' Hi-Lo. The first time I raised the camper I noticed that when full up the corners were not even - about 1" or maybe even 2" different. Two questions:

1) Two of my adjusting studs appear to be adjusted almost all the way out, is there a way to easily shorten the cable to gain back adjustment or do I have have to try to find new cables?

2) How do I know when I have the Hi-Lo adjusted to max height? Is there a floor to ceiling dimension or do I lift until the base section's upper trim and the top section's lower trim are even?

Thank you in advance for any help provided.

Hookkey in Iowa

I don't know if you have already checked this out. My trailer doesn't sit even on the inside either. I thought it was out of adjustment because I couldn't get the tip out to come back in. I just hit the up switch and the tip out came in after that. I did the creep procedure found here in the reference library and haven't had a problem with it since.

http://www.hilotrailerforum.com/f61/cable-replacement-adjustment-1998-24td-125/

http://www.hilotrailerforum.com/f61/how-fix-top-half-creep-your-hilo-trailer-129/
 
Last edited:
Thank you for the help

Thanks to both "JackandJanet" and RCREYES for the needed information and speedy response.

I will do a more complete inspection of cables, pulleys and anchor points to see what I have got going on. I have inspected and lubed the cables and bottom pulleys while lying on the ground beneath the trailer. From that limited view I did not see any rust or broken strands on the cables or any broken pulleys. It does bother me that the adjustment screws are showing such a difference in exposed threads. I would not think that the cables would stretch and even if they did stretch some, it should a somewhat equal amount on each of them. That said, I have not seen the upper pulleys yet so that may be my problem.

I will also see what I have to do to view the mating upper and lower gaskets to determine the fully raised position.

Once again, Thank You!!
 
You're welcome, hookkey, and here's the pictures I promised. Working from memory, I find my description was a bit "off" in my first post. The pictures clarified things for me, and hopefully, for you.

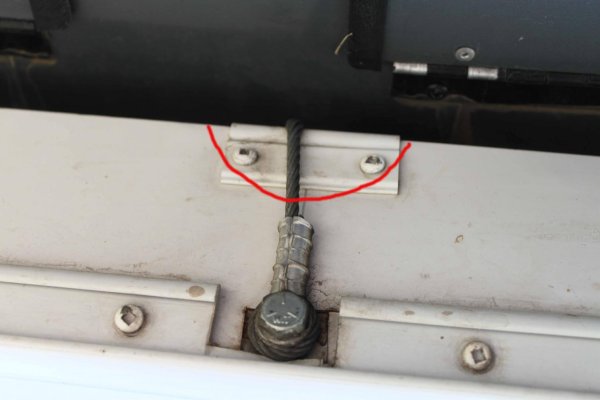
The first picture shows the cable attachment to the top under the forward left side of the trailer. This is an "undamaged" area. The cable is held to the top by the lag screw and the pressure exerted on the edge of the top by the cable is spread out by the small aluminum plate that is held by the two screws.

When I tried to raise the other side too much, it actually distorted (bent in) that plate and caused a severe indentation in the top in an area that I've outlined in red. I was lucky the cable didn't break. Once I released the cable by unscrewing the lag screw and removed the plate, I was able to fill the (big) "dent" with epoxy, restoring the original 90 degree edge. I hammered the plate back straight again.

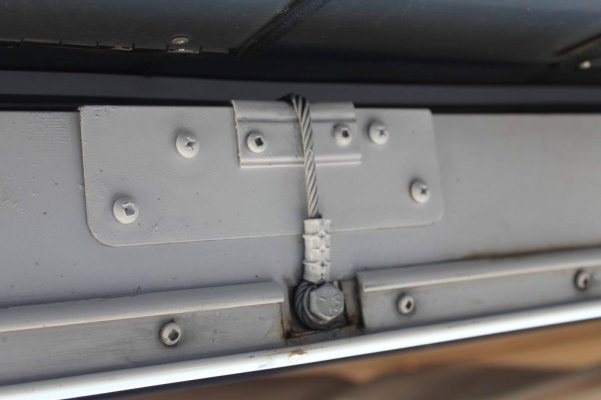
Then, in the second picture, you can see how I repaired the damaged front right side. I first put on a larger 90 degree aluminum plate (held on by 4 screws) to further strengthen the damaged area and then reattached the original plate on top of that. I could then reattach the cable, and adjust it properly.

If your top is damaged like mine was, it has the effect of "lengthing" the cable. You'd have to move the adjusting screws out to compensate. A repair like mine would "shorten" the cable.

You can do this repair with the top lowered onto and supported by 4 2x4s of equal length. (I put the 2x4s between the bottom half "traveling" supports and the top.) This takes all the strain off the cables and gives you enough slack to disconnect/reconnect them.

- Jack
 

Attachments

  • Left Front.jpg
    Left Front.jpg
    80.5 KB · Views: 262
  • Right Front.jpg
    Right Front.jpg
    81.2 KB · Views: 234
Adjusting cables

This was an interesting read for me and it brought up a question I would like to ask RCREYES and JackandJanet. I read the reference RCREYES made about "creep" and realized I may have been doing something in all [3] HiLo's we have owned since the early 80's.

I have always made it a practice when raising the top and it peaks out, I always push the 'raise and lower' control switch to the 'downward' position. In my mind, I am releasing the pressure off the hydraulic system and the top was then locked and resting on the locking mechanism.

Am I wrong in doing this? When it tops out to full extension, is it supposed to remain up without releasing the pressure on the hydraulic pump?

Thanks,

Jerry & Carol Curtis
2406 Towlite
 
I don't think the HiLo manuals really address that. I have always run the top up until it stops and also listen to hear the safety catch drop into place. But, having operated a number of pieces of equipment with hydraulics, it is recommended to relax the hydraulics to relieve pressure from the system. I think there is no harm in backing off the top to rest on the safety catch. That position should be very close to full up if everything is adjusted and working properly. It could extent the life of the seals in the system.

Does anyone care to discuss this?
 
Here's what MY HiLo manual says about raising the top (after you hear the safety lock engage):
To make sure safety bar is locked, depress switch to down position. If the top section does not lower, this indicates that the safety bar is in locked position. Once you have ascertained that the safety bar is locked, lift telescoping switch to pressurize hydraulic cylinder. If the safety bar does not lock, refer to (section 7.9.3).​

I've bolded the part where I believe HiLO wants you to lift the top OFF the safety bar and leave the system pressurized. I'm guessing maybe the safety bar is not meant to actually support the full weight of the top over long periods but is just there as a safety device?

I know I don't lower my top onto the safety bar to "relieve pressure" when camping.

- Jack

Jack,
Thanks for that info. Although relaxing makes sense it would be best to go with what the manual says. If you take a good look at at the safety catch there isn't a whole lot there to support the weight of the top.
 
raising top

JackandJanet,

Thanks for the information. We bought our first HiLo in 1983 and since we had never owned one, and absent an owner's manual, the owner 'showed me the ropes'. He said to raise it, then lower it until it locks to relieve the pressure from the system. Since that time when I referred to a manual online, I never bothered to read the raising and lowering, assuming I already knew the proper procedures.

Funny isn't it, how I've done this with [3] HiLo's and didn't have a problem from doing it the wrong way? I suppose that is a tribute to the engineering that went into the design. Old habits are hard to break but I will certainly try and break this one.

Thanks again,

Jerry
 
I suspect where you really might get into trouble is by trying to move the trailer even a short distance with the top resting on the safety bar. (And I know even short distances with the top up are a no-no.)

I haven't looked, but since the safety bar is a "narrow" thing under the top, could it damage the top if it was used for support? It's certainly different than the 4-point suspension the cables give you.

- Jack
 
Here's what MY HiLo manual says about raising the top (after you hear the safety lock engage):
To make sure safety bar is locked, depress switch to down position. If the top section does not lower, this indicates that the safety bar is in locked position. Once you have ascertained that the safety bar is locked, lift telescoping switch to pressurize hydraulic cylinder. If the safety bar does not lock, refer to (section 7.9.3).​

I've bolded the part where I believe HiLO wants you to lift the top OFF the safety bar and leave the system pressurized. I'm guessing maybe the safety bar is not meant to actually support the full weight of the top over long periods but is just there as a safety device?

I know I don't lower my top onto the safety bar to "relieve pressure" when camping.

- Jack

I agree. I think the safety bar is just that...a safety bar. I do not think it was intended to support the weight because of its size. I know when I jack aircraft, I relieve the pressure on the jack. You can't go wrong by following the manual. :)
 
I agree. I think the safety bar is just that...a safety bar. I do not think it was intended to support the weight because of its size. I know when I jack aircraft, I relieve the pressure on the jack. You can't go wrong by following the manual. :)

I want to ask and point out, did the safety bar design change? if it has, since my 95 model, I didnt know this... As far as I have ever seen, the safety bar only lets the Hydraulic Cylinder rest, the full weight of the top half of camper is still on the cables, and also straining against all the pulleys, and side of the bottom of the top half where cable attaches. Dont forget, that plate that is attaced to the cylinder ram and they place where the adjusting bolts got through the frame, all are under this stress load.

Based on This, and maybe I am all wet, as this is just my speculation. I believe the safety idea is specified back in the day, that the cables were assumed to be new, full strenght and probably since they were spec'd to be more than 10x stronger than specified minimum strength to lift each corner (percentage of the weight of the top half, when level) they (the designers and safety people) figure that a hole or leak in hydraulics was sufficiently eminent( or more probable ) than cable or even those "PLASTIC" pulleys they used would fail, so "safety idea" and other factors bearing on a hydraulic jacking system, the solution was to lowere the jack (that pump plus the hydralic ram is a glorified jack) onto jack stands (aka the metal safety bar), and with orings and hoses failing since jacks were invented, this is why the safety bar was designed. to minimize hydraulic failure as well as the creep all jacks seem to do, when left up without support, over time.

I believe the above is worth reiterating, traveling with the cables carrying the load with hydraulic or on the safety bar itself, changes nothing about how much strain is on the cables have, when not moving and since assumed LEVEL since we all try to be level when camping right? but when you are moving you can cause (just by tipping camper side to side on unlevel roads) not counting jolts from bumps acceleration or even braking, pot-holes and what not, to cause any one cable to surpass its maximum weight limits of any one cable, at some point. TO me, THIS the main reason why you dont travel in the UP position. wind, changing dynamics of which point now is carrying the substantial loads on cables varies so much more when traveling.

I know you all know what I mean, if you have ever carried something as simple fully distributed weight of a heavy object, like a big heavy wood dinning room table or anything? Have you ever got stuck with the lower end? where when table; when it is lifted level, half of the weight is at either side or end, but tip one end down, suddenly that side has increased weight to be carried, more you tip it the more that poor person had to carry, then you have a gorilla jump up and down on it, you better be olympic weight lifter or you will drop that table (assuming it is actually heavy to begin with) ...

Plus storing with cables strained all the time (up) just seems like hanging your hopes on a jack under the car, instead of jack stand at that same point, that resist collapsing.

The last consideration when it comes to any camper, is that there are several hundred consessions or compromises for ANY part used for a camper, from weight, cost perspective. that is why we dont have 40 gallon water heaters, the cost of the heater, the "space" et al. I believe the weight vs if you follow guidelines of not towing while camper is expanded or up, means that the top has a static weight (- or + say things figured when designing, like weight of rain water or snow or effects of high winds) were figured when they had to decide how strong to make that safety bar. bouncing off a curb, just for one example could probably pretzel that safety bar, I know darn well it would in my 5th wheel 29 footer. maybe less likely on that 17 footer?

DId I explain that well enough to see what I mean?
 
Last edited:
Sting, I can't answer your questions because I've never bothered to investigate the "design" of the safety bar, so I don't know how it actually works. I was inferring that it perhaps slid into a hole that would block the movement of the top. And, that it was there to prevent the top from crashing down with someone inside the trailer.

One thing we both know, however, is that it prevents the top from moving down when the top is lowered onto it and you cannot pull the safety bar out with the top resting on it.

And, there are all kinds of stresses that would be placed on the trailer if moved with the top up. Probably, the guides would be broken first. allowing the top to "bang" around against the bottom half. Uneven stresses on the cables would probably distort the top where they attach and might break the pulleys.

The CG would be too high, and the whole frame would probably be subjected to twisting, putting great stress on the sides of the bottom half.

- Jack
 
"Resting" the lift cables

The safety lock on the lift cylinder is just that, a saftey lock incase there is a catastrophic rupture of hydralic lines or cylinder seals. Keeping the pressure on those valves and lines probably will not affect the performance for many years since they are not subject to sun etc. Might be more concerned with rust on cables if parked long periods over dirt or by "skirting" that impedes air flow.
I am on my 3rd HiLo and have had to adjust cables as stated in this thread several times. I do "rest" my cables if I plan to leave camper in the expanded positions more than a few days. I have 4 - 2x2 fir sticks that fit between rest 'bumpers' and then let system (with lock bar raised) down enough to rest on sticks. You can figure out the length and if you want wedges to adjust for minor height differences. (yup, takes at least 2 people unless you make a small "jack stand" to lift each corner enough to place the sticks)
 
I did the same thing as Atboyd with the 2 x 2 fir sticks... only I didn't use a jack or a second person, I just lifted the end with my shoulder and put the sticks in. As has been pointed out, the top is not perfect so each one is a tad different than the other.

Me lifting the corner with my shoulder is a testiment as to just how light the top section really is. It took very little effort and it wasn't like "hurry please I'm gonna drop it". I did it because my top creaps down even though I have done the "clean the valve trick" a couple of times with very little effect, and I'm staying in it long-term, so I'm keeping the weight off the cables. My next step is to flush the system and refill with new fluid. I have to guess the fluid in it is 22 years old only because I cannot see inside (pumps in a side compartment).

As far as the "safety bar" is concerned, I agree with others, it is just that, a safety device, not s support system. It's for nothing more than to prevent the top section from killing people when a cable does snap or a hose blows.
 
As far as the "safety bar" is concerned, I agree with others, it is just that, a safety device, not s support system. It's for nothing more than to prevent the top section from killing people when a cable does snap or a hose blows.

I just will say, so you might need to rethink a little. the safety bar DOESN'T stop anything if the all of the cables snap. Just sayin

Plus inherently if one cable snaps, we've all found that the roof then at that corner drops some, then jams, and you cant get it up or down without interventions... PLUS, the chances of all 4 cables breaking at once so the top can fall all the way down, without jamming first, would only happen in a James bond movie I think, or crash of some kind where the cylider area was affected.

My hilo is 29.5 ft long, you wont lift any corner of my camper with your shoulder I guarantee you that one, well maybe a weight lifter could but a couple beefy teenage football team members had one helluva workout, trying to do so, so I had to get a jack I keep in the camper.

You or I might lift those short little 17ft ones, especially since on most of these the "ft" includes the hitch lenght which is at least 3 ft.
 
The Safety Bar only stops the hydraulic cylinder from retracting, the top is held up or supported by the 4 cables at all times. If a cable or 2 breaks that corner, end or side will drop and jam as sting32 said. A jack is then needed to raise it up out or the jammed position. As they say, been there and did this.
 
You or I might lift those short little 17ft ones, especially since on most of these the "ft" includes the hitch lenght which is at least 3 ft.

Mine is a 22" FunChaser so it's right in between your 29' and the 17' you're talking about, but not a tow lite either... and trust me when I tell you I'm not a football player or a weightlifter... and I just took them out today so I could get one of my tanks filled - and still no jack...

And the hitch lenth is subtracted from yours as well... so 29.5ft minus the 3 ft you talked about...

And yeah, wasn't really thinking about the cable thingy, but it doesn't negate the fact that the "safety bar" is still just a safety device now does it... :D
 
I have recently purchased an 2902BX...When looking at the lifting cable attachment points on the bottom side of the top, the cables have actually cut into the inner edge. On the LR cable, the aluminum box channel (inside the wall) as actually bent due to excessive lifting force. I discovered this while conducting delamination repairs. To rectify this issue, I have had C channels made from 1/8" steel (then powder coated) to assist in spreading the lifting force to more of the upper frame. (Why Hi-Lo put windows above lifting points is beyond me). Has anyone else seen this type of failure?
 

New posts

Try RV LIFE Pro Free for 7 Days

  • New Ad-Free experience on this RV LIFE Community.
  • Plan the best RV Safe travel with RV LIFE Trip Wizard.
  • Navigate with our RV Safe GPS mobile app.
  • and much more...
Try RV LIFE Pro Today
Back
Top