Hilo Plastic Rear Cap Crack

Onebel

Member
Joined
Jul 22, 2012
Messages
13
Location
So Cal
Hi you guys,

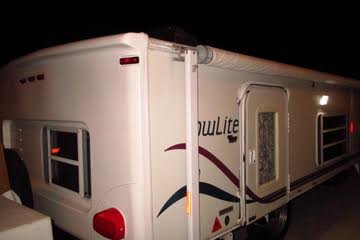
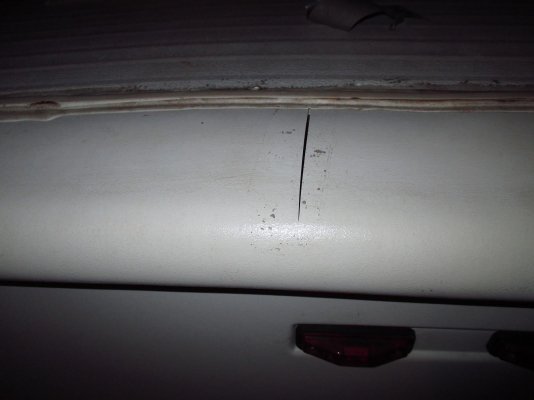
I just replaced the back plastic cap that cracked on my 2001 Hi-Lo Trailer 17t towlight. I ordered the replacement rear plastic cap from hilo trilers.com and a professional RV repair shop replaced/installed the entire rear plastic cap. Now (3) months later it cracked again. Please see attached (2) images.
- What is causing this cracking or splitting of plastic?
- I always put a tarp over my hilo to protect it from the elements
- Also How can this be repaired without having to replace the whole back plastic cap again.
- Is there a special adhesive that we can use that can be fixed and provide a more permanent fix?

Thanks
Isabel
 

Attachments

  • Hi Lo Trailer.jpg
    Hi Lo Trailer.jpg
    69.2 KB · Views: 115
  • Hi Lo Trailer 1.jpg
    Hi Lo Trailer 1.jpg
    9 KB · Views: 96
To stop, hopefully, the crack from getting larger drill a 1/4" hole at the very end of the crack. That will distribute the stress in all directions and reduce the chance of further cracking. That works on steel bridge beams. Seal the hole and crack with Lexel self leveling caulk. It is good for most all caulking applications.
Lexel® - The superior alternative to silicone.
 
End cap crack

I feel bad that you replaced your end cap and now it has cracked again. This is a common problem on the newer trailers as the plastic flexes as you travel down the road. The only slight fix is to drill and caulk to stop the crack from enlarging. Welcome to the forum. My trailer is a 1990 25ft. Classic with the ends made of fiberglass which don't crack. The fiberglass does develop fine spider cracks due to aging and flexing. Enjoy your HiLo and visit the forum often.
 
Thank you guys! I drilled holes on the cracks then caulked them with lexel.
I replaced the back cowl before because the plastic split into 2 it was a very big crack more than 1 foot long and it opened up.
 
This is just my opinion, to me it appears that the back of your trailer is a little to wide and is putting stress on the cap because the crack appears to be pulling open. For what ever reason these caps do crack my 2209 has cracked in the bottom corners but I drilled and caulked before they got more than about 2 inches and so far that has stopped the crack.

This maybe what happened instead of the trailer being to wide. The center of the first cap was pushed in at the top and fastened putting stress in the center of the cap. The second one was installed to the same line as the first, which again put stress in the center of the cap.
 
Last edited:
Hi you guys,

I just replaced the back plastic cap that cracked on my 2001 Hi-Lo Trailer 17t towlight. I ordered the replacement rear plastic cap from hilo trilers.com and a professional RV repair shop replaced/installed the entire rear plastic cap. Now (3) months later it cracked again. Please see attached (2) images.
- What is causing this cracking or splitting of plastic?
- I always put a tarp over my hilo to protect it from the elements
- Also How can this be repaired without having to replace the whole back plastic cap again.
- Is there a special adhesive that we can use that can be fixed and provide a more permanent fix?

Thanks
Isabel
Isabel,
I will refer you to a similar problem I experienced on our 2406T:
http://www.hilotrailerforum.com/f25/roof-repair-1685/index2.html
Go down to the day I first discovered it while repairing my roof problem. You will find one post with pictures one of the split in the cap. I used Web Seal Tape to cover the long slit. I painted it with as close a match as I could and had planned to put some sort of decal over it like the US Flag but never got around to doing it. You definitely need to place tape over it to keep the water out and prevent future damage on the interior due to water exposure. I would recommend Web Seal Tape; expensive but worth it. I had a total of [5] splits on the front and rear end caps. It starts at where it is screwed into the top of the trailer and works its way down the front or back sides. You should check all your screw points to see if you have the beginning of a new traveling split. Drill your stop holes as soon as one begins to prevent further splitting. I covered the entire width of the end cap where the cap stops and the roof begins [in the seam] with Web Seal tape and painted it with a white elastomeric paint. The more you do now, the less problems you will have in the future. As to the whys this happens...I believe the general consensus is the factory cut back on the more expensive fiberglass cap to the cheaper plastic cap. Good Luck!

jcurtis95
Fredericksburg, TX
 
Do you think enlarging the holes where the screws go through would take some stress of the caps, and not screwing down very tight to allow some movement would help? Aluminum and plastic don't expand and contract at the same rates.
 
Last edited:
Do you think enlarging the holes where the screws go through would take some stress of the caps, and not screwing down very tight to allow some movement would help? Aluminum and plastic don't expand and contract at the same rates.

Rich, I do not think that would help. Since the end cap was just replaced and already begun to split, I really believe the best solution is the Web Seal tape. Once in place and regular follow-up checking of where the screw holes are, and he happens to see a new split coming from underneath the web seal tape, he should drill the small stop hole right away to prevent the split from continuing. He could probably cover that short split with a good calk and that should be the end of it.

The splitting beginning at the screw holes is just an inherent trait of those plastic end caps. I know ours developed after traveling over a rough highway for a distance of about 25 miles. By the time we got to our destination it had progressed from the screw hole down to the running light [rear cap] after traveling a total distance of about 170 miles. If the screws are left loose, I believe over time the vibration would speed up the beginning of a new split.

Just my thoughts.

jcurtis95
Fredericksburg, TX
 
Cap crack fixes

Had same problem with our 2005 27T. Took both caps off and replaced rear with new Cap after carefully reinforcing inside of cap with fiberglass cloth and resin, $700 later... Fixed the problem. Did same with front cap except used old cap plus glass cloth.

As I understand, the factory went to a different plastic sometime in early 2000s, and these crack like crazy. Another fix is to find someone locally the does plastic welding. Never tried so can't say how that might work.

Good camping!

Glen
 
I had a rear cap replaced while still under warranty and regretted it because the replacement cracked even worse. Then, my RV dealer did plastic welds but they did not hold. Then, the front one started and both began warping along the roof line, so I put some extra screws in. However, the warping continued and I kept having to close up the gaps with self-leveling caulk.

These problems were not necessarily related to vibration when on the road because they would happen when in storage over the winter with cover on.

Final resolution (I hope): I have used self leveling caulk to plug up the cracks. Last summer an RV dealer where I live pounded in nails to hold the caps down to the roof and then put a very large amount of self leveling caulk over these nails to seal it all. The cost was reasonable. So far, so good.
 
I've used an epoxy based product called G flex by west systems to hold things together. It remains flexible and works on plastic, fiberglass metal and wood. Google it.
 
Is it safe to travel to dealership

I have developed a crack in the front cap as well as the back cap. Roof seems to be fine. My question is, is it safe to travel to the dealership for repairs, or do I need to throw straps and binders around the camper? Is the structure collapsible because of the cracks in the caps? is there a risk that the Hilow travel trailer will collapse on the road?
 
Chicken4wk - welcome to the forum!

The only danger posed by cracks in the end caps is that the openings let water in if it rains and that can rot the underlying wood paneling and any wood in the framing. The caps are purely cosmetic and serve no part in the structural integrity of the trailer. You can simply lower the top to the towing position and tow it to wherever you want it repaired.

However, this is an easy DIY job. You just need to drill a small hole (maybe 1/16" or at most 1/8") at the end of the crack where it is progressing toward the inner part of the cap. This "stop drill" hole spreads out the stress that is causing the crack and stops it from progressing. The hole needs to be at the very END of the crack, you must not have any part of the crack extending past it! Then, you can simply fill the hole and the crack with a good caulk, and we recommend Lexel caulk, which you can find at Ace Hardware or online. Don't use silicone caulk or one of the cheaper kinds. They won't hold up. The caulk will prevent water from entering. Bob's your uncle - you're done!

- Jack
 

New posts

Try RV LIFE Pro Free for 7 Days

  • New Ad-Free experience on this RV LIFE Community.
  • Plan the best RV Safe travel with RV LIFE Trip Wizard.
  • Navigate with our RV Safe GPS mobile app.
  • and much more...
Try RV LIFE Pro Today
Back
Top