How To Get Behind the Control Panel?

Astroham

Member
Joined
Aug 12, 2016
Messages
23
Location
Gilbert, AZ
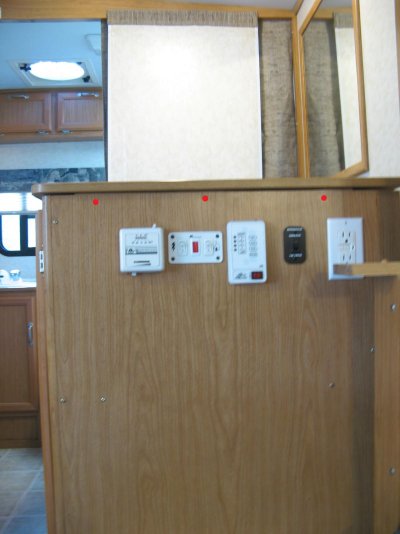
On our 2407T I need to get behind the "control panel" on the fridge cabinet (picture below in case that's not what it's called). I tried taking out all of the screws on the control side, but the panel seems glued beneath every screw except the top three (which are red in the picture). These screws hold the right side of the fridge cabinet top on. By lifting the top up I can begin to see behind the panel, but It seems that I need to remove the three similar screws holding the left-side of the fridge cabinet top on in order to gain access. Am I missing something here?

If I really need to remove the left-side screws, how does one do that? The moveable shower wall panel that slides into the lower wall blocks access to those screws and I can't find an easy way to get it out of the way. Has anyone figured out how to access the wiring behind the control panel?

Some worthy and knowledgeable person needs to write a "How to Disassemble your Hi-Lo" book for those of us just being initiated into Hi-Lo repair/updating. Thanks.

Astroham,
WB4IPB
 

Attachments

  • Panel1A.jpg
    Panel1A.jpg
    131.5 KB · Views: 15
You might try removing the exterior plastic fridge vent and see if there are any screws or brackets holding the counter top on. Perhaps you can remove the shower control assembly and gain access that way. My previous HiLo had the shower control assembly mounted on a panel which then was screwed to the wall. There was an access hole behind the panel. What are you trying to do behind the control panel, just curious? Don't know if any of the above will work for you, but I am just throwing out some suggestions, as I am not familiar with your unit.

Bob
 
You may have already tried this but, have you removed any of the individual covers on the panel to see if there is excess wire pushed back inside that can be used. Tell us what you want to accomplish and maybe someone will throw in an idea. Probably your best access to that area is pulling the fridge out, but I'm sure you don't want to do that.
 
RichR,
I'm going to put a dual Anderson Power Pole receptacle on the cabinet to power my ham radio equipment which I place on top of the fridge when in use. I plan to run a high-current pair of wires from a 50 amp fused connection in the battery compartment under the dining seat and through the wire trough in front of the expanda-room to the control panel area. I need to be able to grab these wires as I fish them through the wiring trough.

It looked very simple until I saw that it was going to be difficult to remove the fridge cabinet top (or side).

Astroham,
WB4IPB
 
That may be a job fishing those hefty wires through there and then connecting them. I replaced the telephone/cable receptacle with a 12 volt socket/cable receptacle but it was easy since I wasn't using heavy gauge wire and I was able to pull the wire down through the space by taping it to the unused telephone wire. The electrical panel is only about a foot away from the fridge.

Have you considered running the wire below the floor and going up the space behind the fridge. Maybe pulling out the 110 receptacle would allow access to fish the wire to a spot nearby.
 
RichR and All,

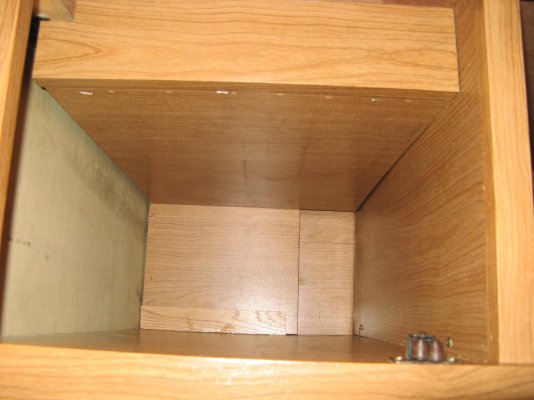
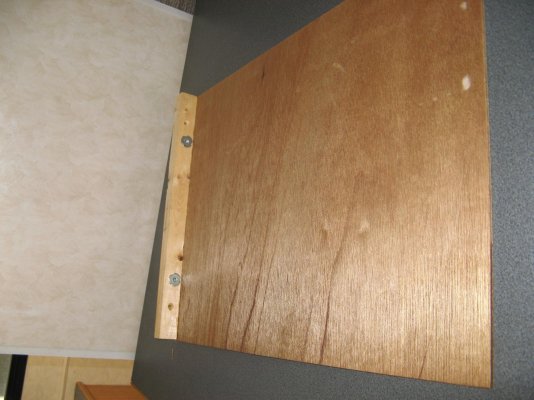
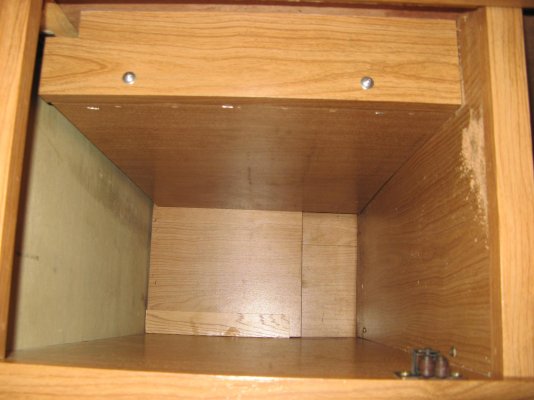
I have solved my access problem. 4 inches inboard from the control panel is another thin panel enclosing the wiring and controls of the control panel. The back end of this panel fits into a slot while the front end was stapled to a 1 x 1 which was screwed in place before the control panel was glued in place (no access to the screws - they were inside). This afternoon I gently pulled out the staples freeing the panel. Now I have access to everything behind the control panel. I removed the screws holding the 1 x 1 in place, removed it from the cabinet, and re-stapled and glued it to the removed piece of panel. Then I drilled the appropriate holes, installed two T-nuts and I now have an easily removable panel allowing access to the back of the control panel (and I didn't have to remove the top of the fridge cabinet).

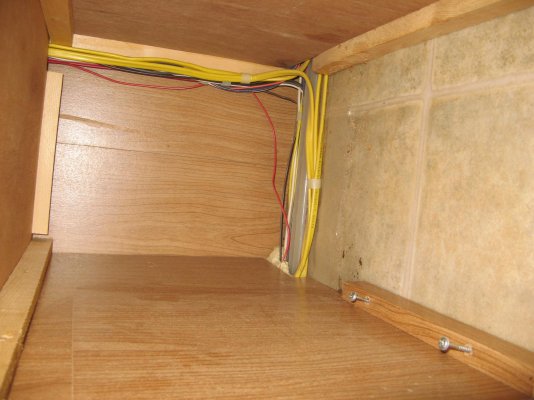
Removing two lower panels below my modified panel gives access to all the wiring going to the control panel as well as the opening to the wiring trough which passes in front of the expanda-room. Even better, there is plenty of room to fit the wires I plan to run in the present trough!

I didn't take pictures this afternoon, but I'll do that tomorrow and post them so you can better understand what I did.

Thanks for the suggestions and moral support.

Astroham,
WB4IPB
 
Anderson for Ham

Astroham,

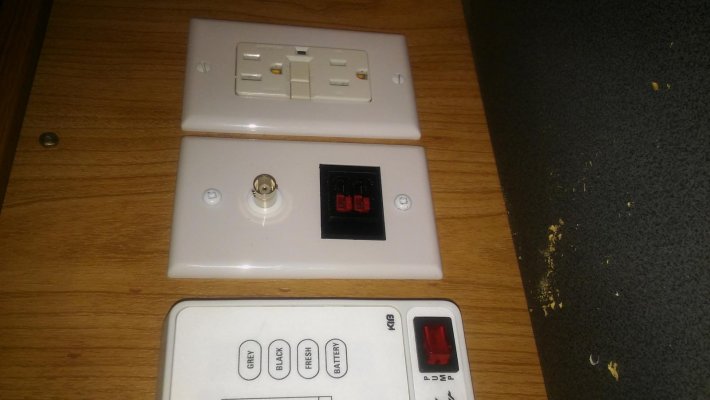
Glad that I'm not the only one who is hacking up my control panel for Anderson powerpoles. Were you just going to do a panel mount? I'm in the process of retrofitting my panel as well with powerpoles and a BNC. This has taken less priority now that a tire blowout took out my wheel well on the other side and in an unrelated event my 12V converter failed... Here's a photo of what I have started.
 

Attachments

  • 1009162018.jpg
    1009162018.jpg
    122.1 KB · Views: 11
S205designs,

That looks nice. I'm sorry to hear about your tire blowout incident and converter problem.

I have an Elixir converter box but recently removed the Elixir converter electronics and installed the WFCO 55 amp multi-level charge electronics. This seems to charge the batteries better (especially by going to float at 13.2 volts when fully charged).

On my control panel I'm adding a cigarette lighter-type connector (right where you have the BNC connector) along with the powerpole panel mount. My antenna connections will go out a port under the couch on the floor of the expanda-room which will get a PVC cap screwed on it when not in use.

I also may put my charge controller on the control panel since it looks as if I will be bringing the solar wires in through the bathroom like everything else. Nothing is cast in concrete yet as the first obstacle for my electric plans was to easily get behind the panel.

Astroham,
WB4IPB
 
Here are the pictures that go with this modification:
1. The inside panel before mod
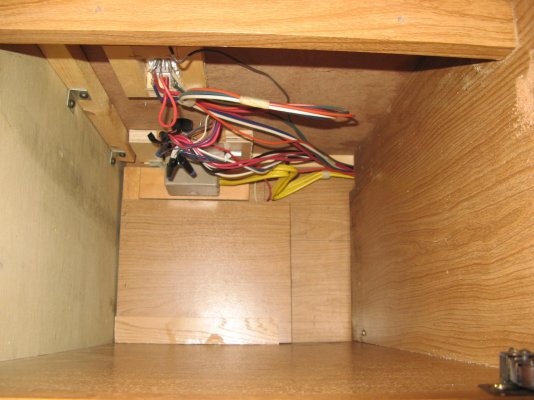
2. Control Panel wiring exposed after inner panel has been removed
3. The inner panel re-stapled and glued with T-nuts installed
4. Back together, but now a removable panel

There are two more pictures in a following reply.

Astroham
WB4IPB
 

Attachments

  • BeforeMod.jpg
    BeforeMod.jpg
    149 KB · Views: 8
  • PanelRemoved.jpg
    PanelRemoved.jpg
    193.2 KB · Views: 7
  • T-Nuts Added.jpg
    T-Nuts Added.jpg
    213.3 KB · Views: 6
  • AfterMod.jpg
    AfterMod.jpg
    148.4 KB · Views: 5
1. Here is what the floor-level wiring looks like after a panel is removed. This is the output of the wiring trough that comes across the front of the expanda-room.

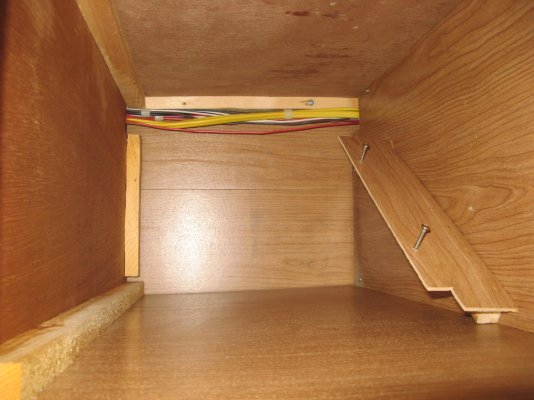
2. In the shelf above this are the wires running to the control panel.

Now the wiring is accessible for additions and modification.

Astroham,
WB4IPB
 

Attachments

  • FloorLevelWiring.jpg
    FloorLevelWiring.jpg
    196.6 KB · Views: 4
  • MidLevelWiring.jpg
    MidLevelWiring.jpg
    191.6 KB · Views: 4

Try RV LIFE Pro Free for 7 Days

  • New Ad-Free experience on this RV LIFE Community.
  • Plan the best RV Safe travel with RV LIFE Trip Wizard.
  • Navigate with our RV Safe GPS mobile app.
  • and much more...
Try RV LIFE Pro Today
Back
Top