Major repairs to walls, windows & Beam 24' - 2002

Beach Papa

Member
Joined
Jun 27, 2013
Messages
27
Location
South Carolina
2002, 24 foot Hi-Lo Camper Window, Wall and Beam Restoration
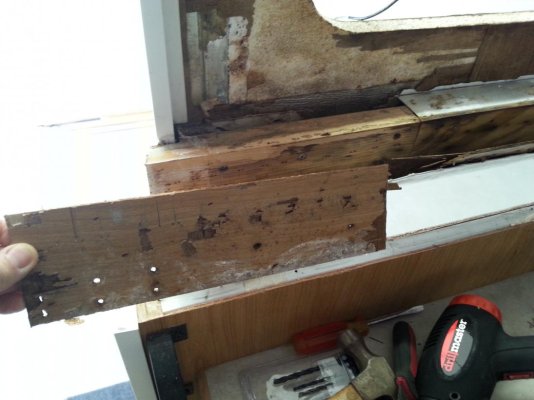
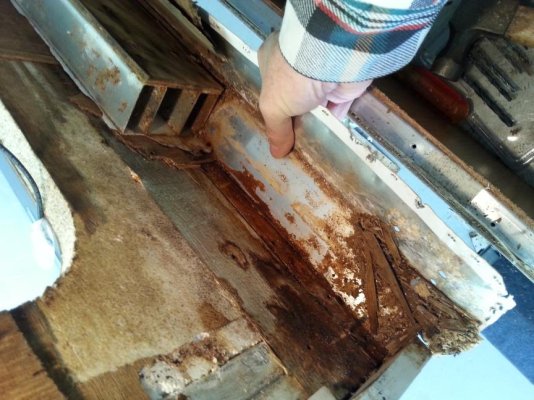
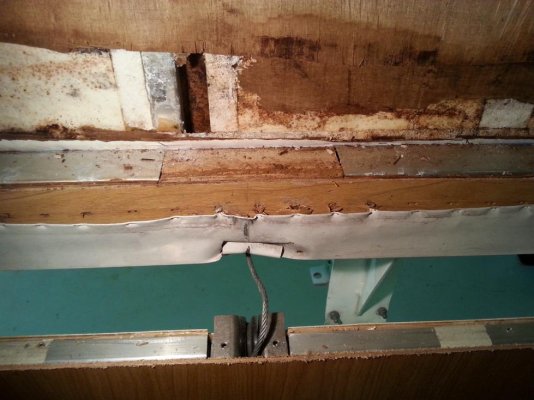
Summary: Last summer (2013) we were on a camping trip and raised the day-night shades when we arrived at the campground. Unfortunately, one of the screws for the restrainer cords that holds the shade down, pulled out of the trim cap above the upper section beam and we discovered that the beam was rotted. Turns out the manufacturer over-cut the opening for the windows in the walls and they leaked and rotted both the lower section of the walls below the windows and the perimeter wood beam below. Twelve and a half feet of beam was rotted on one side and five feet on the other side. The window under the awning was just as improperly installed but the awning protected it from the rain. The window manufacturer says the minimum required overlap between the window and wall is 3/8”. Unfortunately, there were places around the window which had less than 1/8” overlap. The windows looked great from the outside and inside but they were not installed correctly. The windows were installed using putty tape between the frame and the wall and with so little overlap; the putty squeezed out and allowed water to enter. For five weeks my wife and I worked on the camper almost every day (I am retired) either finding materials, cutting and prefabricating parts, tearing out rotted wood, separating the upper and lower sections of the camper, removing windows, or building back walls, beams, wall finishes and reinstalling windows and a new bulb seal. We are now finished and the final product looks great, although nothing is ever perfect. No one got hurt, which was a blessing, but there were some times of concern while the top and bottom of the camper were separated. (I pushed the tongue jack off a 6x6 block of wood while trying to force something into place and the whole camper shifted about a foot which gave us both some concern since the top and bottom were separated at the time. ) I learned a lot and if I had it to do over again, I would do things a little differently. I am pretty handy with tools so I will say this project is not for the complete novice, although it can be done with time, hard work, perseverance and a dry place to work. A long time ago while on the web, I read that the windows in a Hi-Lo should be taken out and resealed. I thought that was ridiculous. If the windows are installed properly, they should not have to be resealed ever. So I did not remove them and reseal them a long time ago. If I had, I would have realized the windows were in fact not installed correctly in the first place and I would have saved myself a HUGE amount of restoration work to have caught the problem before the leaking windows rotted out the walls and beams. I will share a word to the wise. If you have a Hi-Lo and have never removed the windows and/or resealed them, you should read the complete description of my project and perhaps at least take one of your windows out to inspect to see if it was installed correctly before your camper suffers the same fate as mine. I hope all you Hi-Lo owners can benefit from our experiences. We love the concept, we love the camper. If we were to lose this camper, we would probably buy another Hi-Lo, even knowing all the potential problems.
Happy Camping and Blessings to Y’all.
Beach Papa

To see the whole process:
 

Attachments

  • 2002 Hi-Lo rebuild summary.pdf
    1.3 MB · Views: 357
Thank You Beachpapa. I have just pulled my trailer over to do basically the same thing you just did. My eyes are too fuzzy to read the PDF very well, but I can tell it is a great step by step instruction sheet. I will try to write one as well.
I have ordered a bunch of materials and I am awaiting for them all to be on site before I start the major parts.
Once again thanks for taking the time to do this. :D
 
what a great write up!!

I was able to enlarge the PDF and read every word of it. Love your honesty with what worked and where you made some goofs, What a shame to pay such a good price and have the windows not be cut properly. I keep saying everyone should take their windows out and reseal. Wow all this in five weeks!! It sure is scary when the trailer creeks and groans when you are jacking it up and getting the 2x4s in place. We were lucky a HiLo friend came on site and showed DH how to do this. What type/thickness of metal did you use to back up your bulb seal with? We have to replace a 3ft. section that didn't hold up. It is also a good idea to line your floors with cardboard and use duct tape to join pieces. Now it is time for you to go camping!! You could start a retirement business repairing HiLos!! Just kidding. DH only wants to repair ours and no body elses. I'm sure your write up will help someone else.
 
If anyone needs more information, I would be happy to provide, just send me a PM if I don't respond to a post, because I don't always go into the forum. Regarding the attachment of the bulb seal, sorry I don't have any photos of that process, but I had forgotten to take the camera with me that day. We cut 1" wide strips of Aluminum flashing and stapled them over the new rubber bulb seal fin with staples about 1" apart. We used 1" stainless steel, narrow crown staples driven by a compressor. The big box stores (Lowes, Home Depot) did not have aluminum flashing thick enough to do the job without the staples driving all the way through the flashing. We had to go to a roofing supply store. The flashing thickness should be 0.027" - 0.032", which is commonly used to make seamless gutters. On our bulb seal fin flashing we used 0.027" because we had it available and it seemed to work fine with our pneumatic stapler. It is helpful if your stapler has an adjustment for how much force to use driving the staples.

There is also a flashing built into the composite wall that I did not take pictures of. It is a flashing about 4" high and the length of the wall. Since the plywood used in the wall is so thin, screws to attach the guide blocks and beam to the wall would pull out without some kind of support behind the plywood to distribute the load. The flashing sits behind the beam. For this flashing we used 0.032" because the existing flashing seemed to be heavier than the 0.027" flashing we had available. The screws holding the guide blocks and the beam went through pressure treated wood out of which we made portions of the new beam. Therefore, these screws had to be stainless steel and they were 3-1/2" long. Neither Lowes or HD had SS screws this long so we got them at a specialty hardware store. If you are rebuilding walls, the 4" heavy flashing goes into the wall system behind the inside plywood layer. The Gorilla Glue should go both under the flashing and over the flashing to thoroughly bond the flashing into the wall.

I meant to also say that you can either cut the flashing with shears or you can use a utility knife and straight edge. With the utility knife score the flashing several times and just bend it back and forth at the score line to break the piece off.
 
Last edited:
For what its worth, over time the puddy tape will dry out, lose adhesion and shrink regardless of the fit. I just resealed all of my windows on my 1981 FC and they fit correctly BUT everyone of them had some damage, usually limited to just rust on the threads of the screws.
I don't know if this is right or wrong but I used latest generation sillicone type sealant instead of either of the 2 types of sealant tape avialable from Camping World. I just hope I never have to remove them EVER. :eek:

Rick
 
Hello group.
I am getting into a major, but only on the right side, all I need for the left is to reseal everything to prevent the damage. If someone has had a side off can you tell me if I can remove it without tearing down the ceiling. I have no water damage to the ceiling but the upper side board is in need of replacement as well as the bottom beam and I am hoping once the siding is off the board will have roof supports screwed to the side of it rather than the top. It has to be repaired either way but I'm hoping someone can tell me I can just remove the side:D

I will have to raise it all to replace all the bulb seals but I think I should do this side first so I have a good structure to raise.
 
HiLo wall repair

We were able to rip out our side wall without doing anything to the ceiling. We had no ceiling or roof damage. You are correct in doing your side wall repair first. Then do the bulb seal replacement. Keep us posted.
 
Thanks Sam, I was hoping I could do that. I am hoping to replace the aluminum siding with fiberglass too. I found a place that has a roll for a reasonable price but I have to go back to see how long the roll is. I will need 52 feet and it appears to be 3/32 in thick. I have worked with fiberglass autos and it isn't my favorite material but it is strong and easy to repair when damaged.

I will of course post pictures so we all know what not to do:D.
 
Earlier this summer we finally had a chance to take the camper out for a test. We were gone 2 weeks and in the middle it rained for 3 days straight. Not a drop of leaking anywhere. We are happy campers!! Planning to do another 2 week trip in the fall. Blessings and happy camping to each of you. Beach Papa
 
Report on repairs

I know the happy feeling when you are camping in pouring rain and you have no leaks. We also experienced it this summer.
 
Major water damage repair

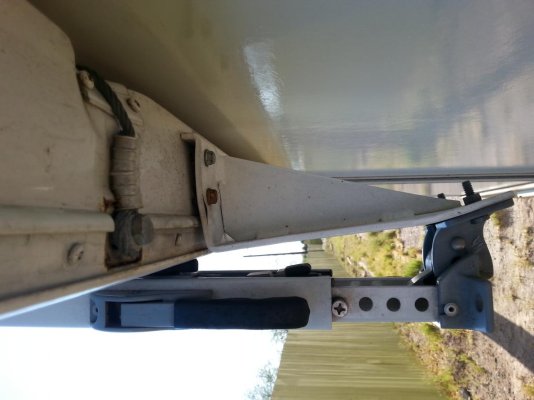
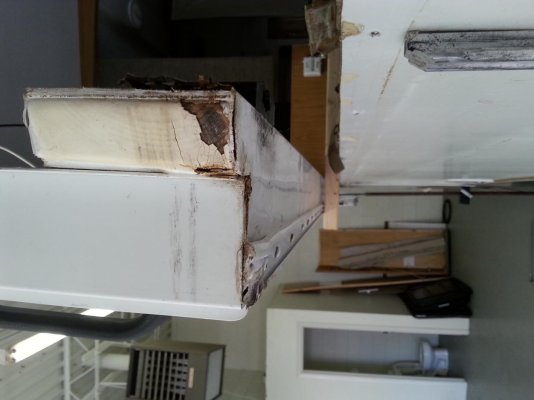
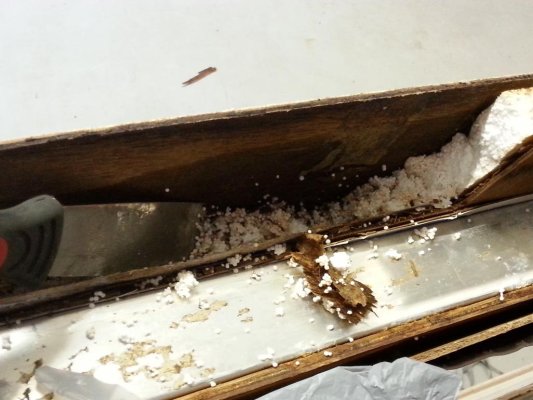
Hey, everybody. I have a 2007 28-footer. I noticed the walls bulging along both sides. This is in the roof section along the lower edge. I also noticed the brackets supporting the awning were not secure, and that the rails were collapsed where the cables bear on them. I've seen Sam's photos and Beach Papa's repair summary. The unit is now indoors. I separated the two halves. I removed all the windows and cabinets, and stripped off all the wallpaper from the interior roof section. Liquid water ran out of the wall. I removed the bulb seal and pulled all the staples. Started digging out the styrofoam on the lower edge of one of the windows. The exterior luan beneath the 1/8" fiberglass sheet, the interior luan, and the interior 1/2" plywood are all more or less rotten. I'm digging out a sodden mess. Seems the construction traps any water that enters with no way for it to dry out. There is aluminum visible at the bottom of the styrofoam, and what looks like a razor-thin strip of aluminum standing between the styrofoam and the 1/2" plywood on the interior side. There is another aluminum member interior of this. I am now trying to figure out the construction of this whole rail, or beam which runs along the lower edge of the roof section. Since it has collapsed under the pressure of the awning brackets and the tension from the cables, I assume there is wood inside there. It must be under the aluminum flashing wrapped around the bottom edge of the roof section. There is a long aluminum channel running lengthwise, horizontally, all the way around the exterior bottom edge of the rail. This channel has many screws driven vertically up into the channel. Perhaps by removing this channel I will be able to remove the aluminum flashing and see what's underneath. I have not been able to find a drawing of how this area is constructed. It sure would help to know what's under there before I tear it up even more. Some cross-section drawings would be ideal. Please contribute if you can help. Thanks.
 

Attachments

  • Awning bracket.jpg
    Awning bracket.jpg
    84.5 KB · Views: 53
  • Channel running under rail.jpg
    Channel running under rail.jpg
    82.3 KB · Views: 51
  • sodden mess.jpg
    sodden mess.jpg
    89.2 KB · Views: 51
  • Wall construction under window.jpg
    Wall construction under window.jpg
    85.5 KB · Views: 52
I just bought a 2005 that has the same damage, though it doesn't look near as bad, it will require the same repair. I resealed the windows, and the roof moldings and took the moldings off the bottom of the top half to let the sides dry out. It will have to sit over the winter because I have to work outdoors, built I intend to revamp the system so the support beam is at the top. I am sure I can do this by adding a beam inside directly above the cable attachment locations that runs from the bottom beam to the newly installed top beam
That should stop the sagging that happens when the door openings are cut in the top half. I have a 94 245TD that has the same problem. My wife says one of them must go, and she likes the 94 best. I like the 05 because it is loaded with every option you could get and has the full size bed.
Good luck with your project.
Charlie
 
Add'l on the water damage

Thanks, Charlie.
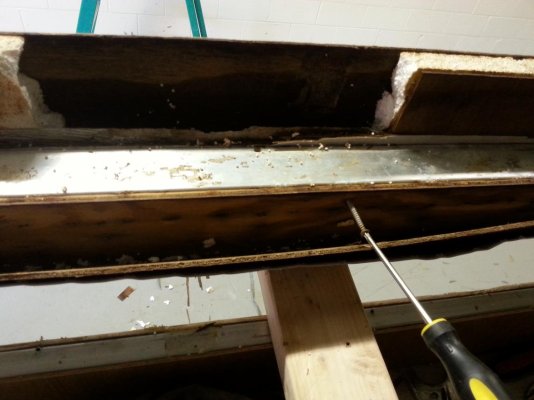
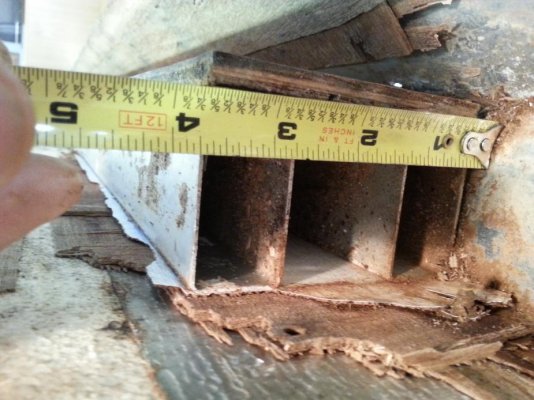
I dug into it some more today and can now see how the wall and beams are constructed. The wall is framed with 1x1 aluminum tubing. Styrofoam fills the spaces in the frame. This is sandwiched on the exterior side with 1/8" luan and 1/8" fiberglass. On the inside the sandwich consists of a thin blade of aluminum with a kind of pebbly texture. This only covers the bottom 3 inches of the sandwich and seems to run all the way down the wall. Next there is another 1/8" layer of luan covered by vinyl wall covering material. Then, only on the interior, there is a stack of 3 aluminum beams, all 2" wide. The bottom one is 1" high, followed by one 1-1/2" high, and finally another one 1" high. Next there is a layer of 1/4" plywood and a layer of 1/8" luan, both 3-1/2" high. Finally there is a sheet of aluminum flashing that covers the bottom surface of the wall and bends up on the interior side for 2-1/2". It traps the fin of the bulb seal and is stapled to the inside of the wall using about a million galvanized staples. The exterior bottom corner sports an aluminum extruded rail that runs the length of the wall. This is attached with screws driven up into the lowermost 1x1 frame tube.
In the area near the door, the construction is somewhat different. The triple stack of aluminum tubes stops about a foot from the door. The space is filled using a piece of standard 2x4 (which is of course actually 1-1/2" x 3-1/2"), plus a short section of 1/2" plywood. This makes up a section 2" wide and 3-1/2" tall - the same as the stack of aluminum tubes.
I tried to capture all this in the photos. I hope it is of help to the next person who has to disassemble their walls.
I see now what collapsed under the force of the cables and the awning bracket. I will probably reinforce the cable areas as Beach Papa did. Not sure about the awning brackets. Under certain conditions, that is an awful lot of torque to put on that lower rail. Please chime in with suggestions. Thanks.
 
HiLo repairs

shagnman, Good thing you have an indoor place to work on your extensive repairs. Take your time and you will have a better than factory built RV. Seems like you have a good understanding on the construction as you tear your HiLo apart. Here is a post on reattaching the awning bracket by Sam Shields 7-31-2010. You can do this!! Keep the questions coming.
 
Awning bracket

Hey there, Sam. Thanks for all the help and encouragement you guys have given me.
I looked at the Sam Shields post. Wish it included photos. I'll probably just attach a reinforcing plate between the bracket and the rail. It bugs me, though, to not know what is inside there. From my investigation so far, it would seem the lag screws go up through the stack of 3 aluminum tubes. If I had designed it, I would have put something more substantial in there - perhaps fill the insides of the tubes with solid material. I hope Hi-Lo did not leave a gap in the tubes there and put in a 2x4 like they did near the door. Again this points up the value of having cross-sectional diagrams of the structure. When I spoke to the guys in Ohio who bought out Hi-Lo's equipment and parts, they said all the engineering drawings were taken out back and burned. What a gold mine that would have been for us! Anyway, if anyone reading this has cut open that area of their trailer, please reply with what it looks like inside.
 
awning reinforcement

You have an aluminum square tubing running through the bottom. The lags are screwed into the tubing. You would have to open up the whole side to be able to slide a pipe into the existing tubing. What DH did was drill all the way through the bracket and tubing. Install carriage bolts on the inside rail through the tubing and into the awning bracket. This should snug it up nicely. It is hard to explain. I will PM you my phone # if you need to talk to DH.
 
Awning bracket anchoring

Hey Sam.
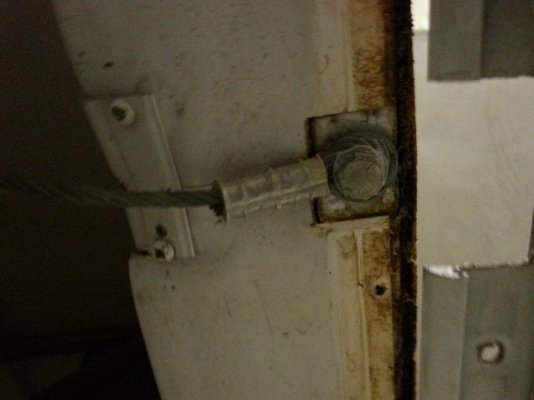
OK, I tore it open even more yesterday. I was wrong about the stack of 3 tubes. Turns out there are only 2 tubes, each 1x2, and a 1-1/2" gap between them. This still adds up to a 2" x 3-1/2" section. They cut out a few inches of this and inserted a wooden sandwich made of a 2x4 with a piece of 1/2" plywood attached to it. This adds up to 2" wide x 3-1/2" tall. They put this section into the beam at the point where the lift cable bears on the beam. On my trailer, this is just a couple of inches from the awning bracket. There is also a small reinforcement plate on the corner under the cable. It is possible that they cut down the wood enough to insert it into the tubing on either side, which would have prevented the awning bracket lag screws from crushing the tubing. I doubt they did this, but can't tell without more demolition. I will post some photos to clarify all this. I considered through-bolting, but it seems this would just crush the tubing. Thanks for the help.
 

Attachments

  • Tubing Stack.jpg
    Tubing Stack.jpg
    92.9 KB · Views: 34
  • Wood rail at cable attachment.jpg
    Wood rail at cable attachment.jpg
    94 KB · Views: 37
  • cable attachment.jpg
    cable attachment.jpg
    96.9 KB · Views: 34
I know this is an old post, but I'm getting ready to do some major work on mine. The aluminum surrounding the lower beam on my camper is pretty corroded and weak at the back corner. It will need replacing I'm guessing, not just reinforcement. I haven't taken it apart yet, but would love any ideas of what to use to fix it.

Also - anyone keep track of their expenses for the beam and wall replacements?
 

Try RV LIFE Pro Free for 7 Days

  • New Ad-Free experience on this RV LIFE Community.
  • Plan the best RV Safe travel with RV LIFE Trip Wizard.
  • Navigate with our RV Safe GPS mobile app.
  • and much more...
Try RV LIFE Pro Today
Back
Top