My New 200 Watt Solar Installation (Now 300 Watts)

Up north we still have lots of trees and a much steeper angle to grab the sun. So- i still need to come up with a removable panel that I can detach and place where I need to. I'll figure it out, eventually. But, for where you are at most the year- I agree it is the best solution.

Rick

Rick, I agree your latitude IS a concern, but I still see charging current after sundown and before actual sunrise. It's usually on the order of one Amp then. And, during even cloudy days, I easily get two Amps.

Rather than worrying about having your panels exactly perpendicular to the sun, I think I'd just go with more panels. You could do three in series with the controller I have and it would still work. If you went to four, I think you'd need a 30 Amp controller. In that case I think I might pair them in two series groups and then wire those two in parallel to keep the input to the controller near 24V. I think trying to maintain a near perfect alignment with the sun is just a losing proposition, and my whole point in mounting my panels as I did is so I could just "forget" them. (I don't of course - it's too much fun looking at the charge meter and seeing the energy input to the batteries.)

- Jack
 
hill, if we can get our battery topped off while in storage with a white canopy framed above the Hi-Lo with a factory-installed and very, very small 15-watt panel on the camper roof, I think it is miraculous. The storage area on that particular side of the house only gets full sun a few hours each day and less time in winter. If we ever build another house, we will certainly look into placing solar panels on the roof; of course, the house would have to be positioned to take full benefit of the panels to recoup our costs of installation.

Dee
 
Thanks guys. Good info and a cause for me re-think some of this. I guess I don't sweat the lattitude that much- but much of our "boon docking", up north, is usually in NFG campgrounds with trees. Big oaks, maples, and white pine. So, it is not unusual that the trailer body itself is parked under a canopy and being able to to locate a panel somewhere else on the camp-site to grab a patch of sunlight is desirable. On the road it is clearly not an issue- or in more open campsites, but those are not always available.

That said, I don't think this is impossible and the fact the trailer lowers to make the top relatively accessible is a big plus. It seems reasaonable to me to mount flexible panels on some type of firm backing and then be able to attach or unattach that apparatus at will. A separate run of cable to the controller would also be necessary- but that should not be too difficult. There are Z brackets out there for mounting -the trick would be locating a good place to mount them for a decent purchase----. And, in that case, a panel with a solid frame might even prove to be more useful. Just thinking out loud, here. :)

Rick
 
I've been following this multi-year discussion with interest. Thank you all so much. I wonder if anyone has thought of removing the TV antenna and substituting a solar panel? It could be aimed at the sun. The problem I foresee is mounting in a way that it would present so little wind load when down (and up in strong winds) as to not warp or blow off. We're probably talking about a single 100 W panel at most.
BTW, the TV antenna on my 1999 21 footer works fine, but is designed to receive the high band VHF channels, and therefore is much larger than necessary to receive the UHF channels which dominate in almost every area. A much smaller antenna (possibly even a small directional UHF antenna) would work as well or better for UHF channels. Changing to a physically smaller TV antenna might be an improvement even if the solar panel idea doesn't work.
 
Thanks for the post, bought two flexable 100 watters on amazon prime day and will use this as a guide!
 
i just got

300 watt panel, and my 50 watt and my 22watt! 372 watts now w 30 amp CC yee haaaaa!new golf cart battery too!does it all! sun or clouds! :)
 
Last edited:
Jack, I see you added one more 100 watt panel. Is this recommended/did you notice a difference? Also any good recommendations on a controller? Thanks in advance!
 
Jack, I see you added one more 100 watt panel. Is this recommended/did you notice a difference? Also any good recommendations on a controller? Thanks in advance!

Yes I did, and yes, there IS a difference. When my batteries were low, I was able to get 14.5 Amps of charging current in full sun (early afternoon). With two panels, my max was about 11.5 Amps as I recall.

I rarely need this much charging current, but it should increase the supply by about 33% if I'm camped in shade, as I expect to be in one month on the North Rim of the Grand Canyon. It was very easy to add, and I simply wired it in series with the other two. Because it went between them, I had to disconnect only one coupler in the old setup and then I connected those to the two couplers on the new panel.

I changed my inline fuse near the battery from 15 Amps to 20 Amps.

My controller was a 20 Amp MPPT controller. That will work with up to 3 - 100 Watt panels. It would PROBABLY work with four, but I'd use a 30 Amp controller in that case. The MPPT controller has circuitry that improves the charging efficiency of the panels, and, it won't overcharge the battery(s). My controller cost a bit over $100. A cheaper, PWM controller will work, but it doesn't control the charging current as well.

I don't see the brand controller I used for sale any more - I do see one that's rated at 30 Amps. However, there are other brands of MPPT 20 Amp controllers and I suspect they are all equivalent.

Hope this helps.

- Jack
 
I thought if I ever added solar I would not mount the panels to the roof.
That way I could park/ camp in the shade and go for the optimal panel placement each time I camp or face them due east in the am and swing them as the sun moves and then west when the sun sets. What would the max lead length be without too much line loss?

Also I wouldn't be adding any more potential places for roof leaking.
 
You would probably need VERY heavy wire if you use, say a 50' lead to the panels (assuming you are using 100 Watt panels like me). I'd go with no less than 8 gauge.

But, you're going to find that trying to keep the panels oriented to the sun is a never-ending chore. And, what are you going to do if you step away from your trailer? To prevent theft, you'd need to bring them inside any time you were away. In addition, the tempered glass ones are heavy and awkward.

I ended up hating the four 15 Watt panels I started with that I put out on the ground facing the sun.

I have no holes in my roof, except for the one that I enlarged slightly to provide entry for the two wires from the panels up there. That hole already existed, since it provided entry for the TV antenna feed.

My panels are "full time". They help supply refrigerator power when we're traveling and they start working at sunrise and don't quit till sunset.

- Jack
 
My Solar Panel Installation (Version 2)

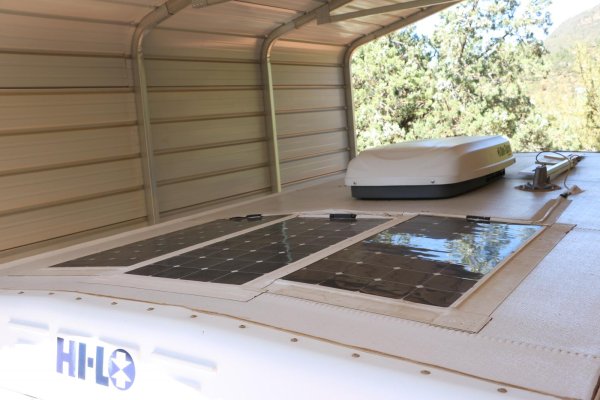
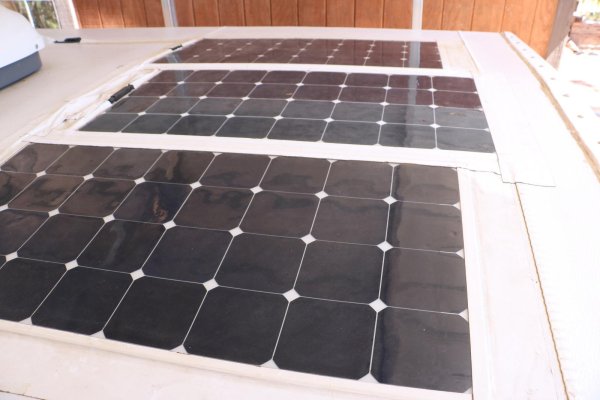
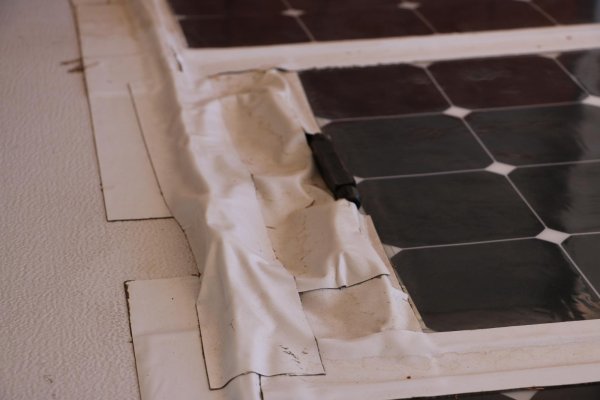
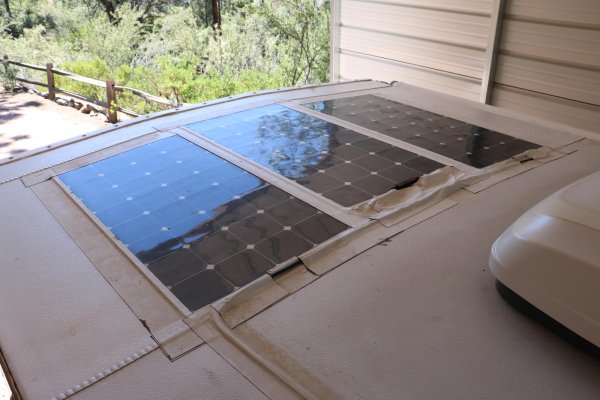
One of our great members, thatguy, PM'd me asking if I had any pictures of my installation with the third panel. It reminded me I needed to update this thread, so here they are. You can see the original panels are holding up fine. The tape holding them down is still the original tape too.

The first picture shows how the new, third panel fits nicely between the other two. I wish I could say I planned things this way, but it was just a happy circumstance. The new panel seems to be an exact match for the other two also, except for the fact that the wire cables coming from it are reversed. The positive cable is on the left side and the negative cable is on the right.

The second picture shows how I moved the center panel forward a bit so that all the connections fit relatively well in the space behind it. (And, I only had to disconnect ONE cable connection in the original installation to mount it this way.)

The third picture shows the only thing I'm not overly happy about. Because the wires in the new panel are reversed, I had to cross them to make the connections. This causes a "bump", but it is smaller than the bumps caused by the connectors at the ends of the cables. So, this area is "lumpy" and not particularly attractive. I could not apply the tape smoothly over these bumps.

The fourth picture just shows the new assembly from the rear.

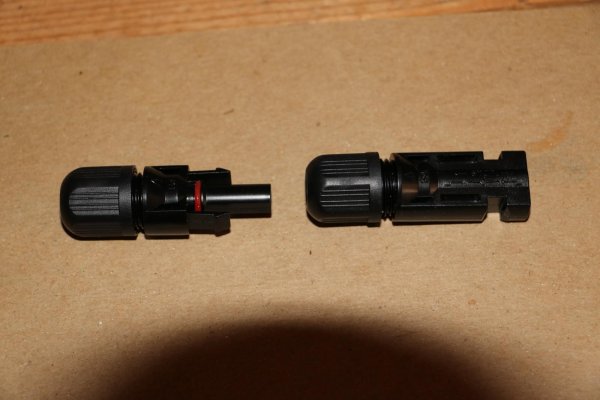
The last is both halves of the quick disconnect connectors that come on the panels. I had to buy a set of these to attach the bulk wiring that ran into the trailer and this was one that was left over. They are easy to apply to the solar cables and they are waterproof. I could have had a neater installation if I had not used connectors, but instead soldered the wire ends together and covered the splice with shrink wrap. However, that would have made adding a panel a bit more difficult.

There were no other changes needed to the original setup except that I replaced the 15 Amp fuse next to the batteries with a 20 Amp version. The panels are all wired in series, so they deliver 36+ volts to the controller, which reduces that to the charging voltage of 13-14 volts.

The only reason I added the new panel is because I fall into the trap of "more is better". :eek: And, I wanted a better charging capacity if camped in shade or under cloudy skies.

Feel free to ask if you have questions.

- Jack
 

Attachments

  • IMG_0681.jpg
    IMG_0681.jpg
    171.9 KB · Views: 24
  • IMG_0682.jpg
    IMG_0682.jpg
    127.9 KB · Views: 17
  • IMG_0683.jpg
    IMG_0683.jpg
    99.7 KB · Views: 18
  • IMG_0684.jpg
    IMG_0684.jpg
    215.5 KB · Views: 22
  • IMG_0686.jpg
    IMG_0686.jpg
    134.2 KB · Views: 12
Thanks so much Jack! I too was wondering why not just cut the couplers/adaptors off and just solder them?But I guess that would void the warranty. Pics looks great and definitely helps to model them after you!
 
Thanks so much Jack! I too was wondering why not just cut the couplers/adaptors off and just solder them?But I guess that would void the warranty. Pics looks great and definitely helps to model them after you!

Cutting the connectors probably WOULD void the warranty, but I wanted to be able to easily disconnect and reconnect the panels if I decided I wanted to move them.

I'd actually thought I might go from 2 to 4 panels when I first did the installation and I WOULD have had to move them. Plus, I had thought I'd do a series/parallel hookup in that case (panels in series pairs, each delivering about 24+ volts, and the pairs connected in parallel, which would double the Amperage.) This would have been a total rewiring on the roof.

But, after seeing how well two panels did, I've decided I only needed one more. This allowed a much simpler connection scheme.

I WILL remove the connectors and solder the wires if I find the current setup bothers me too much. So far, it doesn't.

- Jack
 
Jack,
Thanks for photos and info. What make solar panel and controller do you use. Would something like this- https://www.amazon.com/dp/B018ZUA9EI?psc=1
400 watt system seem an improvement even on your system?

Doug, the panels are fine in terms of power output. Being noncrystalline, they have a longer operating life and reliability. Since they are the rigid kind, in aluminum frames and covered in tempered glass, they are much heavier than mine (16.5# vs my 4#) and they would probably have to be mounted to the roof with screws if you put them there. I wanted to avoid screws and wanted to keep the weight and protrusions from the roof low. Additionally, I find when I get on the roof, I almost always find myself on top of the panels (usually on hands and knees or sitting) and glass covered panels would not stand up to my 200# very well.

I don't care for the PWM controller either. It WILL do the job, but a MPPT controller does a better job of controlling the electrical charge to the batteries. It actually provides MORE power than a PWM type.

I listed the make and models of panels and controller earlier in my thread, but I don't think they are available from Renogy now. The third panel is from Windy Nation: https://www.windynation.com/Monocrystalline-Solar-Panels, but I ordered it through Amazon.

They also sell this 30 Amp MPPT controller: https://www.windynation.com/Charge-...ler-Regulator-12-24-48-Volt/-/1247?p=YzE9MTc=. It's expensive and you only need one that handles 20 Amps if you use 3 panels like I did. MPPT controllers are available from other vendors, and here's one from Renogy through Amazon: https://www.amazon.com/dp/B01MRWTAB5?ref=emc_b_5_t Notice it has a four-stage charge algorithm that is kind to batteries.

Hope this helps!

- Jack
 
One of our great members, thatguy, PM'd me asking if I had any pictures of my installation with the third panel. It reminded me I needed to update this thread, so here they are. You can see the original panels are holding up fine. The tape holding them down is still the original tape too.

Looks great, I'll keep this in mind if we start finding ourselves in places where a recharge would be nice. I can tell you take are of your trailer from those pictures of the roof.
 
I like the low-profile of thos solar panels. The ones I have are built into an aluminum and glass frame and about 1.5 inches thick. How are yours holding up? Looks like nothing is there to protect the solar cells compared to mine which has a big glass cover.
Also, never heard of that tape. I used VHB tape to hold mine down.
 
Hi, marininn - my panels are holding up fine, thank you. I find I have to get on to them with my knees when I'm putting the trailer cover I have on to the trailer. There's no problem putting weight on them, since they are on the rigid roof of the trailer and have no glass over them. In fact, one video I saw when I was first putting them on said you could walk on them without damaging them. I don't do that. But, so far, there is NO damage to any of the three. About the only thing that could happen to them would be low hanging tree limbs scratching them, and since our trailers "tow low", that has not been a factor.

Your panels weigh about 22# apiece as I recall (mine are 4# each) and yours are covered in tempered glass. The ideal way to mount the kind you have is to use brackets that screw into the roof. I didn't want to add holes to the roof, and, I didn't want the extra weight, so I went with what you see here. I also had a cheap set of 15 Watt "glass covered" panels before these, and one of those broke, so I'm not too impressed with glass.

The EternaBond tape is truly "eternal". It has not shown the slightest tendency to lift up, degrade, or otherwise fail to do its job.

In sum, other than the last trip where we were camped in almost total deep shade, these panels and the mounting system have been an unqualified success.

Edit: I have to backtrack a bit on the mounting method I used. The third panel was not secured as well as the first two, which I discovered following a long-distance trip in the year after I created this original post. Please see Post #90 for what happened and how I've improved things.

- Jack
 
Last edited:
Thanks. Sounds like they might be worth the extra $60 each. Certainly more aero than my framed ones.
Panels have a life span. When they are done, you just cut the tape off? Sounds like the tape will be stuck forever.

I think mine are 16 lbs. I mounted them to aluminum angle iron the same length as the panel. I taped the angle iron to roof with VHB tape which has held firm so far over thousands of miles in all weather. Panels are removable is only benefit to mine over yours.
 

Try RV LIFE Pro Free for 7 Days

  • New Ad-Free experience on this RV LIFE Community.
  • Plan the best RV Safe travel with RV LIFE Trip Wizard.
  • Navigate with our RV Safe GPS mobile app.
  • and much more...
Try RV LIFE Pro Today
Back
Top