Ceiling panels
________________________________________
Another question, Jerry, after reading your posts. Have you done anything regarding the ceiling ripples? Ours have expanded toward the front and I'm envisioning having to take down the dining cabinets and removing the wallpaper layer to see what damage there is below the roof. When I checked the roof, there were sections above the damage with what looked to be black soot-like substance over the rippled area, and it seems to be spreading mostly toward the front.
FYI, I had to have the end cap replaced two years ago as it cracked right down the middle through the bathroom window. When the dealer replaced it, they left a gap between the roof and cap. Not knowing if there was any sealant in there, I used the EternaBond tape and added a thin line of sealant to the leading edge of the tape. It's incredible tape. I'd like to know where you got the tape for a good price as I think I'm going to need it; you can e-mail me at indymac15@gmail.com.
Your pictures and step-by-step data were great; you were fortunate to have a covered area large enough for the HiLo.
__________________
2007 22TB HiLo
2010 Toyota Tacoma
Truly,
I apologize for not responding sooner. I started two nights ago and unfortunately, our elderly houseguest came in while I was working on it and I broke a longstanding practice I have, that of copying the response and pasting it to a new email for later use. Instead I ended up exiting the browser and naturally I lost everything I had written so I will start anew.
I did try an idea I had regarding the ripples. I noticed the ripples had begun to really appear after I had finished my roof repairs so I had a bright idea. I got my wife’s iron and placed a cloth over the ripples and some of them were completely removed while others were greatly reduced. My thought was that the water had caused the adhesive in the paper to turn loose from the 1/4” plywood and the heat from the iron would make it more liquid and I thought it would re-adhere to the plywood. Since I have it stored outside and under an RV cover, I lowered it and replaced the cover. A few weeks later when I raised it, the ripples were back and had actually increased. I think if you catch it soon enough, you might be able to use a syringe to inject fresh adhesive and then iron it on, it might hold. I am afraid now that I will have to find some ceiling tiles and replace two sections.
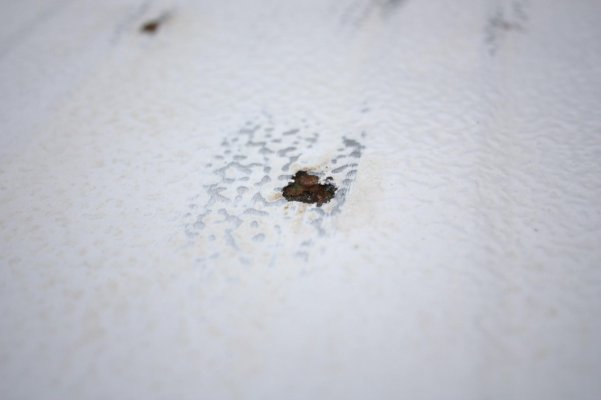
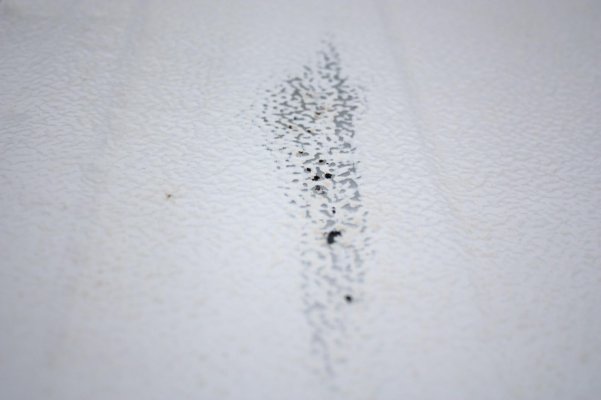
Regarding the sooty looking substance on your roof, mine was like that as well. Did you find any pinholes or signs of metal ‘rot’ anywhere in the black area? I feel that you have the same problem I had. You might try using steel wool and knock some of the sooty substance off and see if you have anything like the two pictures I am attaching. There was a section of the roof on the driver side that was approximately12 feet long and 18” wide that had a total of [45] holes that were caused by electrolysis/metal fatigue. Each had to be covered with eterna bond tape.
The ensuing problems with the ceiling were due to the time factor from when it first began until I first was aware there was a problem. I had just bought the trailer and discovered these holes a few months later. The thin plywood, after being subjected to the summer heat, just simply got worse and basically busted loose. On the inside of the cabinet over the tip out, I originally had to punch holes in a sagging ceiling to allow the water to drain from the sagging ceiling. I have posts somewhere on the forum to show what it looked like. When it dried out, I basically had to remove the rotten plywood and I filled it with a thin Styrofoam sheet and caulked it. The ceiling outside of the cabinet gradually began to show those telltale wrinkles that I am hopeful the insurance will pay for replacing [2] 4x8 foot panels. All the wrinkles were right along and underneath the pinholes I found on the roof and have subsequently repaired. The summer heat did the rest. I feel certain that though I have fixed the roof, I will have to remove either the entire sections of the ceiling tiles or cut out the bad sections and patch them.
I also have [2] cracks, one each in the front and rear end caps [they are shown on another post]. Your model and mine are some of the units they substituted a plastic cap in place of a fiberglass cap; a cost cutting decision that the owner will have to live with. I have tried to repair the cracks with no luck. When it cools off, I am going to either use the eternabond tape or an aluminum adhesive tape to cover the splits and overlapping enough area so that it will appear balanced and somewhat normal. I will then paint it and apply a couple of decals of the US Flag, or Football banner or something.
All these problems have been experienced by several Hi Lo owners and is a reflection of bad management decisions and poor quality workmanship.
I hope this information will be of some help to you.
Good Luck,
Jerry Curtis
2406 T


