Stumped and Confused

Tip Out problems?

Pinn I would think you could wait until warmer weather to see if you actually have a problem. Our HiLo is grumpy when raised in cold weather. It is perfect in warm weather.
 
I do know it didn't want to raise up at all in the cold. Going to a Rally and Dutch Oven Gathering in a couple of weeks. I am hoping there are no issues at that time.
 
Just an FYI, Powerwinch has an active recall for their 2007 models. You can google the info and call Powerwinch directly. They can look up recalls by VIN, but their info is more accurate if you have the Serial No. directly off the winch.:)
 
Just an FYI, Powerwinch has an active recall for their 2007 models. You can google the info and call Powerwinch directly. They can look up recalls by VIN, but their info is more accurate if you have the Serial No. directly off the winch.:)

The recall was for defective winch shafts. Powerwinch no longer has any Hi-Lo VIN data. They need the serial number from the winch. Unfortunately, the serial number is on a paper tag that may be located in various positions on the winch. In some cases, like my Hi-Lo, the tag is in an area where it cannot be read without taking the winch out.

As a result, I chose to ignore the recall. I just make sure that I stand clear of the tip-out when it is going up or down.
 
DH made me wave off the repair guy since we were able to raise the tip out last time, now it has happened again today when we tried to raise the tip out, No power. There is also not a circuit breaker coming off the battery for the switch.. Time to freak out now.. We are leaving Friday to go camping.
49 degrees here so it now too cold. Could it be possible for the battery to need to be replaced?
 
Last edited:
Tipout problem

I have a 2004 28 ft with a tipout and had an electrical problem where the red ( hot ) wire with the black ground went around the frame on its way to the battery box and had rubbed as it went around the sharp edge of the frame, was corroded so I drilled a hole through the frame and fixed the bad corroded spot and and wrapped the wiring all the way to the battery box, upon further investigation I found several questional practices under my camper where this kinda damage could occur on other circuits, I love my camper but not real impressed with the haphazard way they did some of the location on the wireing.
 
I have a 2004 28 ft with a tipout and had an electrical problem where the red ( hot ) wire with the black ground went around the frame on its way to the battery box and had rubbed as it went around the sharp edge of the frame, was corroded so I drilled a hole through the frame and fixed the bad corroded spot and and wrapped the wiring all the way to the battery box, upon further investigation I found several questional practices under my camper where this kinda damage could occur on other circuits, I love my camper but not real impressed with the haphazard way they did some of the location on the wireing.
I too have found wiring that was questionable. When we had our 1999 21T we were on our return trip from Alaska/Canada and discovered wiring on the underside of the trailer that had been enclosed in a plastic tubing was no longer enclosed. The tubing had been destroyed by the Alcan highway rocks.:(
 
Update: Battery tested out fine. took it to a local auto parts store. After a phone consult with a great person. I went to the bundle of wires in the bathroom and cut the tape loose and tightened all of the wire nuts. :eek: Taped it all up individually and then all in a bundle again. Took the cover off to the tip out winch compartment and tightened all those wire nuts. I then tried for several hours to duplicate the no power scenario again, power to tip out every time.
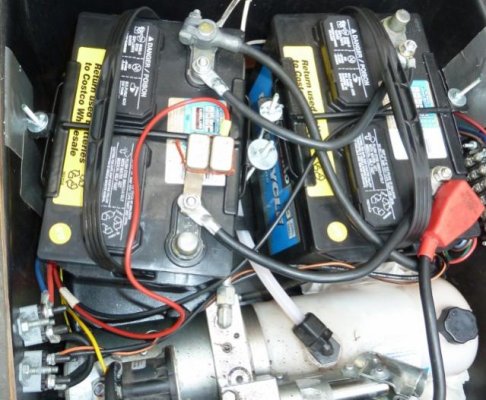
There is no circuit breakers in the battery compartment. I have pictorial proof I can add later.

I'm hoping this solved the problem.

A future project should be to eliminate the wire nuts and use proper crimp-on splices. Wire nuts do not like vibration and can slowly work their way apart. This is why they are not used on cars, boats, etc.

Some people solder connections, but this is also not a good practice. Soldering stiffens the wire ends allowing vibration to fatigue the ends and beak the wires.
 
I was taught that when using wire nuts, always tape the wire nut to the wires going into it. That way the wire nut cannot come loose. Just a thought.......

Bob
 
I was taught that when using wire nuts, always tape the wire nut to the wires going into it. That way the wire nut cannot come loose. Just a thought.......

Bob

That will help, but wire nuts are still not the optimal thing to use for circuits subject to vibration (like a trailer traveling down the road).
 
Pinn,

A few observations:

1- For some reason you are missing the circuit breaker for the tip-out winch. This can be unsafe. If ever a wire shorts out it can overheat and start a fire. You should get a 50 Amp breaker and connect it between the battery + and the wire that goes to the tip-out motor switch.

Here are some examples. The first one has a buss bar that connects directly to the battery post. You can then connect the tip-out wire to the open terminal in the breaker. Note that these breakers are self-resetting:

Amazon.com: Rig Rite 12 - Volt Auto Reset Circuit Breaker: Automotive

http://www.amazon.com/Bussmann-BP-C...065101&sr=8-8&keywords=50+amp+12+volt+breaker

2- All those wires in the bathroom are normally inside a protective sleeve. You may want to get something to protect them.

3- As I stated before, consider replacing the wire nuts with high quality crimp connectors.

4- Add some strain relief to the wire bundle before and after the wire nuts. Every time the top goes up and down it tugs a bit on the wires and this can cause connections to come loose. A good way to do it is to use a strap or a length of very flexible hose with a slit in it. Use tie-wraps to attach this to the wires before and after the wire nuts. Once done, if you gently pull on the wire bundle at the bottom and at the top the force will go through the strain relief and not through the wire nuts. You can also relieve the strain by wrapping electrical tape above the wire nuts and continuing to below the wire nuts. Electrical tape can be messy if you ever need to remove it.

5- The tip-out winch gears deed some grease, If the grease that is already on it is still soft, spread it over the gear teeth. Also, spread some on the large gear while being careful not to get it on the strap. I also recommend that you spray a bit of lube on the shafts where they turn in the housing. This will prevent wear and squeaks.

Good luck.
 
This is way DH and I purchased it. We have made no major mods to it in any way. Except clean it really well.

After speaking with JimL, really nice guy BTW, by phone he informed me that I really need those circuit breakers, which will be installed by an electrician.

The wires in the bathroom were covered by a cloth sleeve, Good or bad? :confused:
I moved it up to be able to see what was going on.

I wasn't sure about the grease on the gears on the winch motor.. :eek:

The wire nuts will be replaced by an electrician .;)

Strain Relief?? I'm not sure what you are talking about.

Thanks for any and all help.
 
Last edited:

Attachments

  • P1000791 (640x528).jpg
    P1000791 (640x528).jpg
    65.4 KB · Views: 12
"The wires in the bathroom were covered by a cloth sleeve, Good or bad? :confused:"

That's good; it is what came from the factory. I did not know that you removed the sleeve for the photo.

"Strain Relief?? I'm not sure what you are talking about."

As the top goes up and down it pulls and relaxes the wire bundle. The way the tape is wrapped right now it does not really provide much protection to the splices (wire nuts) from the pull. This pulling flexes the splices a bit every time and this can eventually lead to bad connections. A strain relief is simply something that will transfer the load of the pull to an area below the splices. As I mentioned, it can be done a number of ways. The simplest is to wrap more electrical tape on the wire bundle starting above the splices, moving down to include the slices, and finishing the wrap a few inches below the splices. Using tape is a cheap and easy way of doing this. While perfectly adequate, I personally don't like it because I may need to cut or unwind it if I ever need to troubleshoot the splices. Then again I'm an engineer; so I'm a bit retentive. :)
 
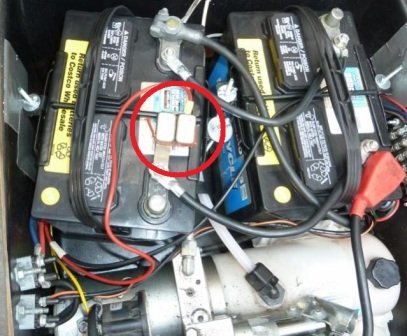
OK, I went in and grabbed your photo and attached here. Can you point out the breaker? Can you tell I am an electrical dummy? :confused:

Look at the attached photo. The breaker is the two rectangular objects attached to the positive post of the left battery, with a red wire coming out. The red wire is the power wire for the tip-out winch. I circled it.

The way it was done at the factory is not a good practice. They used two 25 amp circuit breakers connected in parallel to make 50 amps. This can lead to the whole setup tripping at a lower current than 50 amps. It is a much better practice to replace the two breakers with a single 50 amp one. I recently did this on my trailer.
 

Attachments

  • Tipout CB.jpg
    Tipout CB.jpg
    65.5 KB · Views: 14

New posts

Try RV LIFE Pro Free for 7 Days

  • New Ad-Free experience on this RV LIFE Community.
  • Plan the best RV Safe travel with RV LIFE Trip Wizard.
  • Navigate with our RV Safe GPS mobile app.
  • and much more...
Try RV LIFE Pro Today
Back
Top