What did you do to your HiLo Today?

Yep, we got a little laugh out of the bear story line. We were camped at the Denali Nat'l Park and got back to camp. A mama moose and calf had just been through our site with a grizzly in slow pursuit. We talked about it for a while and then I saw the ticket on the door of the Hi-Lo. "Leave the 12-pack of Bud cans on the picnic table again and you'll be fined $175.00" What is this world coming to? Why is it so hot? And what IS a "hand basket?" Did grizzlies drink Bud forty years ago? And thanks to the ranger for just a warning.....
 
Yep, we got a little laugh out of the bear story line. We were camped at the Denali Nat'l Park and got back to camp. A mama moose and calf had just been through our site with a grizzly in slow pursuit. We talked about it for a while and then I saw the ticket on the door of the Hi-Lo. "Leave the 12-pack of Bud cans on the picnic table again and you'll be fined $175.00" What is this world coming to? Why is it so hot? And what IS a "hand basket?" Did grizzlies drink Bud forty years ago? And thanks to the ranger for just a warning.....

Funny! At least the ranger didn't drink your Bud.

I think our local black bears visit our neighbors because they have chickens. Do bears like chicken?
 
Today I lubricated all of the cables and everything associated with the lift system and I wanted to adjust the cables but after reading different posts about the cables, I’m not sure if I should mess with them.
To get the best possible current measurements, (at least I thought it would be) I measured off of the four out riggers, from the top of the out rigger (not the rubber pad) to the underside of the covered trailer framing (not the trim) and I have 30 7/8” on the drivers side front, 31” on the drivers side back, 31 7/16” on the passengers side front and 31 ¼” on the passengers side back. However, when I measured from the trailer frame, all of the measurements were the same with the exception of the right front, which was 1/8” higher. When I measure the distance inside the trailer from the top of the inside bottom “cap” or “ledge”, to the weather stripping, both sides of the front are ¼” too high and on the driver’s side rear, it is 1/8” too high and the passenger side is 3/8” too high. To compound matters, the inside wall ledge and the outside wall ledge have about a 1/6” inch between them at the front of the trailer on the passenger side and on the opposite side of the trailer in the rear. With that said, I have not had any problems raising or lowering the top, so…..if it ain’t broke, don’t fix it?? I did lower the top down onto 2x4’s as suggested, but did not have very much slack in the cables and was not sure of the best way to loosen the tension nut without twisting the cable…vise grips on the cable sleeve? I should have mentioned I have had this trailer since January of this year so I have no knowledge of any previous service. Suggestions welcomed.
 
Started packing her up to go to the Lake again this weekend.. :D This may be the last of the summer camping until it cools down some.:cool:

got some stuff to do upgrades and replacing of old parts while out camping.
 
Today I lubricated all of the cables and everything associated with the lift system and I wanted to adjust the cables but after reading different posts about the cables, I’m not sure if I should mess with them.
To get the best possible current measurements, (at least I thought it would be) I measured off of the four out riggers, from the top of the out rigger (not the rubber pad) to the underside of the covered trailer framing (not the trim) and I have 30 7/8” on the drivers side front, 31” on the drivers side back, 31 7/16” on the passengers side front and 31 ¼” on the passengers side back. However, when I measured from the trailer frame, all of the measurements were the same with the exception of the right front, which was 1/8” higher. When I measure the distance inside the trailer from the top of the inside bottom “cap” or “ledge”, to the weather stripping, both sides of the front are ¼” too high and on the driver’s side rear, it is 1/8” too high and the passenger side is 3/8” too high. To compound matters, the inside wall ledge and the outside wall ledge have about a 1/6” inch between them at the front of the trailer on the passenger side and on the opposite side of the trailer in the rear. With that said, I have not had any problems raising or lowering the top, so…..if it ain’t broke, don’t fix it?? I did lower the top down onto 2x4’s as suggested, but did not have very much slack in the cables and was not sure of the best way to loosen the tension nut without twisting the cable…vise grips on the cable sleeve? I should have mentioned I have had this trailer since January of this year so I have no knowledge of any previous service. Suggestions welcomed.

Hi Garry,

I'm getting ready to service the lift system soon myself. Just curious as to what lubricants you used? I hadn't thought to measure all the corners as it seems to lift properly.

Thanks,
 
Hi Garry,

I'm getting ready to service the lift system soon myself. Just curious as to what lubricants you used? I hadn't thought to measure all the corners as it seems to lift properly.

Thanks,
Hi Greg,
I use Water Resistant W D 40 on the cables and W D 40 White Lithium Lubricant for the hydraulic cylinder rod. As previous posts have stated, be sure to use a towel (rag) to detect frayed cables when lubricating them.
 
OK, just spent an hour or so under the trailer. Very interesting under there! Luckily, my trailer sits up pretty high so it's actually quite roomy unless you are under the axles.

I cleaned off the old grease and applied wheel bearing grease to the guide rod. In the future, I will probably use white lithium as it's easier to see when applied on the rod. Looks to be in great shape, no rust. Question: should grease also be applied to the exposed part of the ram which sits above the guide rod, or does the hydraulic fluid keep that lubricated?

I then sprayed all the pulleys with a spray silicon. I found that a piece of plastic sheeting works well to catch the over spray. It's thin enough and pliable enough to get behind the ram, etc. To lube the cables, I sprayed silicone onto a rag and ran it along the cable.

A caution about working under the trailer. You may want to wear some gloves. I did not and almost caught my hand on some sharp screws protruding from the floorboard above me. Also, be aware of the stabilizer jacks as you could hit your head on the screw jack. Might be be better to raise the jacks before doing this maintenance item.

I also recommend doing a thorough inspection of the underside at the same time since you're already down there.

Another question: are there any accessible pulleys or cable inside the trailer?

I still need to raise and lower the top and test the manual bypass system but will probably do that next week when I plan to lower it anyway to do some other maintenance.
Greg, on the inside of the trailer there are four pulleys on the lower inside walls. You can easily locate them just by noting where the pulleys are that are under the trailer and right up against the trailer frame. You have to remove the top trim from the inside wall to lubricate the pulleys and slowly spray lubricant on the cables so it can run down the cable.
 
Greg, on the inside of the trailer there are four pulleys on the lower inside walls. You can easily locate them just by noting where the pulleys are that are under the trailer and right up against the trailer frame. You have to remove the top trim from the inside wall to lubricate the pulleys and slowly spray lubricant on the cables so it can run down the cable.

Found them and lubed 'em. I had to slightly raise the tip-out on the front driver side pulley to facilitate removing the end screw on that trim piece but pretty quick and easy job. Thanks again, Garry!
 
Found them and lubed 'em. I had to slightly raise the tip-out on the front driver side pulley to facilitate removing the end screw on that trim piece but pretty quick and easy job. Thanks again, Garry!

Glad to help. When I lubed mine I was afraid I wouldn't be able to access the screw by the tip-out, but with a long driver bit it was a piece of cake.
 
Rattle can painting faded decals

The last two days we have been taping off and painting faded decals. Pretty tedious,but seems to be going well. Now I need a hug as I was sleep deprived and lowered the RV with several objects on the counter. Crunch crack the bottom of the cupboard. DH is not happy to have another fix it project. Can't believe I did this after owning this HiLo for 11 years. That is why they call them accidents. DH cleaned to roof line with alcohol and spot applied rubber roof primmer to the spots where the cover rubbed them off. I will defeniately bubble wrap the entire edge so the cover won't do any rub damage this winter.
 
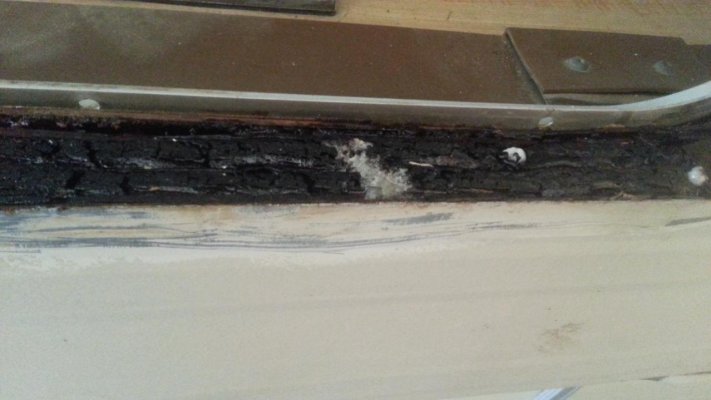
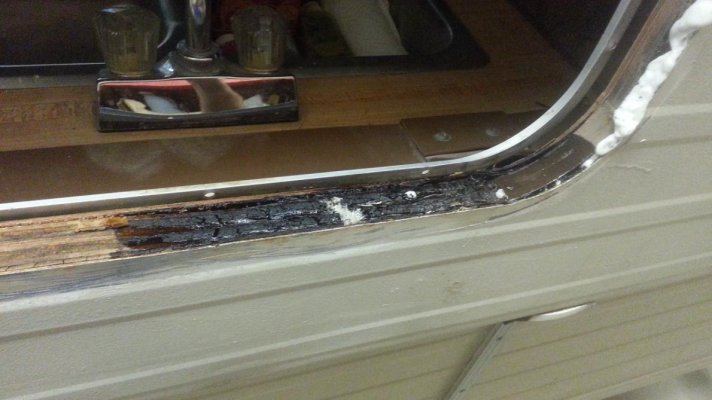
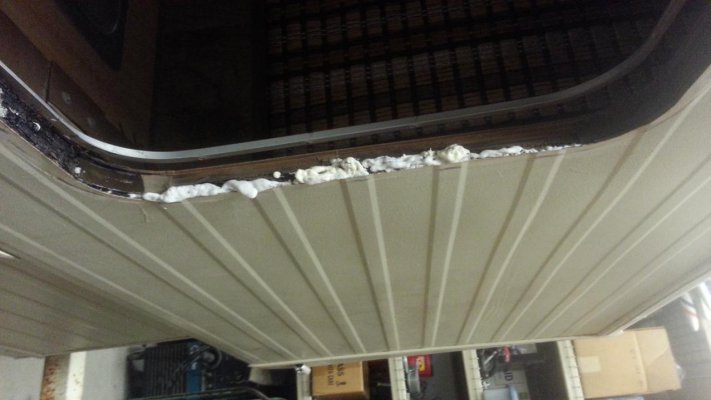
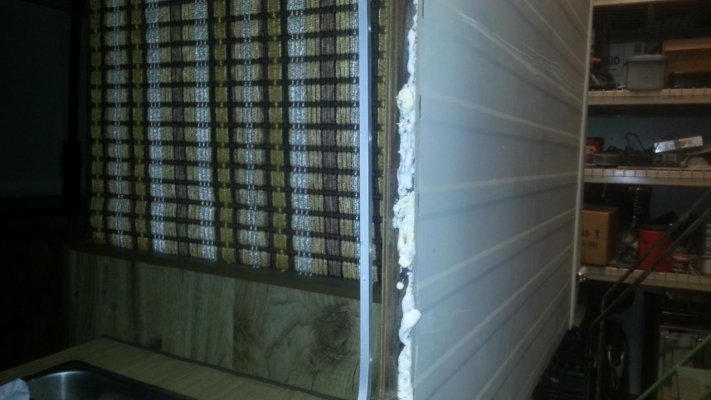
oh boy. I have been resealing my windows and end caps and had a couple surprises. The largest window, which is in the kitchen, I had a lot of rot on the right side and the bottom right side. I am not in the mood, nor do they have the time, to tear the top apart and rebuild the wood. I ended up using that spray foam called great stuff and stuck the tube as far into the right side rot and injected foam as I pulled the tube out. I did this probably at 10 locations on the right side so about a 2 foot length. The bottom was going to be a little tougher because it wasn't quite as rotten and there is no way to stick a tube in there unless I drilled some holes so I used 30 minutes epoxy which is very thin and I poired close to half cup in that 12 inch area and let it soak into the wood. Before I did this the wall was very flimsy in that right corner area and there is no way for the window to squeeze the wall and create a good seal. After letting the epoxy dry overnight I'm happy to say that whole area is very very solid. Success. Now I need to pull the end cap which I was trying to avoid but there is so much drama I study and old silicone that I have no choice but to pull the cap and or the clean it well enough to get a good seal again. Next step will be all of the aluminum trim pieces on the top and bottom on both sides. Fortunately for me I live in Arizona where we do not have a lotta rain so the damage overall has been memo but man these screws are like hey WIC to water has almost every screw had rust. I'm replacing all the screws with galvanized self tapping screws. They are Phillips head screws but I sure do miss the square drive. I would settle for clutch drive screws even as Phillips strip to easily.

Rick
 

Attachments

  • 20140709_063039.jpg
    20140709_063039.jpg
    92.3 KB · Views: 35
  • 20140710_101508.jpg
    20140710_101508.jpg
    85.9 KB · Views: 38
  • 20140709_063049.jpg
    20140709_063049.jpg
    96.5 KB · Views: 35
  • 20140709_063057.jpg
    20140709_063057.jpg
    85.4 KB · Views: 34
Yesterday I did the lift system lube (inside and out) so today I lowered the top half so I could test the manual back-up system. 155 pumps later (whew!) it was up again. Seems to work fine- a good way to get an upper body workout. I found switching arms every 10 pumps or so makes it easier. Also, you need to remove the propane bottle on the driver side to operate the manual pump. Checked the fluid level in the reservoir. I could still see fluid when the top half was all the way up, and when all the way down the level was about a half inch from the top so all seems normal.
Am I missing anything?

Also lubricated the tip-out gears, inspected the web strap and body seals.

While the top half is still down, next up is: lubricating the TV antenna; doing a good inspection of the roof seals, vents and skylight; inspecting top half seals and tightening exterior screws.

Also noted that the range fan vent does not have a screen to keep bugs out. I'm wondering if I should bother fabricating one since it only is open when the range fan is operating. Has anyone done this?

Thanks,
 
Last edited:
Trailer stays in Pagosa!

We left the 93 in Pagosa. My wife will be going back up July 31st to see the grandchildren in their 4H endeavors. My son-in-law will set it up at the Last Resort and my wife will stay for 3 weeks. I have a meeting in Austin on August 12-14. I will then leave Austin and travel to Pagosa to celebrate my oldest grandson's 13 birthday. I will stay for a week and then come on home to go back to my part time job. We are racking up a lot of travel miles this summer. Also, the trailer will continue to stay in Pagosa as the Colorado group are going to go up the west coast into Oregon in last part of September. They are going to use the trailer with the understanding that they have to get me lots of pictures of their travels!
 
funchaser

sealed up all the lights in the back.can not believe the lack of caulk found under the lights... Wifey finished up painting inside got the whole ceiling done. Looks way better now than the crap cabinets they used in 85.

Gunna do the front lights tomorrow....if I can after we hit the river all day.

Then all the roof items sunday!

Got this camper for $500....gunna be priceless after we r done:)
 

Try RV LIFE Pro Free for 7 Days

  • New Ad-Free experience on this RV LIFE Community.
  • Plan the best RV Safe travel with RV LIFE Trip Wizard.
  • Navigate with our RV Safe GPS mobile app.
  • and much more...
Try RV LIFE Pro Today
Back
Top