What did you do to your HiLo Today?

Cleaning the HiLo

DH always washes the roof first as the dirt goes down the sides.Then we wash the rest of the trailer and wax it with Gel Gloss.
 
I will plead the 7 P's on the wash job.
Proper Prior Planning Prevents Piss Poor Performance

DH and I have just shortened the name of the cleaning solution to just Awesome. And use it for almost all of our cleaning needs in the house.
 
spent five hrs. detailing the HiLo

It was a balmy 89degrees today. Sure put in some sweet equity today. Washed the exterior. Then we washed the awning and applied Armor all to it. Gel gloss was applied to the upper half. In the AM I will get the lower half waxed. It is going to rain Sunday afternoon and evening and into Monday. Happy Mothers day to all. Sp/typo sweat equity. Getting ready for our first campout.
 
Fresh water tank drain broke on Sunday. I replaced it with a new one. I really want to replace that down the road with a better type drain so that I don't have to replace it in another few years.

After replacing our awning and several fits of convincing DH that something need to be put on the door to keep the fabric from being torn or worn by the door opening while the awning is deployed. I put a wheel on the door. I am happier now.
 
I bought three new Maxxair vent covers today. The Hi-Lo will breath much better with some ventilation. Hope to get them installed in the next few days.

Oh yeah, the tow vehicle got a complete brake job today with new rotors, calipers, hoses, and pads.
 
Last edited:
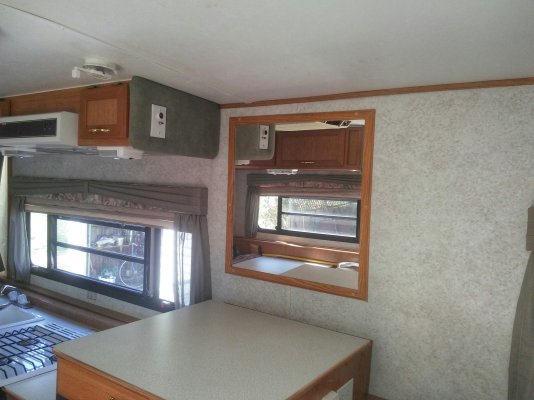
I bought some molding to match the interior and framed the mirrors. I also took off the a/c shroud and the front window cover to repair cracks prior to covering.

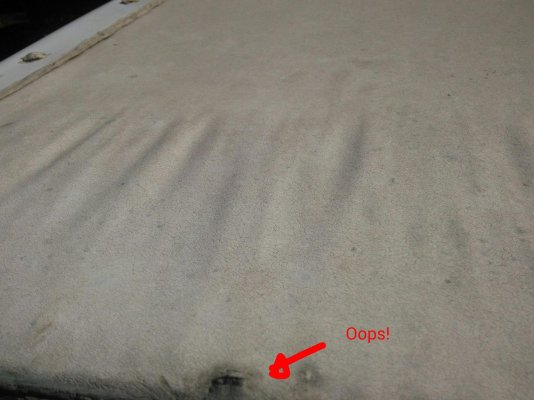
Unfortunately, just before I tucked her up for winter I noticed this damage to the front corner of the roof. I'll be scouring this forum to glean what I can on roof repairs.

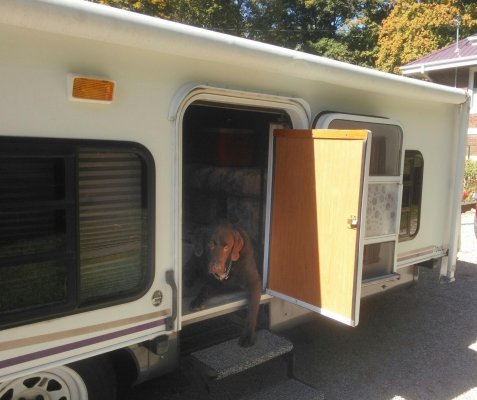
Last picture is our mutt 'Hemi' who refused to leave the trailer when we returned from a local trip to Clinton Lake, Illinois. :cool:
 

Attachments

  • IMG_20151021_113450-01.jpg
    IMG_20151021_113450-01.jpg
    197 KB · Views: 26
  • IMG_20151021_114107_kindlephoto-14374068.jpg
    IMG_20151021_114107_kindlephoto-14374068.jpg
    204.3 KB · Views: 41
  • IMG_20151011_124949-01.jpg
    IMG_20151011_124949-01.jpg
    221.8 KB · Views: 39
Bought a Mr. Heater portable propane heater for use while boondocking, especially useful since my installed propane furnace is on the blink. It can also double as emergency heating for the house if we lose power for an extended time. Tested it yesterday and works well for small areas up to 200 square feet.

http://www.amazon.com/F232000-000-B...&sr=8-2&keywords=mr+heater+portable+big+buddy

Also bought a new propane regulator which may be causing the issue with my trailer furnace (thanks for the suggestion, Les!). Still need to install and test it so I'll let you know. Just had our first good rain and snow of the season (1.1") so I'll be replacing the regulator when things warm up!
 
Last edited:
HI-LO Logos

The Hi-Lo Logos on both the front and back of our eleven year young trailer are in fairly bad shape so I decided to try my hand at a cardboard stencil. I made the stencil out of fairly thin but rigid cardboard and then began the search for a paint that was close to the original logo. I found a spray paint that was very close to the original color at our local big box store. I did not take any before pictures of the logo before I removed it and I do not recommend trying your hand at a cardboard stencil as it is too much like work but the new logo is attached. Whether it will stand up to the environment is yet to be seen.
 

Attachments

  • Hi-Lo Logo.jpg
    Hi-Lo Logo.jpg
    48.5 KB · Views: 13
Looks great to me! I thought about going to my local vinyl sign company and have them make me up four in the blue and two in white. The blue for the Hi Lo and the white for the rear side windows of the TV. :D
Tree
 
LED tail lites

Some time in the past, I realized that standard trailer taillights were extremely dim at best, especially during the day time. Several months ago, I ordered a pair of 17" LED red stop/turn/taillight assemblies from Amazon and finally installed them today, to work in conjunction with the existing taillight assembly. What a difference!
Even after installing LEDs in the stock assemblies, these Long bars installed vertically really make an impact. Even my DSO was impressed. Now I'm sure I can be seen from behind. Total cost about $30 and a wire coat hangar. Sorry, but due to the trailer location, I'm unable to take pictures, but will in the future. Install was simple, but the black and green wires from the LEDs are reversed from the trailers black and green. :D :D :D
Tree
 
I am picking up a 17T on the way to Texas. I asked the seller how high the ball was on his tow vehicle. He said it was 23 inches. The spec on the 17T says the trailer hitch height is 26 inches. I bought a used Reese load equalizer hitch. My 2007 Nissan Frontier came with towing package. The ball height of the Reese hitch before i raised it was 18 inches. I was able to get it up to 23 1/2 with it in the top holes. I also have ordered a Curt 2 5/16 ball with a 2 inch shank rise which should bring my ball height to 25 1/2 inches. That looks like all I can get out of it. I think I can still adjust the tension bars and the sway control. Do you think this will work?
 
jt, Check out the youtube video from etrailer for installing a WDH. There are two basic types, and both are shown. My Caddy has a automatic leveling system, but I install the WDH as etrailer recommends. When joined to the TV, I raise the complete assembly (TV and TT) to 27 1/2" off the ground). Install my bars with 5 links, lower the assembly and it's completely level. The auto system doesn't run but a couple of seconds. Prefect!
Tree
 
What we did to our 2009 Hi Lo this weekend

My honey replaced a rusted cable that broke probably from water damage due to lack of keeping the roof caulked! He thinks the other three look pretty good! But will take all the paraphenalia he needs to replace the others in case it happens on our 2 week trip to Michigan in July! He gooped the goop on the awning that is getting brittle, just to prevent further damage. May have to replace that someday. He is getting to know this rig slowly, was on his back examining everything underneath and he'll probably grease the wheels before we leave. It's a 2009, so not old and not new. Hopefully nothing else rears its head while we travel! And hope we get comfortable enough with it to keep it and love it! We just are unsure about the whole rig re: its cables, structure and what else the water damage caused, and how much more money we want to invest! We got it from a local dealer who didn't know anything about Hi-Lo's and then the company went caput after this model year and have no repair manual! Fortunately a handy husband who knows to a point on how to repair things helps a great deal! Happy Fathers Day to him and all you dads!
 
Welcome to the forum.

We put our rubber roof coating material on the white material closest to the roof line. Then we washed the awning and applied son of a gun to both sides of the awning. Kind of like wax on a floor. The dirt is easier to wash off.
 
I replaced my bad flush valve with this
SeaLand SE314349 Water Valve Kit by Sealand
from amazon.
It was a perfect match for my toilet which is in my 1985 hi-lo. Pain to install due the restricted space, but works perfectly.

Good luck with your other repairs. Stay COOL

steve

I rebuilt my Mansfield toilet flush valve today because, well, I am tight like that. LOL
NOT for the faint hearted. I "should have" taken a LOT more pictures of it as I disassembled it but eventually I figured it out. Actually, I should have replaced it with the above mentioned unit but I am impatient and wanted it NOW. (I have the time, just hard headed I guess)
Also, my valve has a male 3/8 flare fitting on it instead of the 1/2" FPT ? that I noticed online on the new valves. As it turned out it would not have mattered as I had to modify that line anyhow (read 2nd to last paragraph)

All "O" rings and main seal were found at ACE Hardware but the main shutoff seal had to be modified slightly by opening up the center hole from ~1/8" to ~3/8" by using a hole punch from Harbor Freight.

Cost was around $8 with tax.

I pulled the toilet to access easier and this made the valve testing much easier as I was able to adapt my water hose directly to the valve.

Also known to me was the shutoff valve leaking. I replaced that crappy plastic valve (I HATED this plastic lines in 1977-1979 when I worked on RV's) with a house type made for 3/8" soft/hard copper that I adapted to plastic fuel line for in/out. That line fit perfectly over the OEM plastic line and 2 hose clamps secured it on every junction. Only then did I notice a crack in the OEM flare fitting that attaches to the toilet valve. Another trip to ACE and I was up and running.

While I had this trailer in my shop I replaced both holding tank shut off valves as one or the other was leaking and I did not want to cut corners or waste time replacing 1 and then the other later. At least I KNOW the plumbing is tight now.

Thanks for the part # in the quote above Steve. :cool:
Rick
 

Try RV LIFE Pro Free for 7 Days

  • New Ad-Free experience on this RV LIFE Community.
  • Plan the best RV Safe travel with RV LIFE Trip Wizard.
  • Navigate with our RV Safe GPS mobile app.
  • and much more...
Try RV LIFE Pro Today
Back
Top