2007 23C Rebuild

Thanks Jack! I am looking forward to seeing how the guide blocks do when I get that far.

Thanks Sam! That was my first thought as well (making some extra guide blocks for others) once I get through this rebuild, I may check to see it there is enough interest in them. Pretty cool story about your DH and making the striker plates.

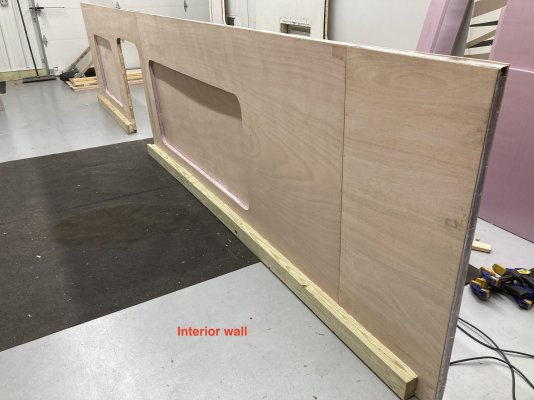
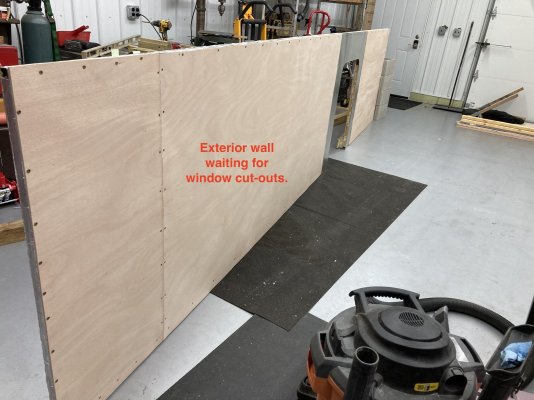
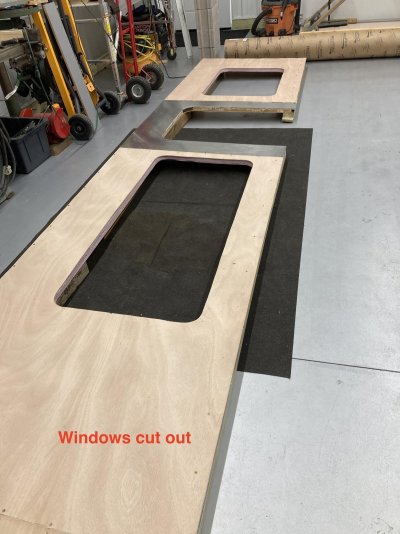
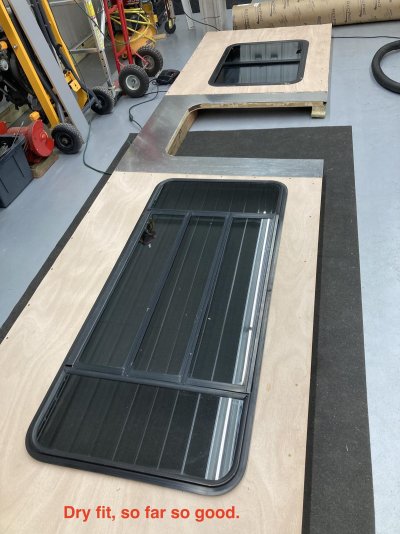
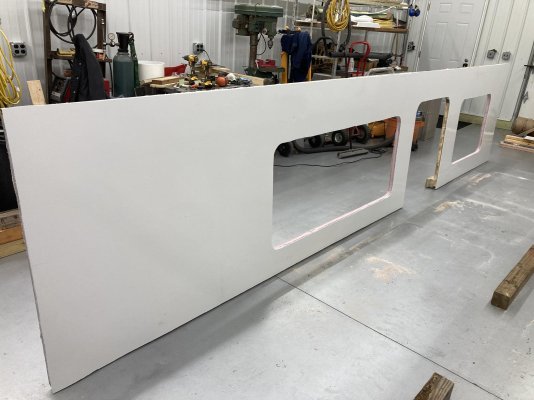
With fear and trepidation I laid out the window markings and cut the openings on the exterior wall. My biggest fear was cutting a little wide and having a window that didn’t fit or seal properly. I know just about anything can be repaired, I just didn’t want to go down that road. A little trimming after my initial cut and the windows fit snuggly into the openings.
A little work on my seams and I will be ready for the Filon siding.
 

Attachments

  • C3010134-22F3-4F22-A342-ADE92D102018_1_201_a.jpg
    C3010134-22F3-4F22-A342-ADE92D102018_1_201_a.jpg
    193.6 KB · Views: 9
  • 1212975C-EB8F-46E1-8DF0-DB6FCC517589_1_201_a.jpg
    1212975C-EB8F-46E1-8DF0-DB6FCC517589_1_201_a.jpg
    201.3 KB · Views: 9
  • D0EC9FAF-3E1E-44C1-8569-98951EF6E25C_1_201_a.jpg
    D0EC9FAF-3E1E-44C1-8569-98951EF6E25C_1_201_a.jpg
    222.8 KB · Views: 6
  • CDD92100-C95F-44D1-B2CC-93850D0BA31A_1_201_a.jpg
    CDD92100-C95F-44D1-B2CC-93850D0BA31A_1_201_a.jpg
    241.8 KB · Views: 9
You do pretty work, Rahn! I think your trailer is going to be a real gem when you get finished.

- Jack
 
Cutting hole for window.

When we took all the windows out of our 1996 26ft. Classic. We found one hole was cut a little too big. DH shimmed it up. Some have reported the window opening was cut a little bigger from the factory. I would put your walls and outer skin together. Then install with the window out. Seems like the weight with the window in would make it heavy and awkward. I was told a replacement window is $600.00 ouch!! Keep up the good work.
 
When we took all the windows out of our 1996 26ft. Classic. We found one hole was cut a little too big. DH shimmed it up. Some have reported the window opening was cut a little bigger from the factory. I would put your walls and outer skin together. Then install with the window out. Seems like the weight with the window in would make it heavy and awkward. I was told a replacement window is $600.00 ouch!! Keep up the good work.

Thanks Sam, you pretty much read my mind. I am planning on putting the windows in last, when the project is completed. Last thing I need or want is to crack a window while working on other projects.
I think, at this point, once completed (minus windows) the DW and I can still pick up the sidewall. Also the window openings will nice hand holds! If we can't, I guess I will use the ‘phone-a-friend’ option. :rolleyes:
 
Good Afternoon!

This is an amazing accomplishment! Would the CAD file be something she would be willing to share with the group?

Your build (re-build) is looking great!

Thanks!
 
Good Afternoon!

This is an amazing accomplishment! Would the CAD file be something she would be willing to share with the group?

Your build (re-build) is looking great!

Thanks!

I can ask her. I do remember that they have a couple different printers and she had mentioned that the new and improved printer used a different language program than the old ones and they were having to basically rewrite each part to work on the newer printer.
But I will check with her to verify.

Thanks for the idea!
 
HiLo Rebuild.

I knew you wouldn't mind any comments ect. Your build is coming along nicely. We are getting itchy to see the finished product. It gets boring in the long winter. Change of subject. I guess the April 8th eclipse is a big thing. Thousands of visitors are expected at the actual water..N iagara Falls. Hotel rooms are renting for thousands of $. I need to rent out my bedroom and sleep on the couch. My brother works for the Maid of Mist boat ride. He has to start working a week before the eclipse. It is too cold for the boats to be put in the water. They can't go in until the ice boom is taken out. Keep the posts coming.
 
Phone a friend.

When we were checking out our 1996 to purchase I ended up calling another HiLo owner. Our other HiLo didn't have the three position switch. Phone a friend works provided they were home. On second thought i have their cell phone #.A third person might be the way to go. Two could do the holding while you screw the panels in place. It is called working back smart.
 
I can ask her. I do remember that they have a couple different printers and she had mentioned that the new and improved printer used a different language program than the old ones and they were having to basically rewrite each part to work on the newer printer.
But I will check with her to verify.

Thanks for the idea!

Thanks for checking into it. A known good CAD file will be a great resource to those of us with aging trailers in the future.

Can't wait to see the finished product!
 
I need to rent out my bedroom and sleep on the couch.

Or pick up a couple more HiLo’s, park them in the yard and rent those out. Think of the interesting people you would meet.
 
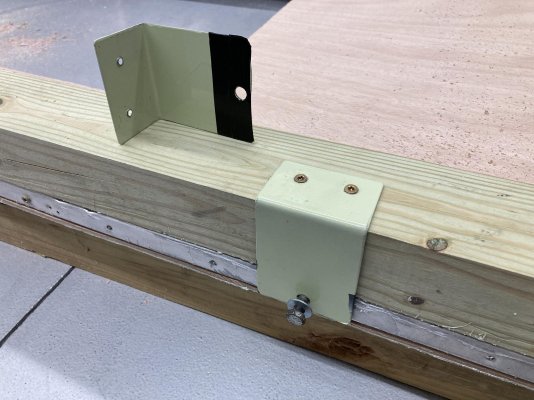
Cable L brackets

Installed the cable L bracket stiffeners on the 4x4. I covered the plate with black electrical tape where it comes in contact with the aluminum frame.

I learned/was taught that trick/idea working on Huey's in the military, for dissimilar metals. (Patches on the aluminum skin or skin to frame.
I guess it worked, never had one come back with much of any corrosion. (If and when they came back.)

Actually it is a common practice and approved by FAA. So, it should be good for the HiLo.
 

Attachments

  • IMG_4306.jpg
    IMG_4306.jpg
    221.8 KB · Views: 6
Windows fit!

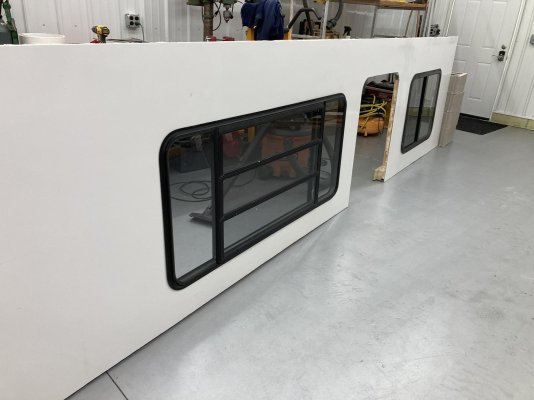
The right side skin is on!! Just need to do a little trimming here and there, and a few other projects on the camper lower half and it will be ready to mount.

Temporarily stuck the windows in to make sure they would fit. So far I am liking the look.

There is still a plastic film on the skin, I will remove that just before I permanently install the windows.
 

Attachments

  • IMG_4308.jpg
    IMG_4308.jpg
    186.2 KB · Views: 10
  • IMG_4309.jpg
    IMG_4309.jpg
    149.5 KB · Views: 9
Last edited:
Wow! What beautiful work! And, I'm impressed with the trick of using tape between dissimilar metals. Wish I'd thought of that! Amazing how obvious that is once I see it done.

- Jack
 
Wow! What beautiful work! And, I'm impressed with the trick of using tape between dissimilar metals. Wish I'd thought of that! Amazing how obvious that is once I see it done.

- Jack

Agreed, looking really good. It kind of makes me want to tear my own all apart and do better!
 
Thanks guys, putting the wall together on the shop floor, where I could lay it flat and weigh it down, while drying was really nice.
 
Guide Blocks 3-D printer files

Thanks for checking into it. A known good CAD file will be a great resource to those of us with aging trailers in the future.

I do have four different 3-printer files for the guide blocks. They are all the same pattern, just different formats for different printers.

I would like to post them here, but the file extensions are not accepted. If anyone has any ideas on how to get them posted that would be great.

The extensions are: .obj, .mtl, .stl, .glb
 
I'll contact an Administrator about this Rahm, thanks!

- Jack

Thanks Jack, that would be great, I will let you decide if you want it placed in it’s own thread (maybe a sticky) where it is easy to locate.
 
Last edited:

New posts

Try RV LIFE Pro Free for 7 Days

  • New Ad-Free experience on this RV LIFE Community.
  • Plan the best RV Safe travel with RV LIFE Trip Wizard.
  • Navigate with our RV Safe GPS mobile app.
  • and much more...
Try RV LIFE Pro Today
Back
Top